A practical guide for QA teams that have too many test cases, limited time, and releases that cannot wait.
When everything feels important, QA needs prioritization. Modern software teams release faster, systems are more connected, and product changes move through pipelines more frequently than before. At the same time, QA time is still limited. Testers rarely have the perfect amount of time, documentation, test data, or stable environments.
So the real question is not:
“What can we test?”
It is:
“What should we test first?”
That is where risk-based testing becomes one of the most useful QA approaches in 2026.
ISTQB defines risk-based testing as a testing approach in which test activities are selected, prioritized, and managed based on risk analysis and risk control. In simple words, it means QA effort should go first to the areas where failure would hurt the most.
Risk-based testing is not about testing less.
It is about testing smarter.
Why risk-based testing matters more in 2026
Software products are rarely simple now. A single user action can involve the frontend, backend, database, API, payment provider, CRM, analytics tool, notification service, authentication provider, and third-party integration. One small change can affect several parts of the product.
At the same time, QA teams are expected to support faster delivery, continuous testing, automation, AI-assisted test generation, and more frequent releases. Current software testing best-practice discussions for 2026 highlight risk-based testing, automation, metrics, and AI as key areas for building more robust QA processes.
This creates a familiar situation:
The team has many things to test, but not enough time to test everything in depth.
If QA treats every test case as equally important, the team can spend too much time on low-risk areas and not enough time on the flows that could block users, cause financial loss, corrupt data, or damage trust.
Risk-based testing helps QA answer a better question:
Where would a defect create the biggest problem?
That answer should guide test planning.
The problem with “test everything equally”
Testing everything with the same priority sounds safe, but it often creates false confidence.
For example, a QA team may execute 120 low-risk UI checks and still miss one critical issue in billing logic. The test report may look good because many test cases passed, but the product may still be risky.
This is one of the biggest traps in QA management: A high number of passed test cases does not always mean strong release confidence.
Some tests protect the product more than others. A typo on a secondary settings page is not equal to a failed payment confirmation.
A small alignment issue is not equal to incorrect user permissions.
A missing placeholder text is not equal to exposing another customer’s data.
Risk-based testing helps teams avoid this problem by looking at impact, probability, and business importance before deciding what to test first.
What “risk” means in QA
In QA, risk usually combines two questions:
How bad would it be if this failed? This is the impact. How likely is it to fail? This is the probability.
A high-risk area is usually something with high impact, high probability, or both.
For example, payment processing is high impact because failure can directly affect revenue and customer trust. Recently changed code may be high probability because new changes are more likely to introduce defects. A third-party integration may be risky because your team does not fully control its behavior.
Risk does not always mean “the most complex feature.” Sometimes the riskiest area is the one customers use every day.
Sometimes it is the area with repeated bugs.
Sometimes it is the part nobody wants to touch because the logic is old, fragile, or poorly documented.
A tester’s job is to notice these signals and turn them into a practical test priority.
Areas QA teams should usually test first
Every product is different, but some areas commonly deserve high priority.
Payment and billing flows
Payment issues are rarely minor. If users cannot pay, are charged incorrectly, receive the wrong invoice, or do not get access after payment, the business impact is immediate.
For payment and billing, QA should prioritize:
- successful payment;
- failed payment;
- payment timeout;
- duplicate payment attempt;
- discount or promo code logic;
- tax calculation;
- subscription renewal;
- subscription cancellation;
- refund flow;
- invoice generation;
- access after payment.
A payment flow should not be tested only from the UI side. It is also important to check what happens in the payment provider, backend, email notification, subscription status, and admin view.
Login, authentication, and access permissions
Access issues can affect security, privacy, and trust. A login bug may block users from the product. A permission bug may expose data or allow users to perform actions they should not be able to perform.
QA should prioritize:
- log in with valid and invalid credentials;
- password reset;
- session expiration;
- multi-factor authentication, where applicable;
- role-based access;
- organization-level access;
- admin permissions;
- read-only permissions;
- deleted or disabled users;
- cross-account data access.
Access control should always be tested with multiple roles. A feature that works correctly for an admin may behave incorrectly for a regular user, a manager, a guest, or a user from another organization.
Data loss or incorrect data
Some bugs do not crash the system. They quietly damage data. That can be much worse.
Examples include:
- saved changes disappearing;
- incorrect totals;
- duplicated records;
- broken data sync;
- wrong status after an action;
- outdated information shown to users;
- incorrect report values;
- data overwritten by another user.
These issues can be hard to detect because the interface may still look fine.
Risk-based testing should give high priority to flows where users create, update, delete, import, export, or sync important data.
A useful question is:
Would the user or business make a bad decision if this data were wrong? - If so, test it early.
Integrations with third-party systems
Modern products depend heavily on integrations. A feature may look successful in the UI, but fail behind the scenes because the CRM, payment provider, email service, analytics platform, chatbot, map service, or external API did not receive or return the correct data.
Prioritize integration testing when the feature depends on:
- payment gateways;
- email or SMS services;
- CRM systems;
- analytics platforms;
- authentication providers;
- file storage;
- maps or location services;
- booking systems;
- accounting tools;
- external APIs.
The UI is only one part of the flow. QA should also check whether the correct data is sent, received, saved, displayed, and handled when the integration fails.
Recently changed functionality
Change creates risk.
Even a small update can affect existing behavior, especially if the product has shared components, reused logic, or connected workflows.
Recently changed areas should usually be tested before stable areas.
QA should ask:
- What changed in this release?
- What existing behavior depends on this change?
- What could break around it?
- What bugs were fixed?
- What should be retested because of the fix?
- Are there related regression cases?
AI-driven tools and modern automation can help prioritize tests based on code changes and historical defect patterns, but the team still needs a clear risk model and human review of what matters for the release.
A good rule: Do not test only the new feature. Test the area around the change.
Features used by most customers
A low-complexity feature can still be high risk if many users depend on it.
For example, search, login, checkout, dashboard loading, notifications, or profile editing may not always be technically complex, but if most users use them, defects become visible quickly.
QA should prioritize high-usage flows because they affect more customers and generate more support pressure when broken.
Useful signals include:
- analytics data;
- customer support tickets;
- user behavior reports;
- product team input;
- frequently used workflows;
- core business journeys.
A rarely used advanced setting may wait. A broken daily workflow usually cannot.
Areas with repeated defects
Past defects are one of the best risk indicators. If the same module has broken several times before, it deserves attention.
Repeated defects may indicate:
- unclear requirements;
- fragile code;
- weak test coverage;
- complex business rules;
- poor ownership;
- dependency issues;
- technical debt;
- unstable integrations.
Risk-based testing should use defect history, not only current requirements.
A simple QA habit helps: After each release, look at escaped bugs and recurring defects. Then update the regression suite based on what actually caused problems.
This turns real project experience into better coverage in the future.
How to prioritize test cases in practice
Risk-based testing does not need to be complicated. You can start with a simple scoring model.
For each feature, flow, or test case, estimate:
Impact: What happens if it fails? Probability: How likely is it to fail? Visibility: How many users will notice it? Change level: Was it recently changed? Business importance: Does it affect money, data, compliance, or core workflows?
You can score each factor from 1 to 3:
1 = low 2 = medium 3 = high
Then use the result to decide what to test first.
For example:
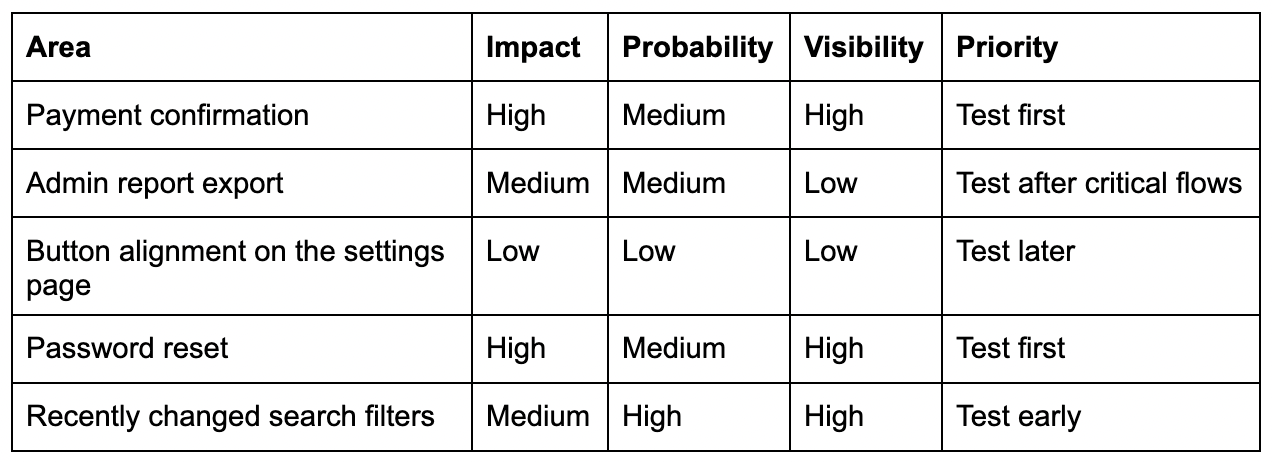
This does not need to be a heavy process. Even a simple risk discussion before test execution can improve QA focus.
A practical release prioritization checklist
Before starting test execution, QA can ask these questions:
User impact
- Which flows are most important for users?
- Which defects would block users completely?
- Which areas are used most often?
Business impact
- What affects payment, revenue, conversion, or operations?
- What affects client trust?
- What affects reporting or decision-making?
Data risk
- Where can data be lost, duplicated, overwritten, or shown incorrectly?
- Where can users access data they should not see?
Technical risk
- What changed recently?
- What depends on third-party services?
- What areas have unstable integrations?
- What areas had repeated bugs before?
Release confidence
- What must be in place before we can recommend release?
- What can be tested later without serious risk?
- What should be included in smoke, regression, and deep testing?
These questions help QA move from “we have many test cases” to “we know what matters most.”
What to test first when time is very limited
Sometimes QA has very little time before release. In that case, prioritize in this order:
First, test the flows that block users from using the product. It includes login, registration, onboarding, access to key features, and critical navigation.
Second, test flows that affect money, data, or permissions. It includes payments, subscriptions, billing, personal data, access roles, and anything related to security or privacy.
Third, test recently changed functionality and the areas around it. Most regression risk comes from change, not from untouched parts of the product.
Fourth, test integrations that support key flows. If an integration fails silently, the user may not see the problem immediately, but the business may still lose leads, payments, notifications, reports, or records.
Fifth, test the most-used paths. If many users depend on a flow, even a small bug can create a large support issue.
This structure gives QA a realistic plan when full coverage is not possible.
Common mistakes in risk-based testing
Risk-based testing is simple in theory, but teams often make mistakes when applying it.
Mistake 1: Prioritizing based only on developer comments
Developers know the technical change, but QA should also consider user impact, business rules, permissions, data, and integrations.
Developer input is valuable, but it should not be the only source of risk assessment.
Mistake 2: Treating all regression tests equally
Regression suites often grow over time. Without prioritization, teams may spend too much time executing old, low-value cases.
Regression tests should be reviewed and grouped by priority.
Mistake 3: Ignoring production data
Analytics, support tickets, customer complaints, and escaped defects are strong signals. They show where real users experience problems.
Risk-based testing should learn from production reality.
Mistake 4: Forgetting to update priorities
Risk changes. A low-risk feature can become high-risk after a major redesign, a new integration, a pricing change, or a customer complaint.
Test priorities should be reviewed regularly, especially before important releases.
Mistake 5: Confusing “urgent” with “important”
A request may feel urgent because someone asked loudly. But QA should still check whether it is truly high risk.
Good prioritization protects the product, not just the schedule.
How TestCaseLab supports risk-based testing
Risk-based testing works better when priorities are visible. If test cases are scattered across spreadsheets, documents, chats, or personal notes, it becomes harder to understand what should be tested first and why.
TestCaseLab helps QA teams keep test cases structured and easier to manage.
A practical risk-based workflow can look like this:
1. Organize test cases by feature or module This helps the team quickly find relevant coverage for each product area.
2. Mark priority clearly High-risk cases should be easy to identify before execution starts.
3. Build test runs around release risk Instead of running everything randomly, QA can create test runs for smoke testing, critical regression, changed areas, and full regression.
4. Keep execution history visible Past results help the team understand which areas fail repeatedly and deserve more attention.
5. Update cases after real defects When a bug is missed, add or improve the test case so the same risk is covered next time.
This turns risk-based testing from a one-time discussion into a repeatable QA practice.
Final thoughts
In 2026, QA teams do not need more random testing. They need better focus.
Fast releases, connected systems, AI-assisted workflows, and limited QA time make prioritization essential. Risk-based testing helps teams decide what deserves attention first, what can wait, and where testing will create the most release confidence.
The goal is not to test less. The goal is to test where failure would matter most.
Start with what can hurt the user, the business, the data, or the release's confidence. Then organize that work clearly, execute it intentionally, and keep improving your test suite after every release.
Strong QA is not measured only by how many test cases were executed. It is measured by how well the team understood the risk.