please wait

Blog

Make the most out of your experience and check
articles about TestCaseLab functionality

blog image

Integrate with Treeify - Streamline Test Case Creation

calendar
July 25, 2025

If you're looking to generate test cases using AI and send them directly to your TestCaseLab project, Treeify makes the process simple and effective. With Treeify’s AI-assisted workflows, you can create test scenarios in minutes — and with our integration, export them to your TestCaseLab workspace in just a few clicks.

This guide will walk you through how to connect Treeify to your TestCaseLab account and start exporting test cases right away.

What You'll Need

To export AI-generated test cases from Treeify to TestCaseLab, you’ll need:

  • API Token
  • Company ID

These three values are required to enable secure and accurate test case transfers. Follow the steps below to find them.

1. Get Your API Token

Ask your Company Admin in TestCaseLab to generate an API token.

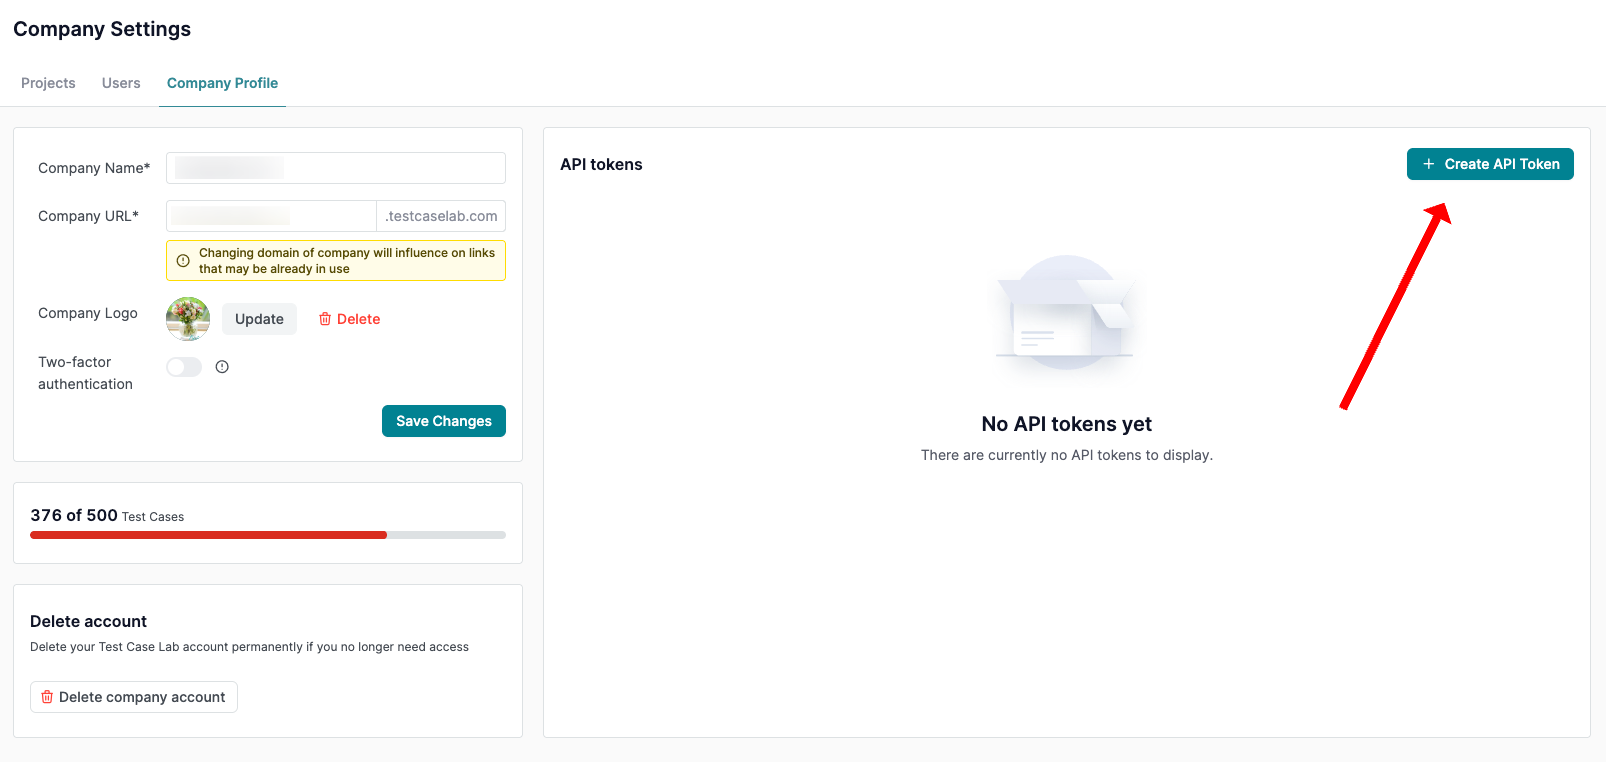
  1. Go to Company Settings > Company Profile.
  2. Find the API Tokens section.
  3. Create and copy the token.

API tokens allow you to integrate TestCaseLab with external tools like Treeify securely. Only Company Admins have access to manage them.
2. Find Your Company ID

You’ll use the API token with a tool like Postman to retrieve your Company ID.

Get Company ID
  • Send a GET request to:https://app.testcaselab.com/api/v2/companies
  • Include your API Token in the Authorization header:Authorization: Bearer YOUR_API_TOKEN

Example Response:

[

 {

   "id": 123,

   "name": "Your Company Name",

   "subdomain": "yourcompany"

 }

]

  • Copy the id value — that’s your Company ID.

3. Connect Treeify and Start Generating Test Cases

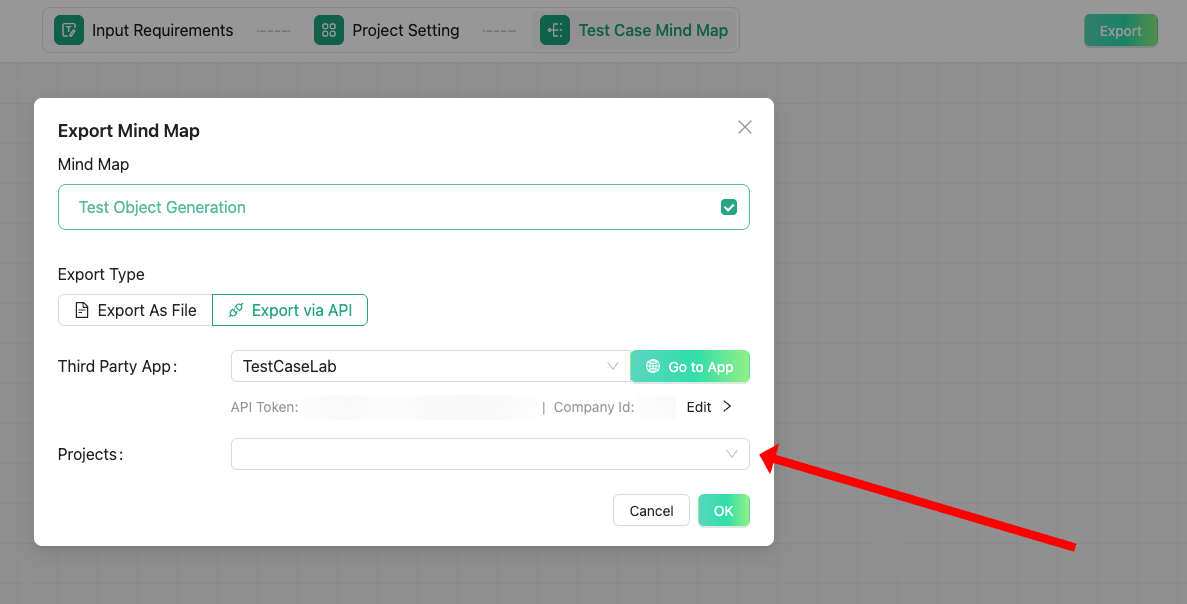
Once you have all the data — API Token, Company ID — you are ready to start in Treeify.

  • Sign in to your Treeify personal account (note: company-wide accounts are not yet supported).
  • Generate test cases via Treeify
  • Navigate to the TestCaseLab export integration option.
  • Input:
    • Your API Token
    • Your Company ID
  • Confirm and export them directly to your selected TestCaseLab project.
    How to work with Treeify? Learn
    here.

Good to Know

  • Treeify is currently free to use, making it an ideal time to try it out with your team.
  • Need help? You can request 1-on-1 onboarding or reach out via email or the Treeify Discord community.
  • To learn more about the API, refer to TestCaseLab’s API documentation in the Help Center.
  • You can report any issues directly via the “Report a Bug” feature in Treeify. Since the tool is still in beta, your feedback will help the team enhance the user experience.

    Smarter Testing Starts Here

    This integration bridges the power of Treeify’s AI-assisted test generation with the structure and collaboration features of TestCaseLab. Whether you’re refining test coverage or scaling your QA team’s workflow, this setup helps you do it faster and more intelligently.

    Let your QA flow better — with AI and TestCaseLab.

    arrow right
    blog image

    Generate Reports - Analyze and Share Results

    calendar
    December 4, 2024

    TestCaseLab offers three types of reports to analyze and share Test Run results. Reports can be accessed from the Test Run page and shared externally with stakeholders, even if they don’t have access to the Company Account.

    Learn more about Test Runs here.

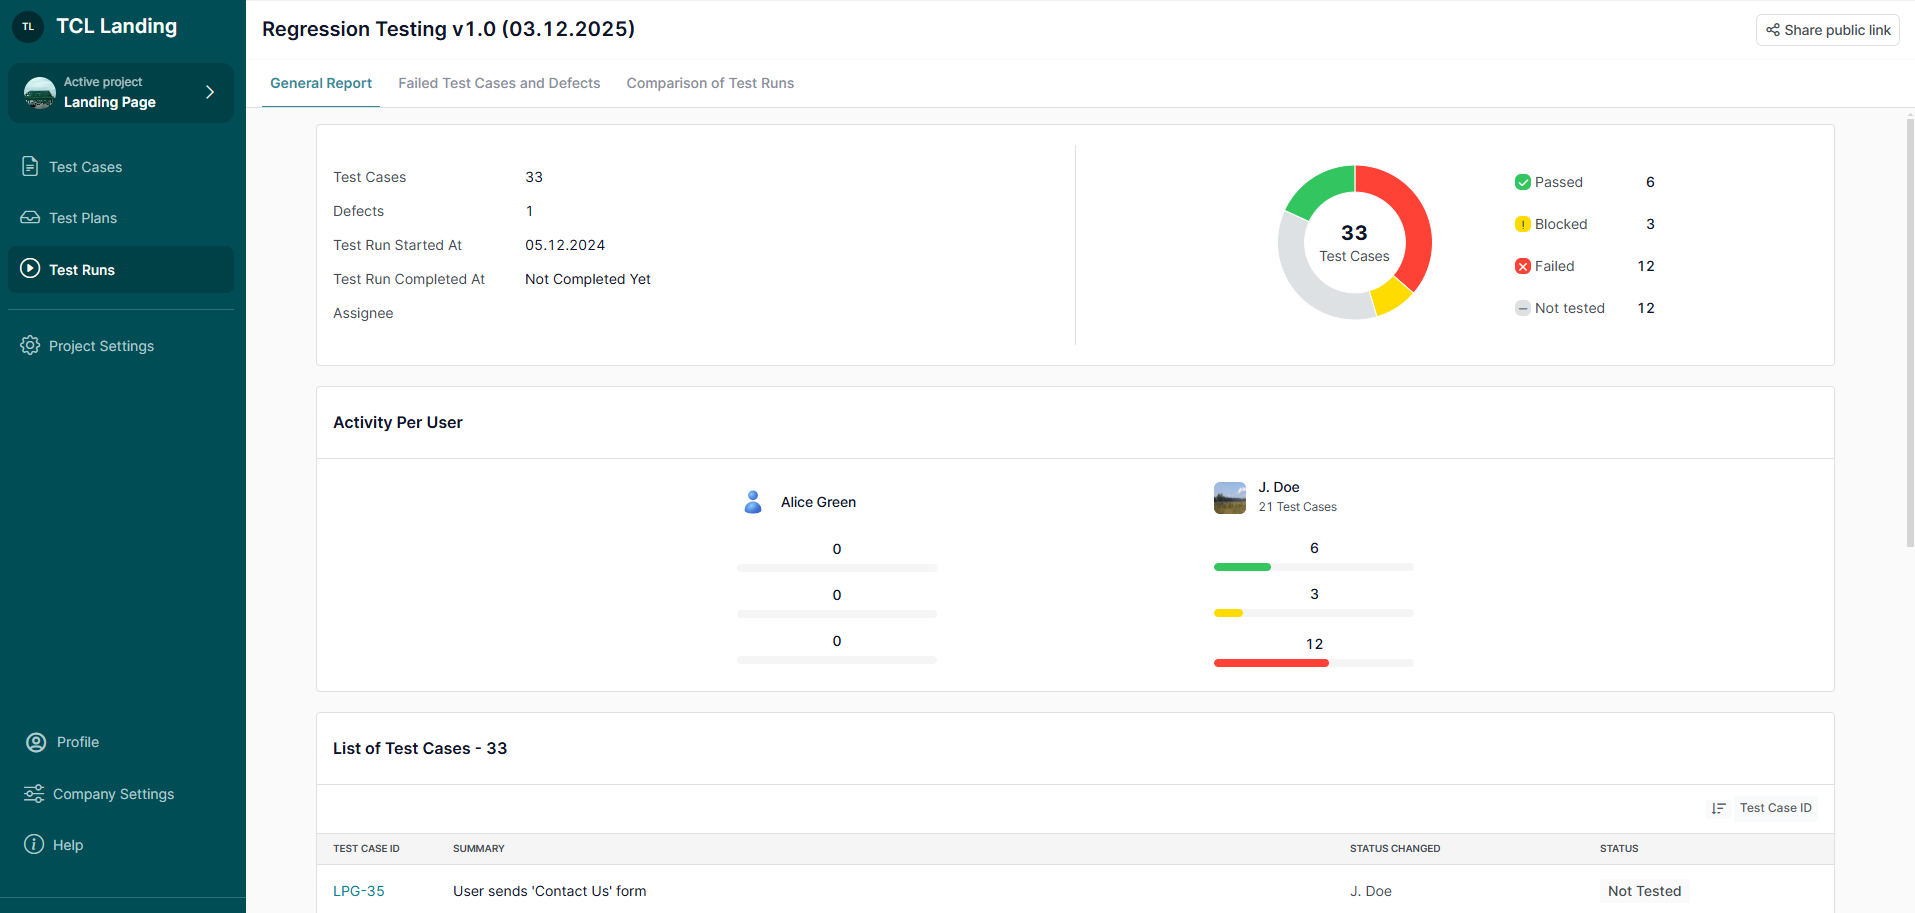
    1. General Report

    Provides a high-level summary of the Test Run results.

    Includes:

    • Number of Test Cases Executed: Total count of test cases run.
    • Number of Defects Reported: Issues identified during the Test Run.
    • Test Run Assignees: List of users assigned to the Test Run.
    • Pie Chart: Visual statistics based on test case result statuses (e.g., Passed, Failed, Blocked).
    • Activity per User: Tracks contributions by each team member.
    • List of Test Cases with Results: Detailed table showing the status of all test cases.
    General Report

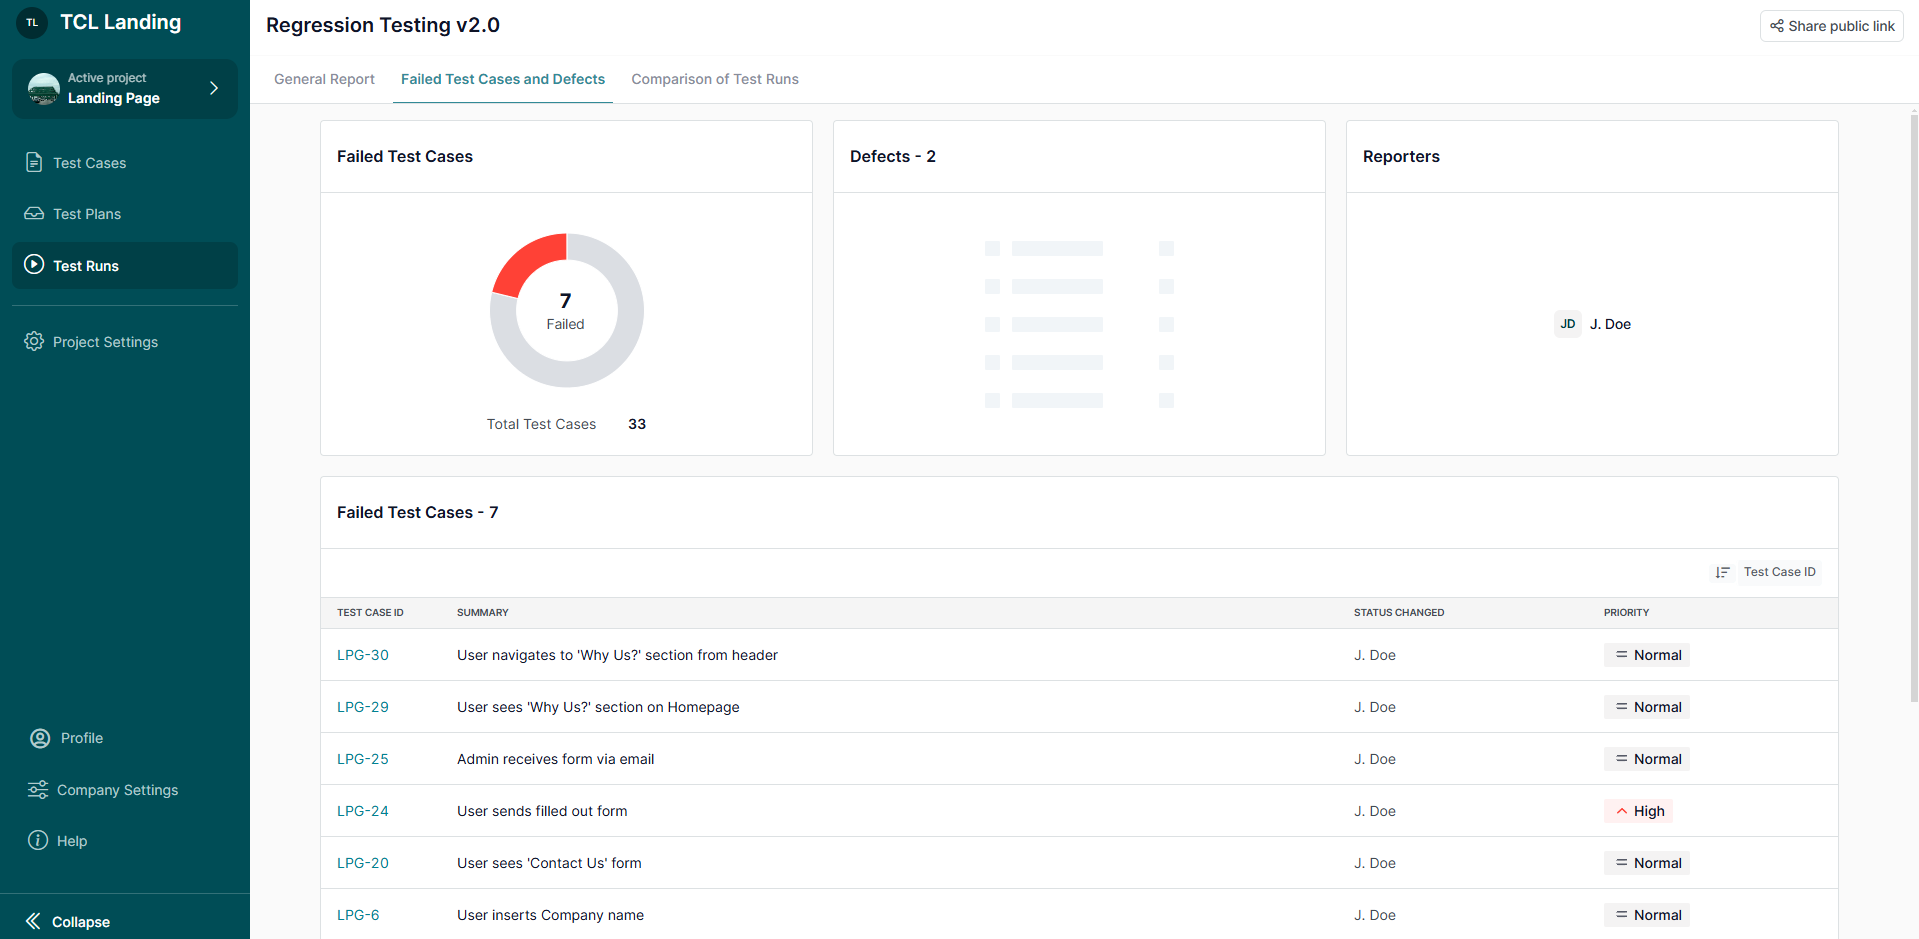
    2. Failed Test Cases and Defects Report

    Focuses on problem areas by highlighting failed test cases and associated defects.

    Includes:

    • Pie Chart: Visual statistics on the number of failed test cases.
    • Number of Defects: Total count of defects reported during the Test Run.
    • Reporters List: Identifies users who reported defects.
    • Failed Test Cases List: Table of test cases that failed.
    • Defects List: Detailed information about reported defects.
    Failed Test Cases and Defects Report

    3. Comparison of Test Runs

    Allows comparison of results across multiple Test Runs.

    How to Generate:

    • Select up to 4 Test Runs for comparison.
    • Click the ‘Show Report’ button to generate the comparison.

    Use Case: Ideal for identifying trends and analyzing progress, especially when comparing Test Runs based on the same Test Plan.

    Comparison of Test Runs Report

    What’s Next?

    Generate the report type that aligns with your needs to gain insights into testing activities and outcomes. For additional assistance, check related guides or contact support—we’re here to help!

    arrow right
    blog image

    Run Tests & Report Bugs - Ensure Quality Assurance

    calendar
    December 4, 2024

    Running tests ensures thorough execution and accurate tracking of your system's quality. Use this guide to effectively execute test cases, log results, and analyze outcomes.

    Learn what is a Test Run here.

    1. Run Tests Using the Checklist

    • Use the Test Cases List in the Test Run for quick execution:
      • Quick Pass: Click the ‘Quick Pass’ button to mark a test case as Passed.
      • Change Status: Use the dropdown menu to set the test case status to:
        • Not Tested (default).
        • Passed.
        • Failed.
        • Blocked
    Run Test via Checklist
    • For Failed or Blocked Tests:
      • A modal window appears when setting a test case to Failed or Blocked.
      • In the modal, you can:
        • Add comments for additional context.
        • Attach files such as screenshots or logs.
        • Report a Bug:
          • Automatically via integrated tools
          • Manually by adding a bug link.

    Read more about Integrations here.

    Add Test Result Details
    Report a Bug via Integration

    2. Run Tests in the Test Case Detail

    • Open Test Case Details to execute tests step-by-step:
      • Set individual step results as you work through the test case.
      • If any step is marked as Failed or Blocked, the system automatically updates the entire test case status accordingly.
      • Add comments, attachments, or report bugs directly within the details view
    Execute Test Cases via Test Case Details
    • Use the ‘Next’ button to move to the next Not Tested test case.
    Go to the Next Not Tested Test Case

    3. Completing the Test Run

    Once all test cases are executed, the Test Run status updates to Completed.

    Completed Test Run

    4. View Test Run Reports

    • After completion, a detailed Test Run Report is generated, including:
      • A summary of results (e.g., passed, failed, blocked cases).
      • Logs for each test case.
    • Use the report to:
      • Analyze results.
      • Compare outcomes across up to 4 Test Runs to track progress and identify trends.

    Read more about Reports here.

    Example of Report

    What’s Next?

    Running tests in TestCaseLab ensures accurate tracking and documentation of your testing process. For further assistance, check related guides or contact support—we’re here to help!

    arrow right
    blog image

    Create & Manage a Test Run - Execute Tests with Precision

    calendar
    December 4, 2024

    Create a Test Run

    Creating a Test Run helps organize and execute a specific set of test cases to meet your testing objectives. Follow this guide to set up a Test Run efficiently.

    Learn what is a Test Run here.

    1. Create from the Test Plan’s Page

    • Navigate to the Test Plan’s page and select the Test Plan you want to use.
    • Click the ‘Create Test Run’ button.
    • The Test Run will automatically include the test cases from the selected Test Plan, arranged in the same order defined in the plan’s Checklist.
    Create a Test Run based on a Test Plan

    2. Create from the Test Runs Page

    • Go to the Test Runs page.
    • Click the ‘+ Test Run’ button to open the creation form.
    • Fill out the following details:
      • Title: Enter a unique name for the Test Run.
      • Test Plans: Select one or more Test Plans to base the Test Run on.
      • Assignees: Choose the users responsible for executing the Test Run.

    Note: Skip the ‘Test Plans’ field if you prefer to manually add test cases.

    Create a Test Run

    3. Manually Include Test Cases

    If you skipped the Test Plans field during creation:

    • Open the Test Run’s inner page.
    • Click ‘Edit Run’ to access the test case selection interface.
    • Use the checkboxes to select the test cases you want to include in the Test Run.
    Manually add / remove Test Cases from a Test Run

    4. Start Running

    Once the Test Run is prepared and all desired test cases are included, start the execution process.

    Learn more about running Test Runs here.

    Execute a Test Run

    Manage a Test Run

    Managing a Test Run ensures your testing process stays organized and adaptable to your needs. Follow this guide to work efficiently with Test Runs.

    1. Test Run View Modes

    Test cases in a Test Run can be displayed in two modes:

    • Grouped-by-Suite View Mode:
      • Default view, grouping test cases by Suites.
      • Sorting is inherited from the Test Cases page and can only be updated by Project Administrators.
    Grouped-by-Suite View Mode of Test Run
    • Checklist View Mode:
      • Displays a flat list of test cases.
      • Test cases can be rearranged using drag&drop by any Project Member.
      • Ideal for customizing the order for convenient testing workflows
    Checklist View Mode of Test Run

    2. Rearranging Test Cases

    • Checklist View Mode:
      • Use drag-and-drop to reorder test cases for your preferred testing sequence.

    Note: Changes in Checklist View Mode do not affect the order in the Grouped-by-Suite View Mode.

    Drag&Drop Test Cases in a Checklist View Mode
    • Test Runs Created from Test Plans:
      • If the Test Run is based on a Test Plan, the test case order from the Test Plan is applied.

    Note: Any changes made in the Test Run will not affect the Test Plan’s original order.

    3. Edit a Test Run

    Use the ‘Edit Run’ modal to update Test Run details:

    • Title: Modify the Test Run name.
    • Assignees: Add or change the testers assigned to the Test Run.
    • Include/Exclude Test Cases: Adjust the list of test cases in the Test Run.

    Note: Newly added test cases in Checklist View Mode will appear at the bottom of the list.

    Edit Run Form
    Edit Test Run title in-line

    What’s Next?

    Managing Test Runs effectively ensures smooth execution and adaptability for testing needs. For additional help, check related guides or contact support—we’re here to help!

    arrow right
    blog image

    Manage a Test Runs List - Organize and Monitor Progress

    calendar
    December 4, 2024

    Test Runs are one-time executions of test cases designed to validate functionality and quality.

    Managing Test Runs helps streamline test execution and keep track of testing progress and results. Use the following guide to effectively organize and manage your Test Runs.

    Learn what is a Test Run here.

    1. Create a Test Run

    • Go to the Test Runs page.
    • Click the ‘+ Test Run’ button to add a new Test Run.

    Note: Test Runs can be created either based on pre-created Test Plans or by adding test cases directly into an empty Test Run.

    Learn more about creating a Test Run here.

    Create a Test Run

    2. Sort Test Runs

    Sort Test Runs by Name for better organization.

    3. Filter Test Runs

    Apply filters to focus on specific Test Runs based on:

    • Status: Filter by Not Started, In Progress, or Completed Test Runs.
    • Assigned to You: View Test Runs where you are the assigned tester.
    • Cases Within Runs Assigned to You: Focus on specific test cases assigned to you within a Test Run.
    Test Runs Filtration

    4. Manage Test Runs

    • Duplicate: Create a copy of an existing Test Run for reuse.
    • Archive and Restore:
      • Archive Test Runs to temporarily remove them from active use.
      • Restore archived Test Runs when needed.
    • Delete: Permanently delete Test Runs that are no longer required.

    Note: Deleted Test Runs cannot be restored.

    Test Run's Options

    5. Export Test Run Reports

    Generate and export reports from completed Test Runs in the following formats:

    • CSV
    • PDF
    • Online View

    Learn more about reports here.

    Example of a Report

    6. Switch Test Runs List View Modes

    • Line View: A standard list format for Test Runs.
    Line View of Test Runs list
    • Grid View: Displays pie charts for visual tracking of progress and completion status.
    Grid View of Test Runs list

    What’s Next?

    Efficiently managing Test Runs ensures a smooth testing workflow and accurate reporting of results. For additional help, check related guides or contact support—we’re happy to assist!

    arrow right
    blog image

    What is a Test Run in TestCaseLab - Execute and Track Tests

    calendar
    December 4, 2024

    A Test Run is a one-time execution of a set of test cases within a project. It enables testers to verify the functionality and quality of a system by following predefined test cases and logging the results.

    • Manage testing activities effectively and monitor progress.
    • Verify that all planned test cases are executed.
    • Systematically document results for reporting and analysis.
    Test Run

    Key Features of a Test Run

    1. Purpose

    Test Runs are used to execute test cases and record test results such as 

    • Pass
    • Fail
    • Block.

    2. Creation

    Test Runs can be created in two ways:

    • From a Pre-Created Test Plan: Quickly generate a Test Run using a prepared template of test cases.
    • Manual Test Run: Select and add test cases individually to create a custom Test Run.
    Create a Test Run based on a Test Plan
    Create a Test Run via Test Runs page

    3. Execution

    Once a Test Run is started, you can:

    • Execute each test case in the list.
    • Record outcomes and provide additional details like comments, attachments, and defects if necessary.

    Learn about running tests here.

    4. Reporting

    • Upon completing a Test Run, the system generates an automated Test Run Report that includes:
      • A summary of results (e.g., passed, failed, blocked cases).
      • Detailed logs for each test case.
    • Reports can be exported in CSV, PDF, and viewed online.

    Learn about Reports here.

    Example of Reports

    5. One-Time Execution

    A Test Run is executed once. If retesting is required, a new Test Run should be created.

    What's Next?

    For further assistance, check related guides or contact support—we’re happy to help!

    arrow right
    blog image

    Create & Manage a Test Plan - Build Your Testing Framework

    calendar
    December 4, 2024

    Create a Test Plan

    Creating a Test Plan allows you to organize and prepare reusable templates for efficient Test Runs. Follow these steps to set up a Test Plan for your project.

    Learn what is a Test Plan here.

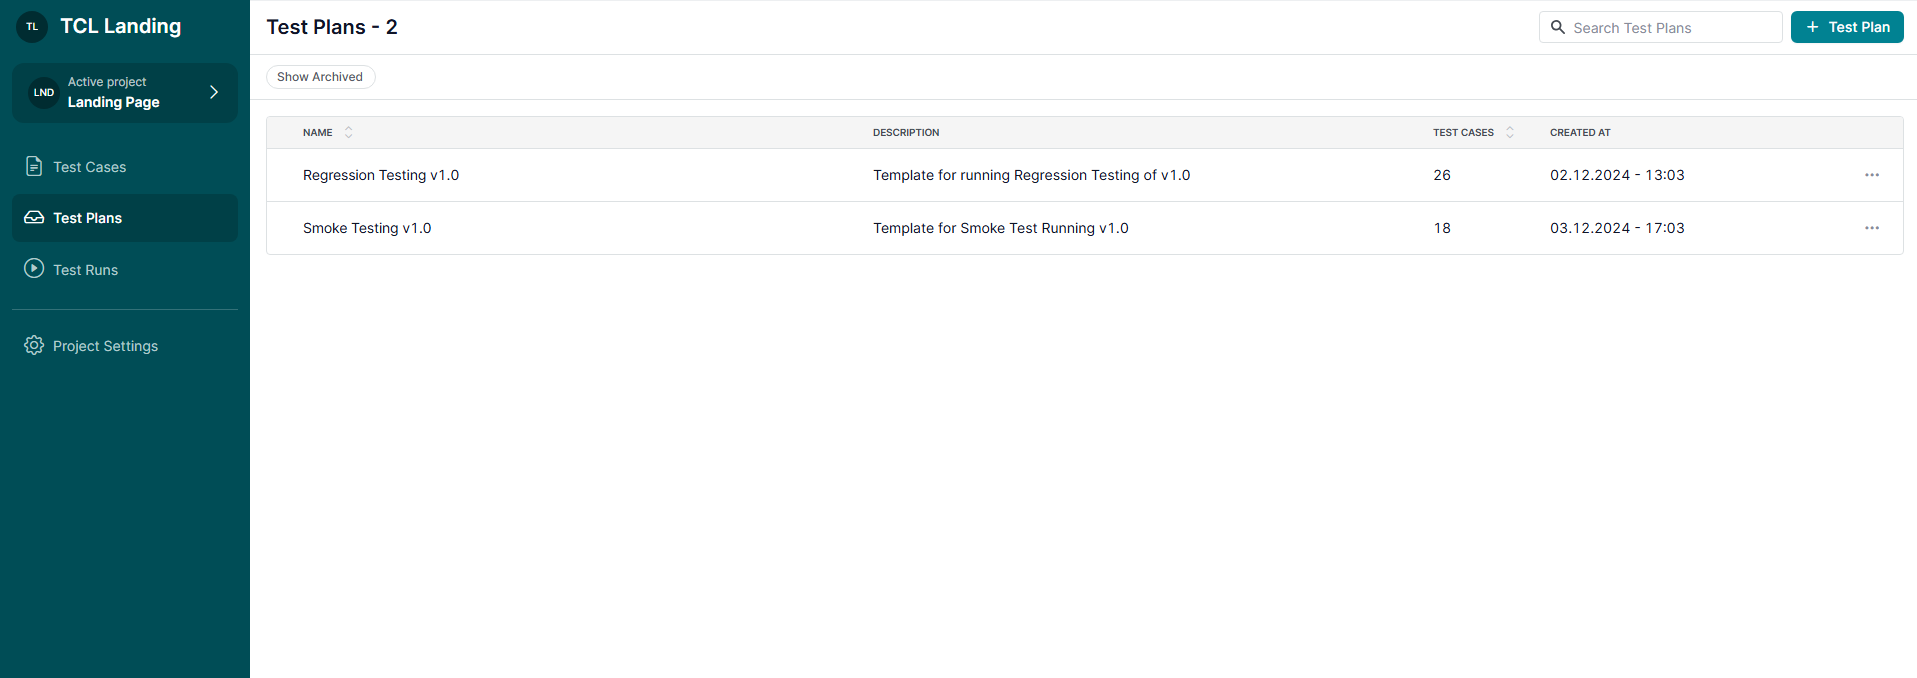
    1. Go to the Test Plans Page

    Navigate to the Test Plans page in your project.

    Test Plans

    2. Click the '+ Test Plan' Button

    Select the ‘+ Test Plan’ button to open the Test Plan creation form.

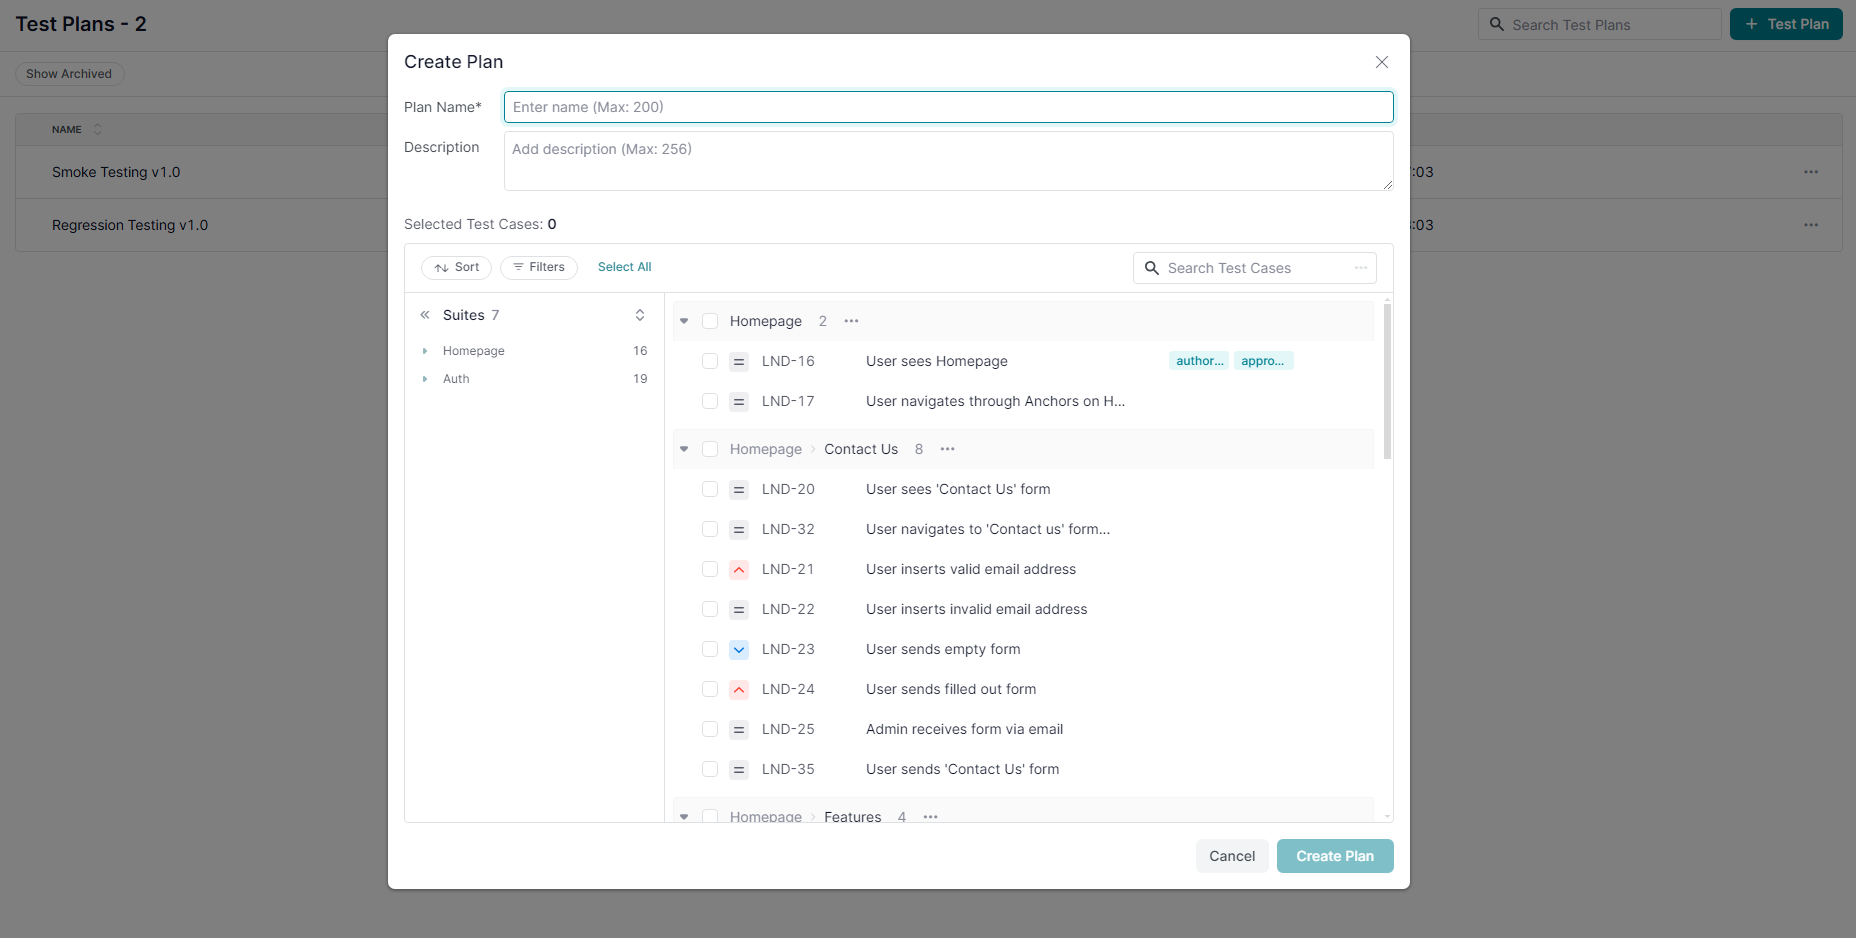
    3. Fill Out the Test Plan Form

    • Title: Enter a unique and descriptive name for your Test Plan.
    • Description: Provide a brief description outlining the purpose or scope of the Test Plan.
    • Include Test Cases: Add the test cases you want to include.
      • You can update the Test Plan details and modify the included test cases at any time after creation.
    Create a Test Plan

    Manage a Test Plan

    Managing Test Plans allows you to customize test cases and adapt workflows to fit your testing needs. Follow this guide to efficiently manage and update Test Plans.

    1. Test Plan View Modes

    Test Plans display test cases in two modes for flexible management:

    • Grouped-by-Suite View Mode:
      • Test cases are grouped by Suites, reflecting the original project structure.
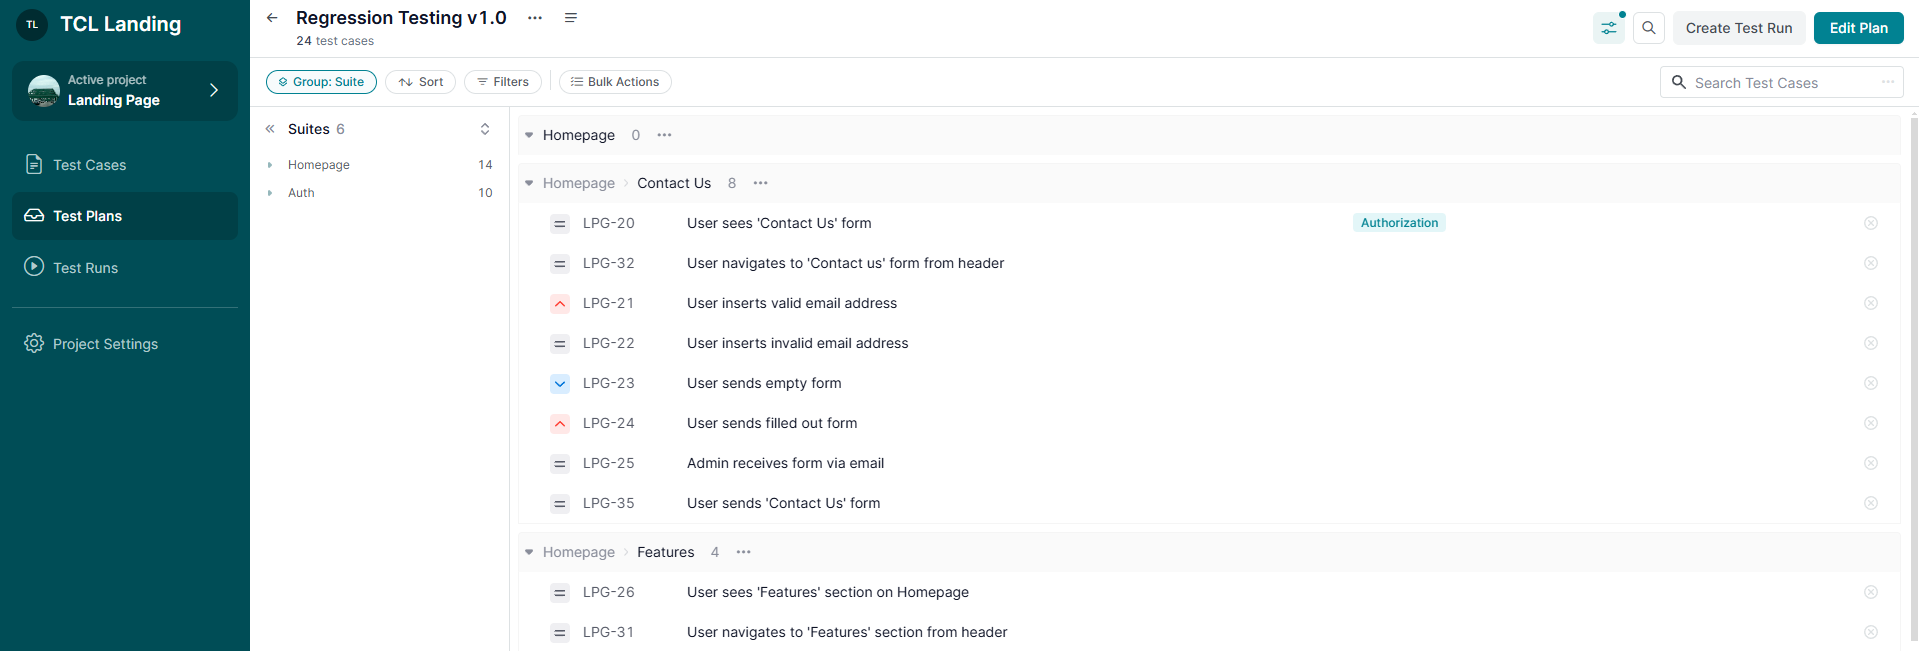
    Grouped-by-Suite View Mode
    • Checklist View Mode:
      • Displays a flat list of test cases.
    Checklist View Mode

    2. Rearrange Test Cases

    • Grouped-by-Suite View Mode:
      • Test cases remain grouped by Suites.
      • Rearranging is limited to Project Administrators and impacts the project-wide arrangement (available from the Test Cases page).
    • Checklist View Mode:
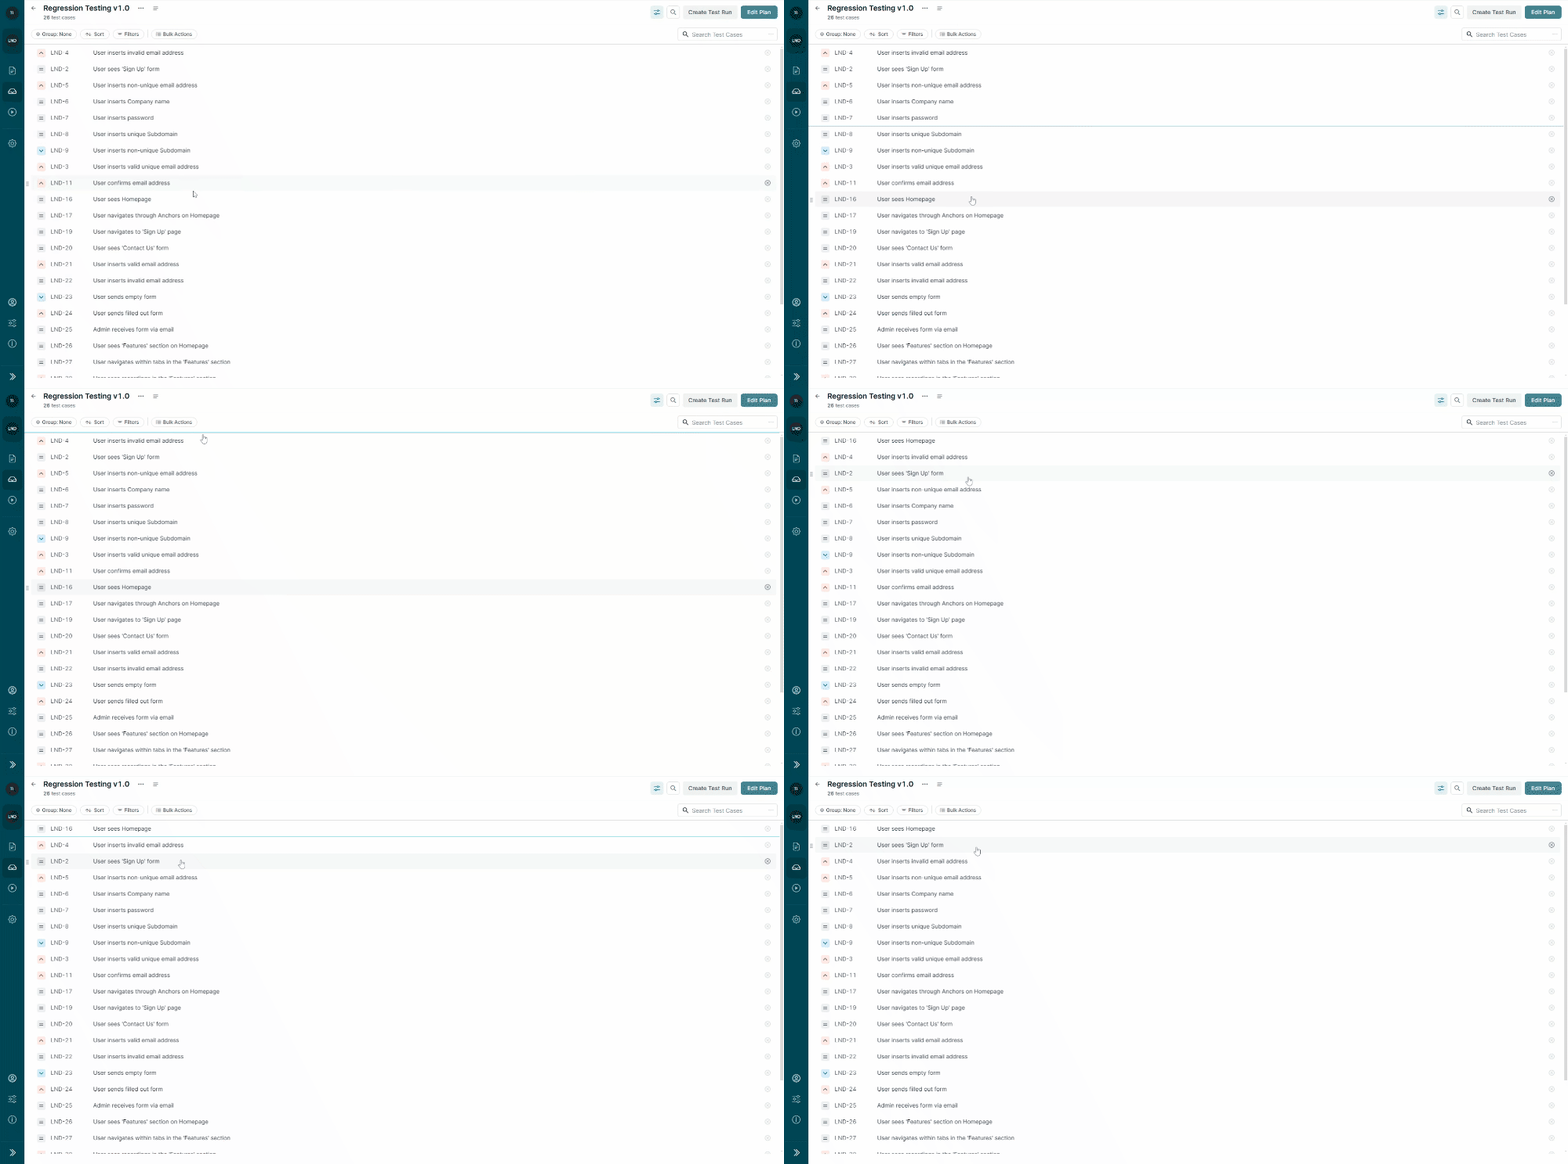
      • Drag&drop test cases to reorder them for testing workflows (available for all Project Members).

    Note: Changes in this view do not affect the original order in Grouped-by-Suite View Mode.

    Drag&Drop Test Cases in a Checklist View Mode

    3. Edit a Test Plan

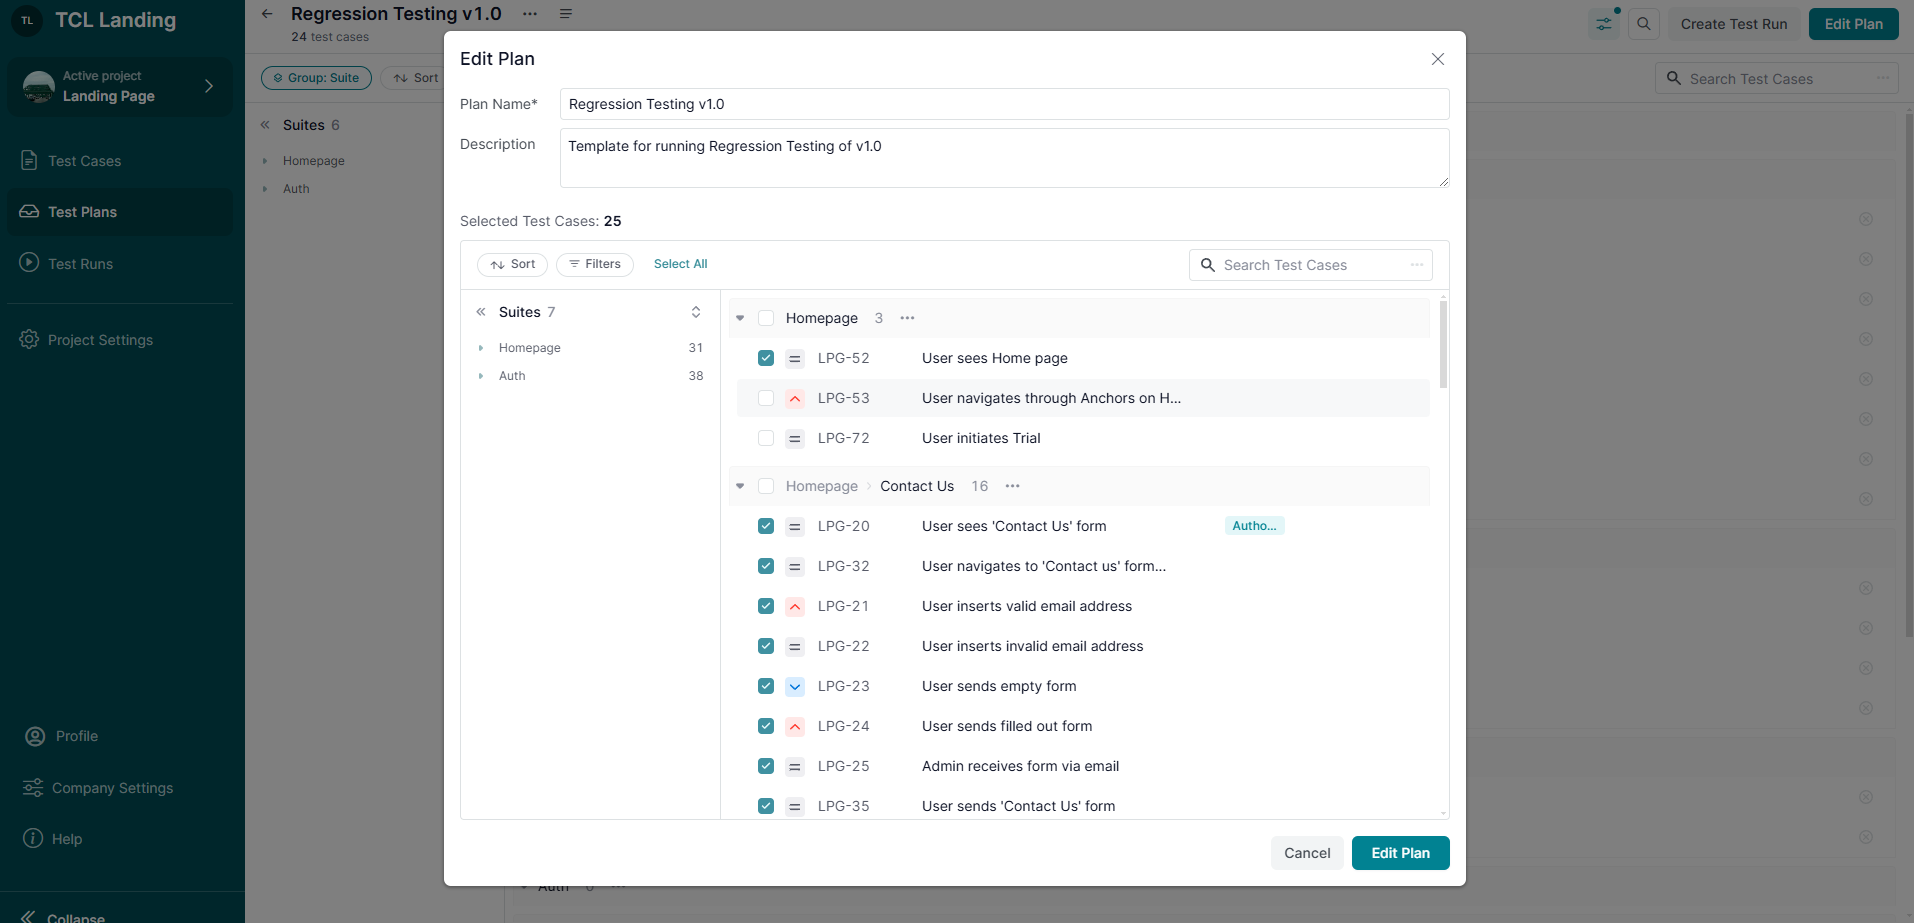
    • Open the ‘Edit Plan’ modal to:
      • Update the Title or Description of the Test Plan.
      • Include or exclude test cases to refine the content.

    Note: New test cases added to a Test Plan will appear at the bottom of the list in the Checklist view mode.

    Quick Update a Test Plan title
    Edit a Test Plan via Form

    What’s Next?

    Customizing Test Plans ensures your testing workflows are efficient and organized. For additional assistance, check related guides or contact support. We’re here to help!

    arrow right
    blog image

    Manage a Test Plans List - Prepare for Organized Execution

    calendar
    December 4, 2024

    Test Plans are reusable templates that streamline the preparation of Test Runs. Proper management of your Test Plans ensures your team stays organized and ready for efficient testing.

    Learn what is a Test Plan here.

    1. Create a Test Plan

    • Go to the Test Plans page.
    • Click the ‘+ Test Plan’ button to add a new Test Plan.
    Create a Test Plan

    2. Reorder Test Plans

    Use drag&drop functionality to rearrange Test Plans and organize them as needed.

    Drag&Drop Test Plans

    3. Sort Test Plans

    Sort Test Plans by:

    • Name
    • Amount of Test Cases included in the plan.

    4. Archive and Restore Test Plans

    • Archive Test Plans: Temporarily remove Test Plans from active use.
    • Restore Test Plans: Bring archived Test Plans back into active use when needed.

    5. Delete Test Plans

    Permanently delete Test Plans that are no longer required.

    Note: Deleted Test Plans cannot be restored.

    6. Duplicate Test Plans

    Create a copy of an existing Test Plan to reuse its structure and included test cases for planning new testing activities.

    7. Export Test Plans

    Export a Test Plan to a CSV file for:

    • Sharing with team members.
    • Creating a backup.

    Note: Exported files can be imported back into the same project or another project.

    Learn more about importing Test Cases here.

    Test Plan's Options

    What’s Next?

    By managing your Test Plans effectively, you ensure that your team has well-organized templates ready for efficient Test Run creation. For further assistance, check out related guides or contact support—we’re here to help!

    arrow right
    blog image

    What is a Test Plan in TestCaseLab - Plan for Consistent Testing

    calendar
    December 4, 2024

    A Test Plan in TestCaseLab is a reusable template that organizes a specific set of test cases for streamlined testing activities. It acts as a blueprint for creating Test Runs, enabling teams to prepare structured and repeatable test case groups efficiently.

    • Simplify Test Run preparation by pre-organizing test cases.
    • Maintain consistency in test case selection and order across different Test Runs.
    • Ensure a structured testing approach, minimizing the risk of missing critical areas.
    Test Plan

    Key Features of a Test Plan

    1. Purpose

    A Test Plan defines a collection of test cases that are executed together during a Test Run.

    Learn what is a Test Run here.

    2. Reusability

    Test Plans serve as reusable templates, allowing you to:

    • Use the same Test Plan to create multiple Test Runs.
    • Avoid the need to reselect or rearrange test cases for each new Test Run.

    3. Customization

    Customize Test Plans by:

    • Adding Test Cases: Include test cases relevant to the testing objective.
    • Updating Details: Modify the Test Plan’s title, description, or included test cases anytime.
    • Reordering Test Cases: Arrange test cases in Checklist View Mode using drag-and-drop for a custom sequence without altering their order in a Grouped-by-Suite View Mode.

    4. Organization

    Group test cases logically within Test Plans, often by features, components, or testing phases, to enhance organization and clarity.

    5. Integration with Test Runs

    Test Plans serve as the foundation for Test Runs, simplifying preparation by providing a pre-arranged set of test cases.

    Read more about creating Test Runs based on Test Plans.

    Create a Test Run based on a Test Plan

    6. Flexibility in View Modes

    Test Plans offer two modes for working with test cases:

    • Grouped-by-Suite View Mode:
      • Displays test cases grouped by Suites, reflecting the original project structure established on the Test Cases page.

    Note: Only Project Administrators can rearrange test case ordering in this view mode (from the Test Cases page).

    Grouped-by-Suite View Mode
    • Checklist View Mode:
      • Provides a list of test cases without grouping by Suites.
      • Allows any Project Member to reorder test cases via drag&drop for convenience.

    Note 1: Rearranging test cases in the Checklist view mode in the specific Test Plan does not impact the original ordering of the test cases in the Grouped-by-Suite view mode. 

    Note 2: Rearranging test cases in the Checklist view mode doesn’t affect the ordering of the test cases in other Test Plans.

    Note 3: Rearranging test cases in the Checklist view mode doesn’t affect the ordering of the test cases in Test Runs created based on this Test Plan before this update.

    Checklist View Mode

    7. Reporting Compatibility

    • Export Test Plans to CSV files for sharing or backup purposes.
    • Imported files can be reused within the same project or transferred to another project.
    Export a Test Plan

    What’s Next?

    For more information, check related guides or contact support—we’re happy to assist!

    arrow right

    Organize Your Testing Process

    Start using TestCaseLab now as your test case management system and bring your Quality Assurance at the top-level!
    Get Started For Free
    No Credit Card Required
    Organize Your Testing Process