Blog

Make the most out of your experience and check
articles about TestCaseLab functionality

Integrate with Treeify - Streamline Test Case Creation
icon calendar
July 25, 2025

If you're looking to generate test cases using AI and send them directly to your TestCaseLab project, Treeify makes the process simple and effective. With Treeify’s AI-assisted workflows, you can create test scenarios in minutes — and with our integration, export them to your TestCaseLab workspace in just a few clicks.

This guide will walk you through how to connect Treeify to your TestCaseLab account and start exporting test cases right away.

What You'll Need

To export AI-generated test cases from Treeify to TestCaseLab, you’ll need:

  • API Token
  • Company ID

These three values are required to enable secure and accurate test case transfers. Follow the steps below to find them.

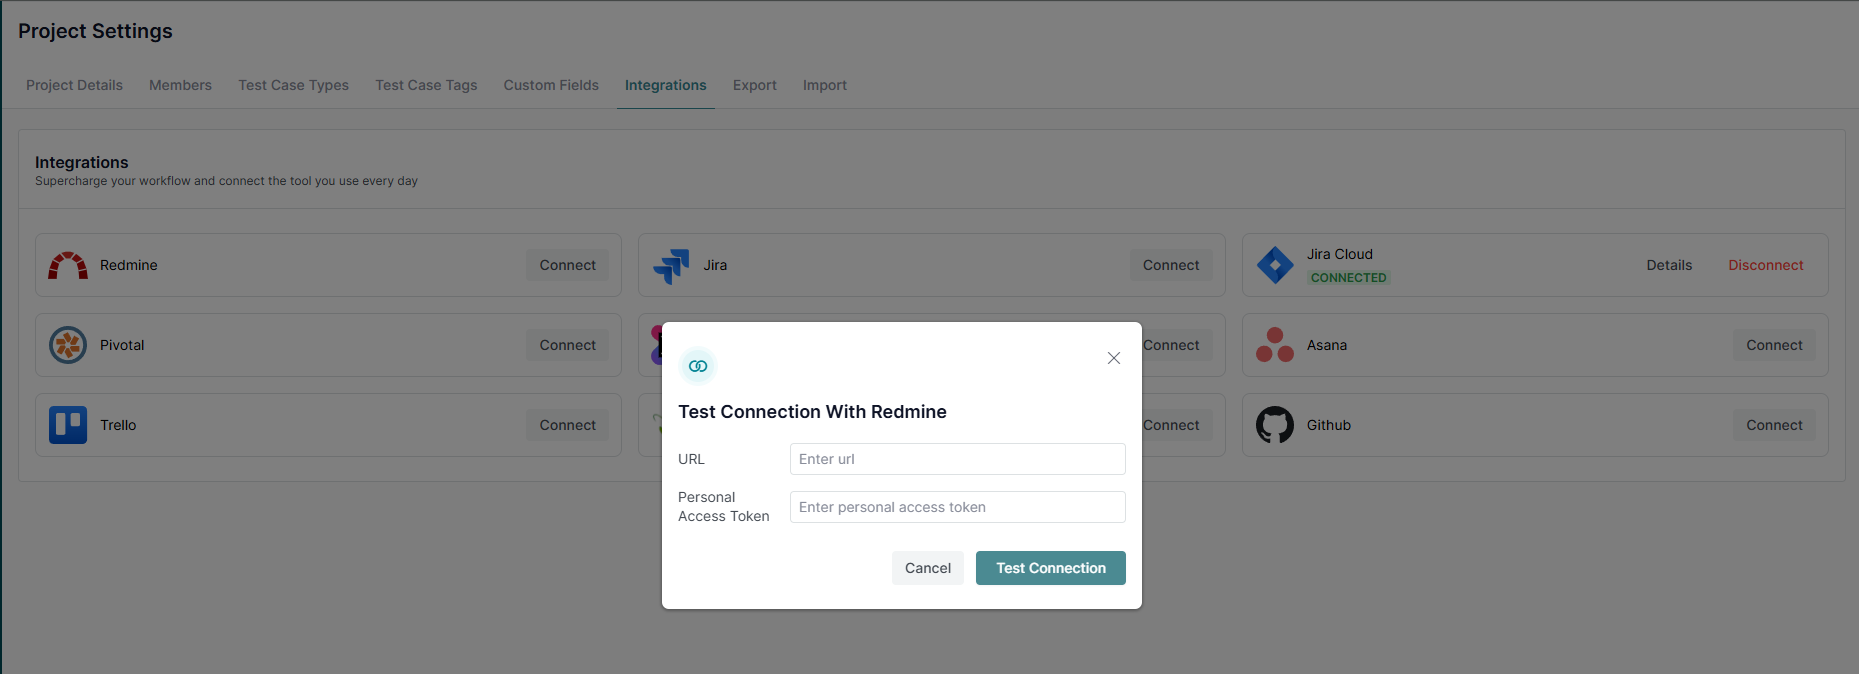
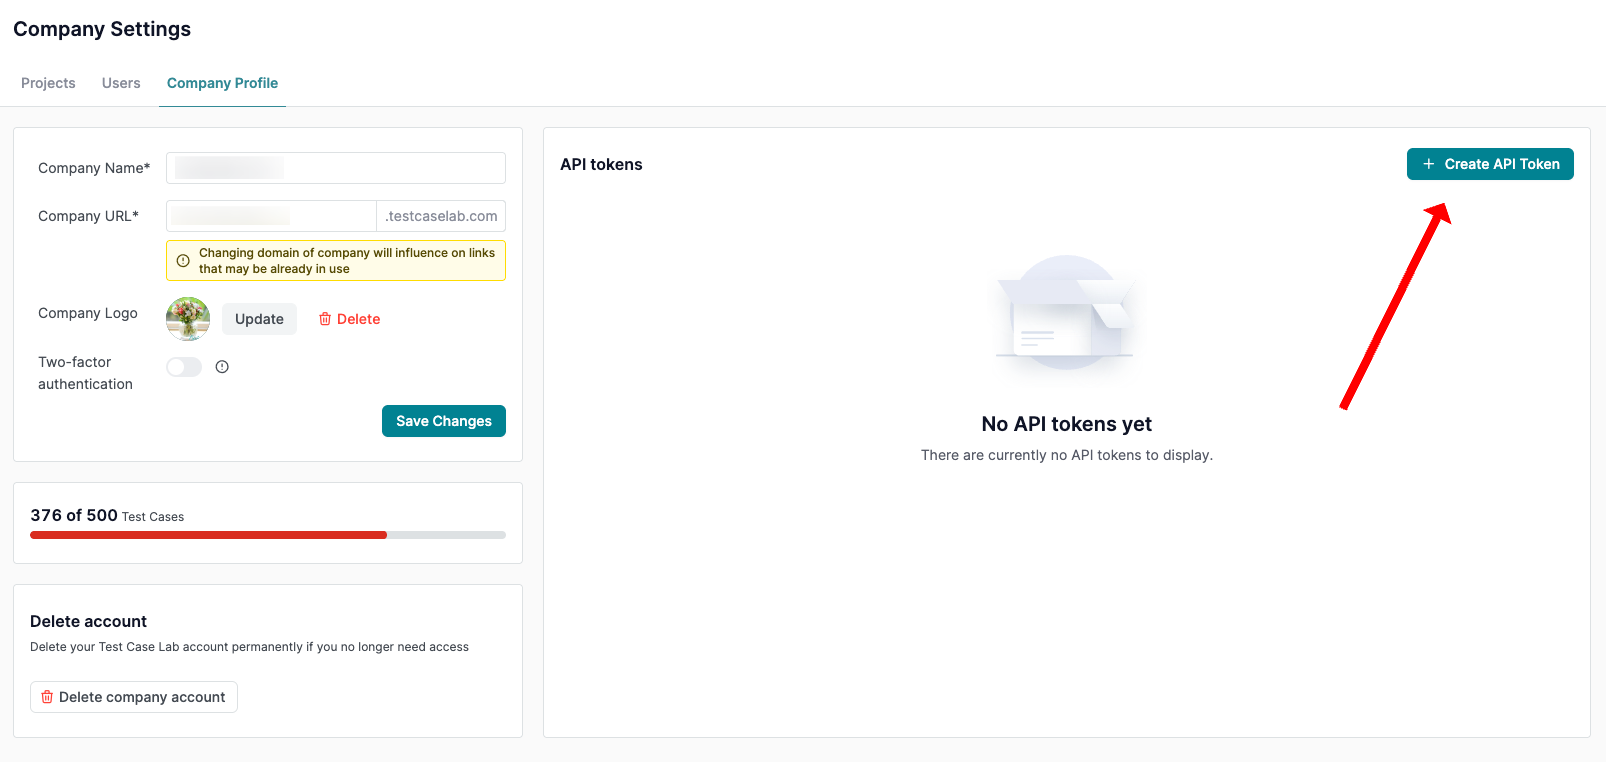
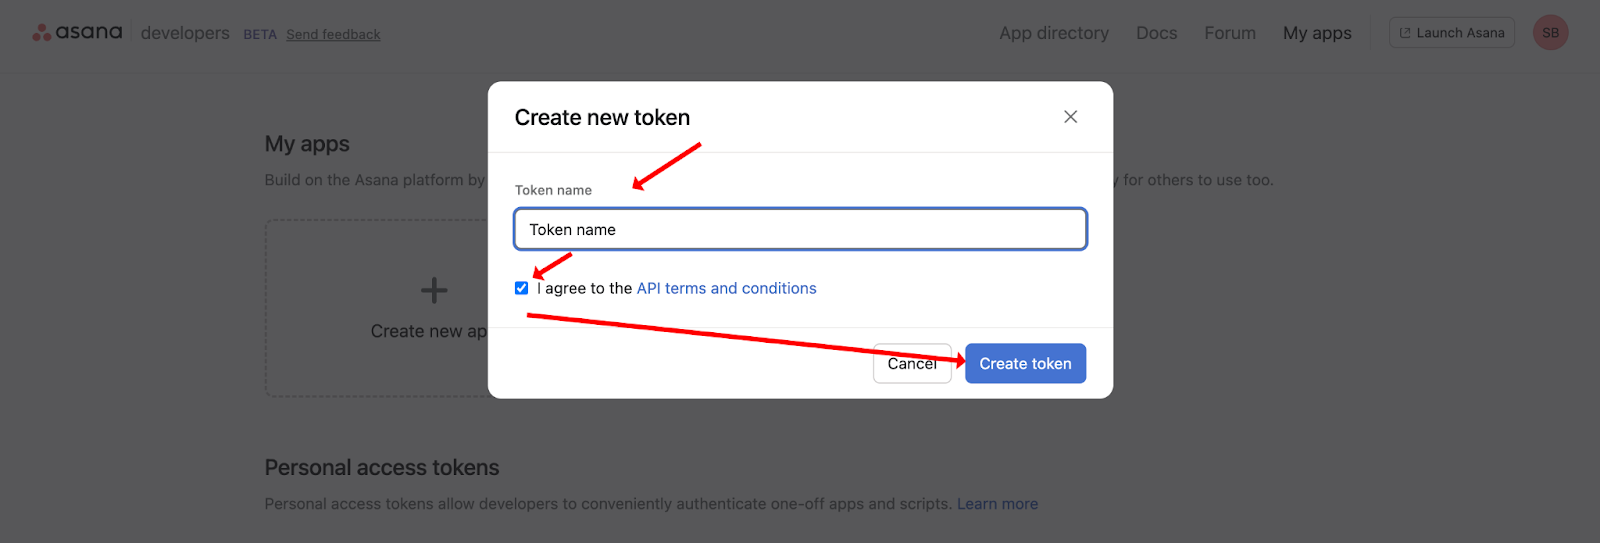
1. Get Your API Token

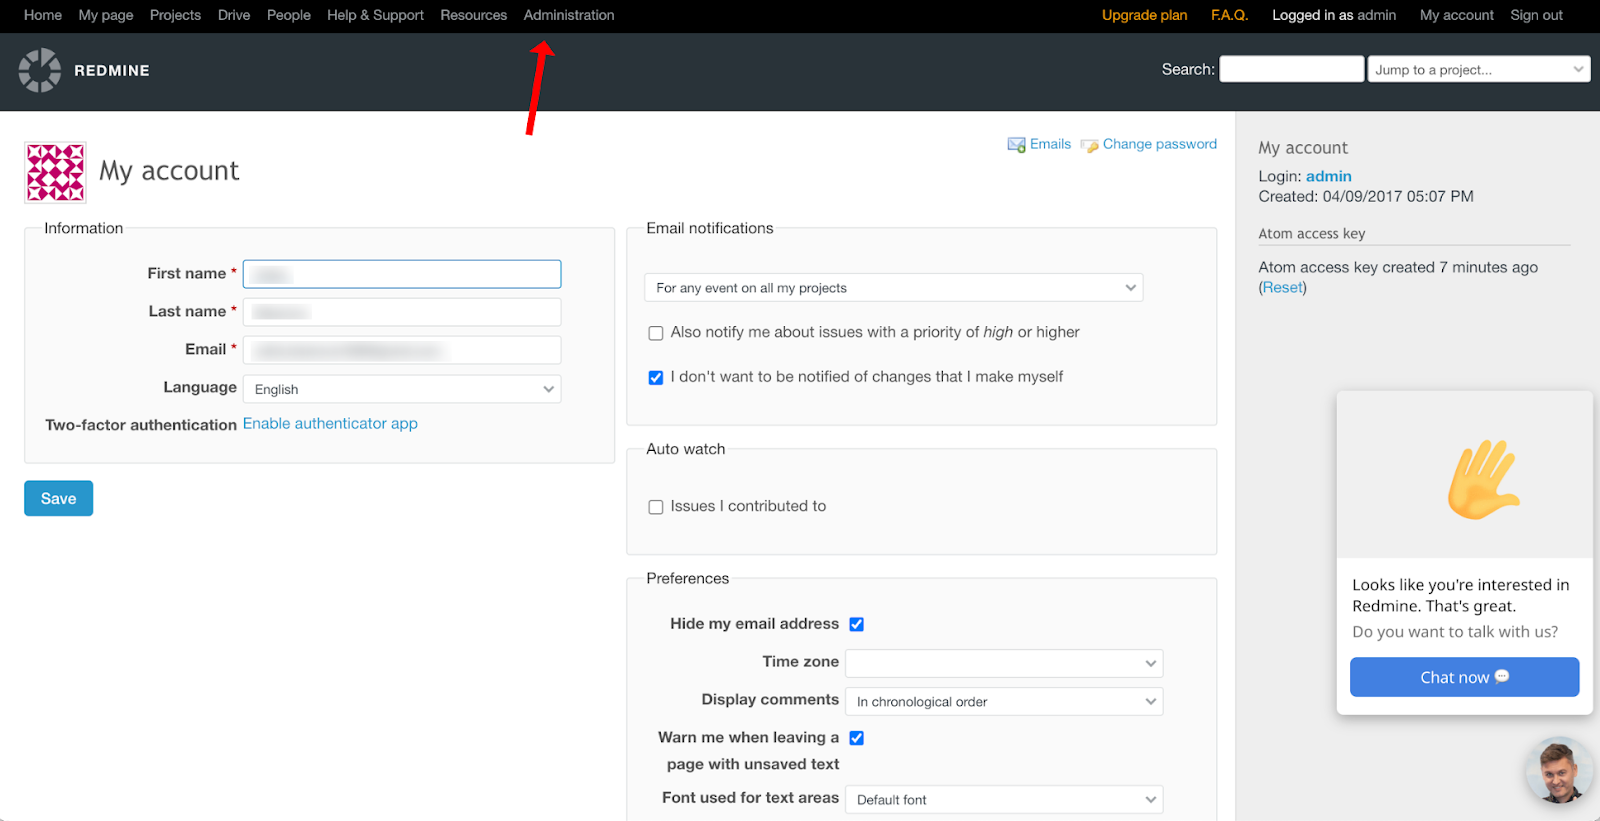
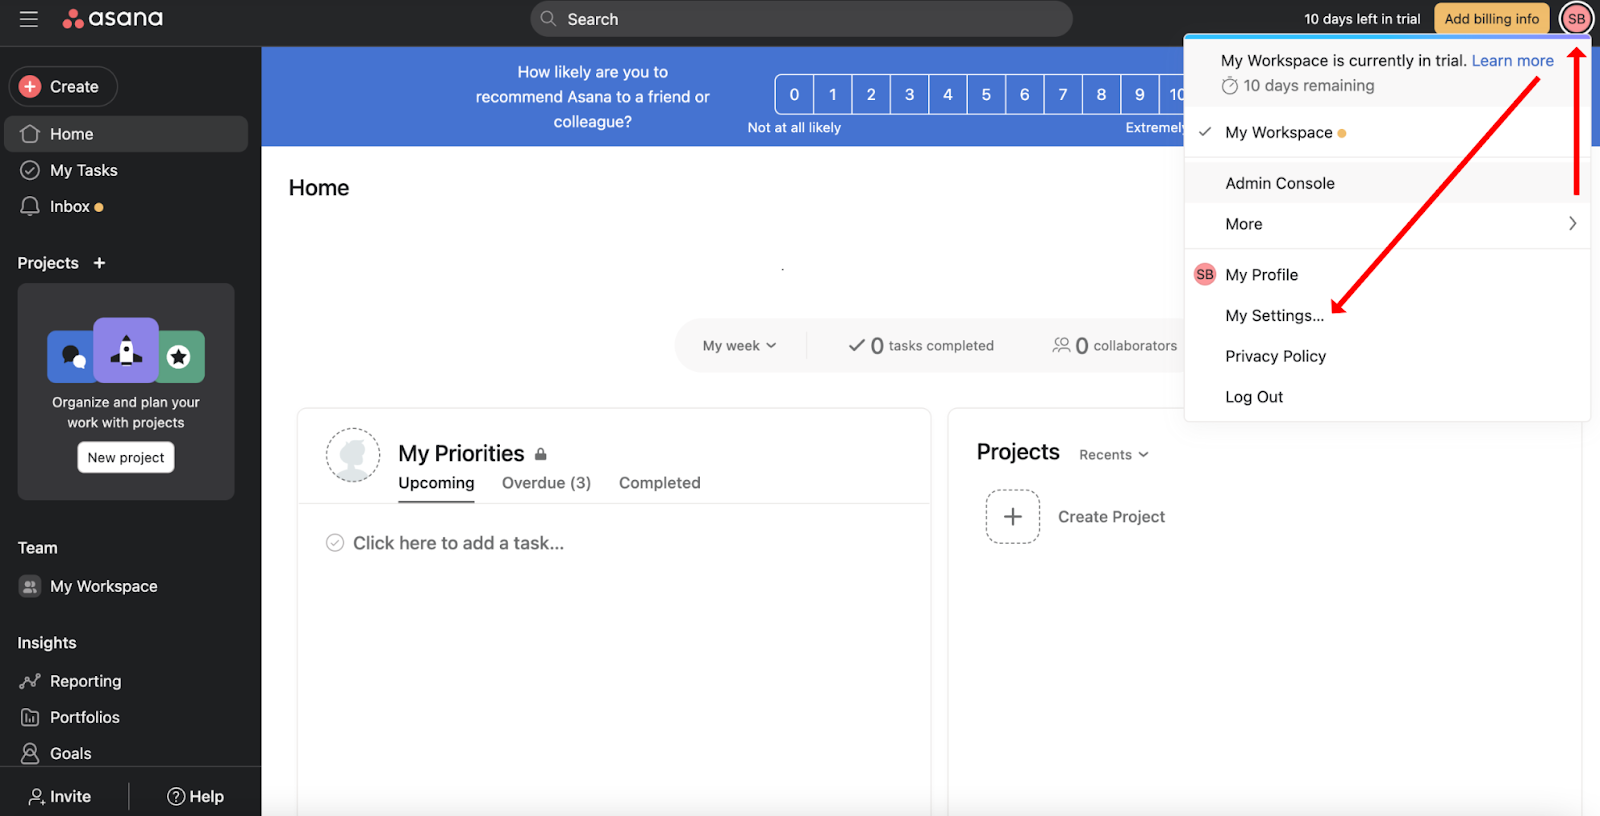
Ask your Company Admin in TestCaseLab to generate an API token.

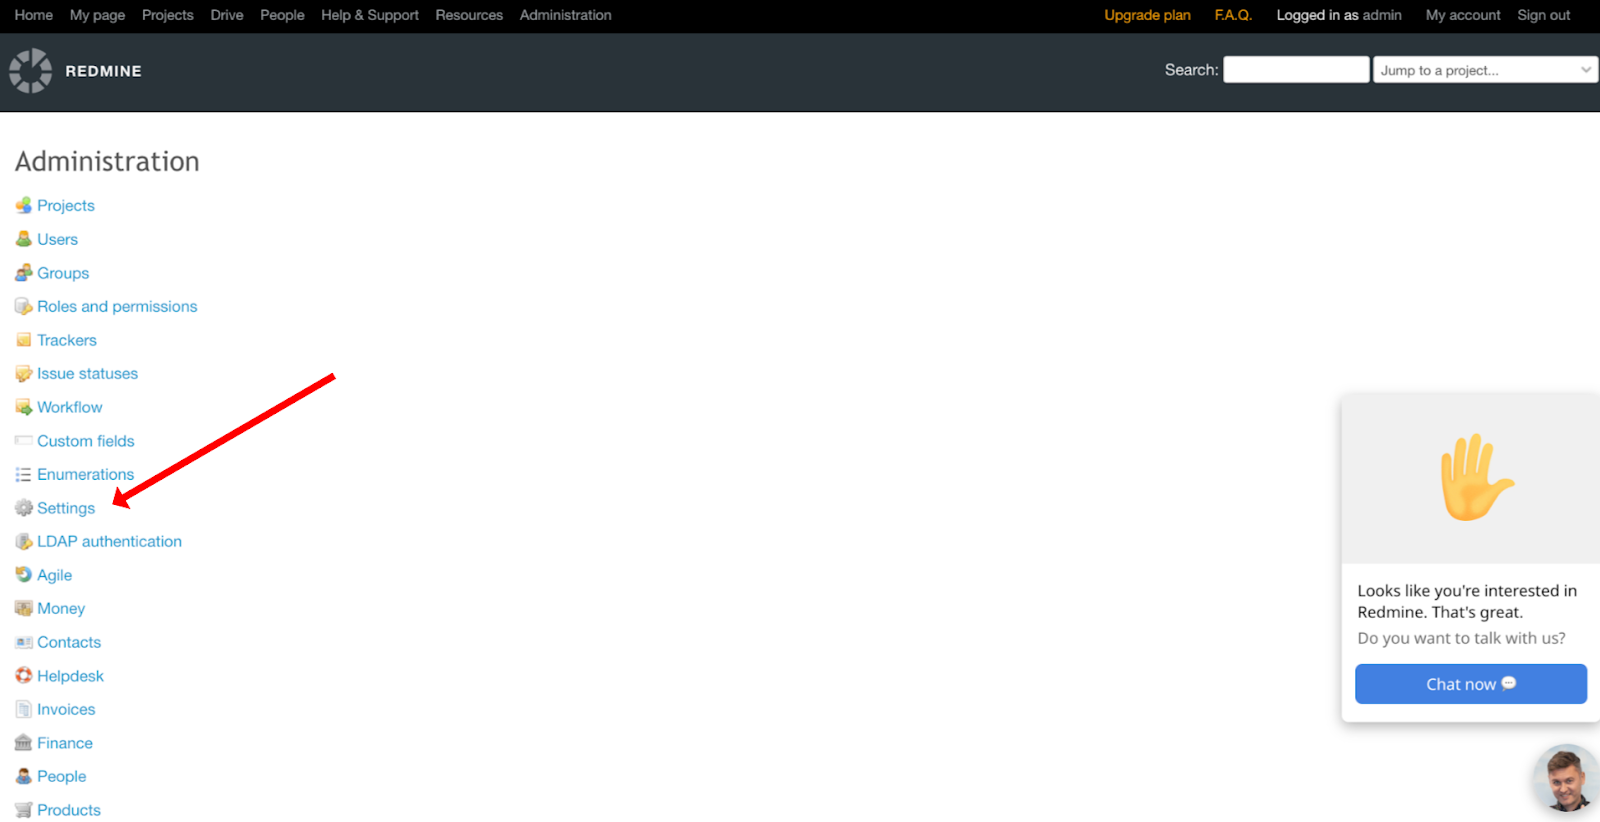
  1. Go to Company Settings > Company Profile.
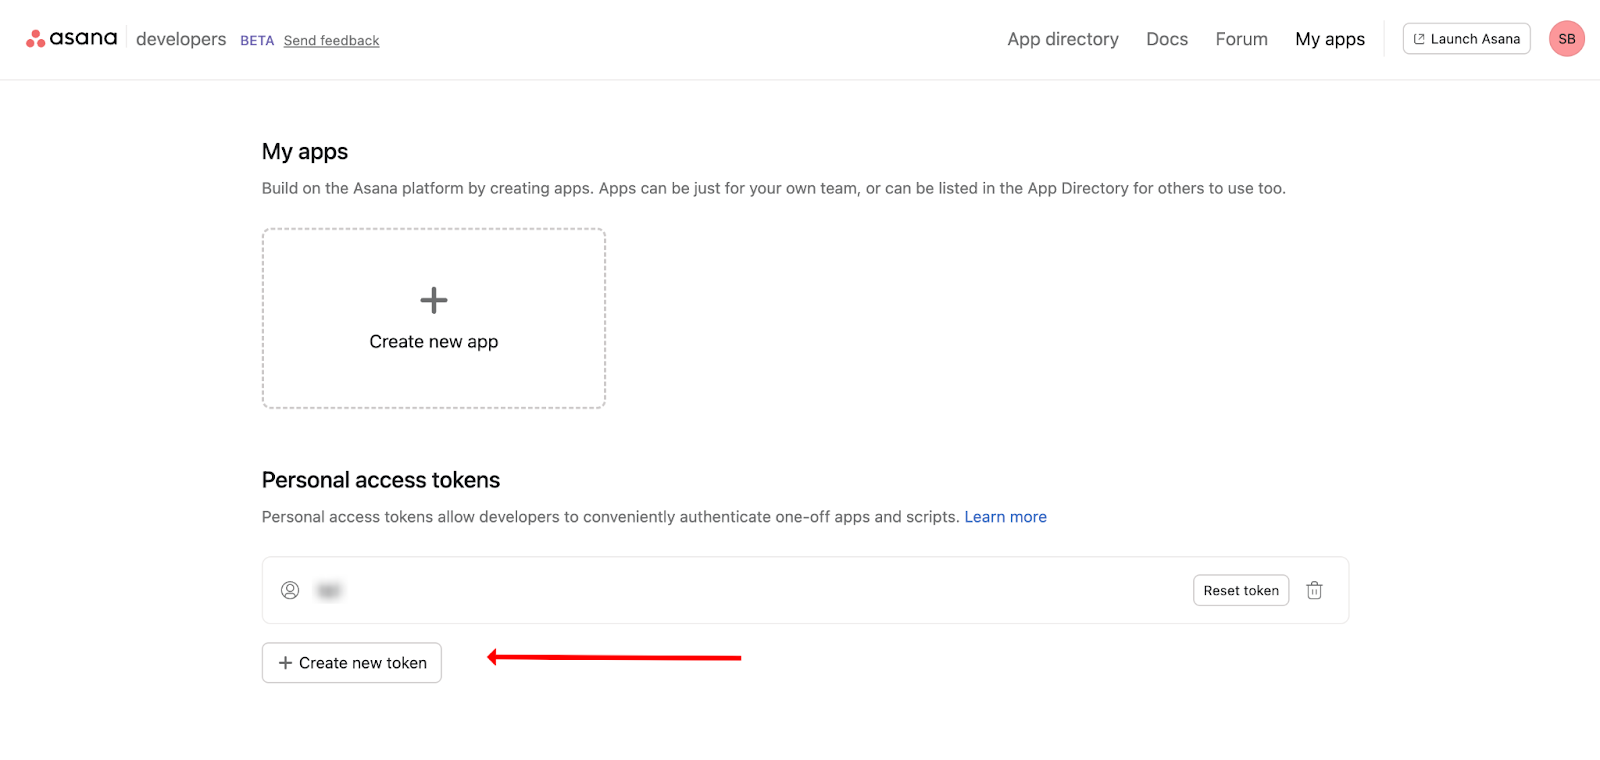
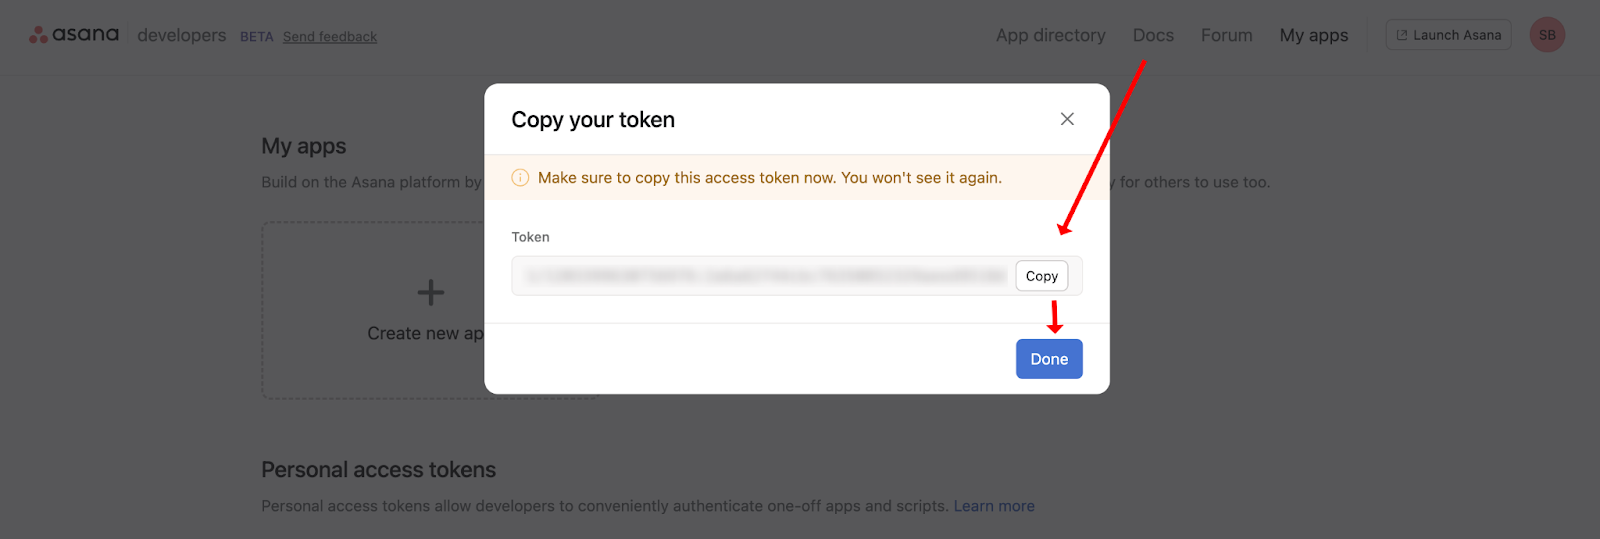
  2. Find the API Tokens section.
  3. Create and copy the token.

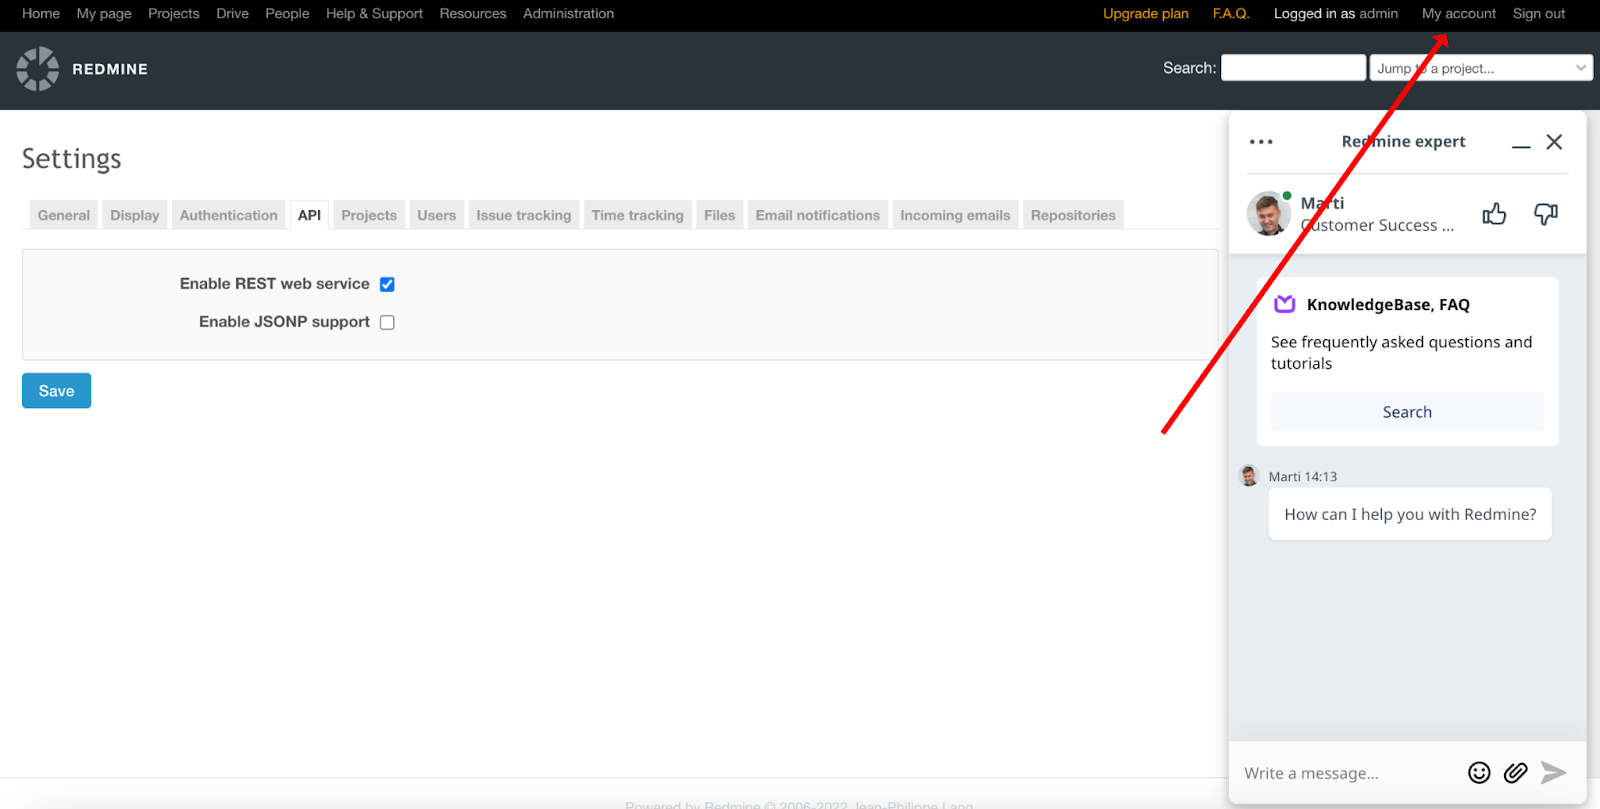
API tokens allow you to integrate TestCaseLab with external tools like Treeify securely. Only Company Admins have access to manage them.

2. Find Your Company ID

You’ll use the API token with a tool like Postman to retrieve your Company ID.

Get Company ID
  • Send a GET request to:https://app.testcaselab.com/api/v2/companies
  • Include your API Token in the Authorization header:Authorization: Bearer YOUR_API_TOKEN

Example Response:

[

 {

   "id": 123,

   "name": "Your Company Name",

   "subdomain": "yourcompany"

 }

]

  • Copy the id value — that’s your Company ID.

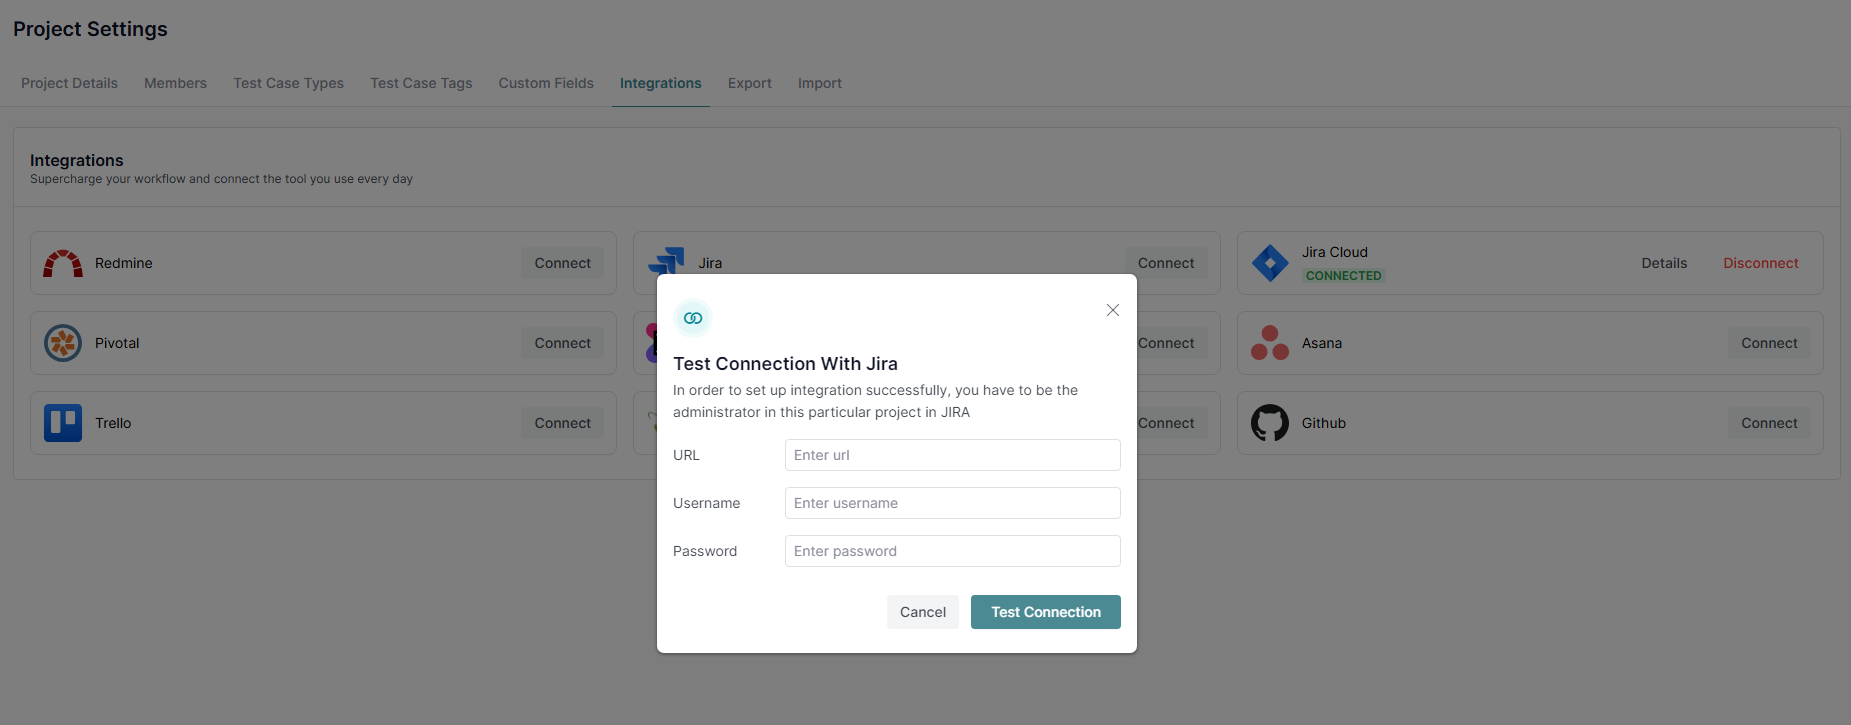
3. Connect Treeify and Start Generating Test Cases

Once you have all the data — API Token, Company ID — you are ready to start in Treeify.

  • Sign in to your Treeify personal account (note: company-wide accounts are not yet supported).
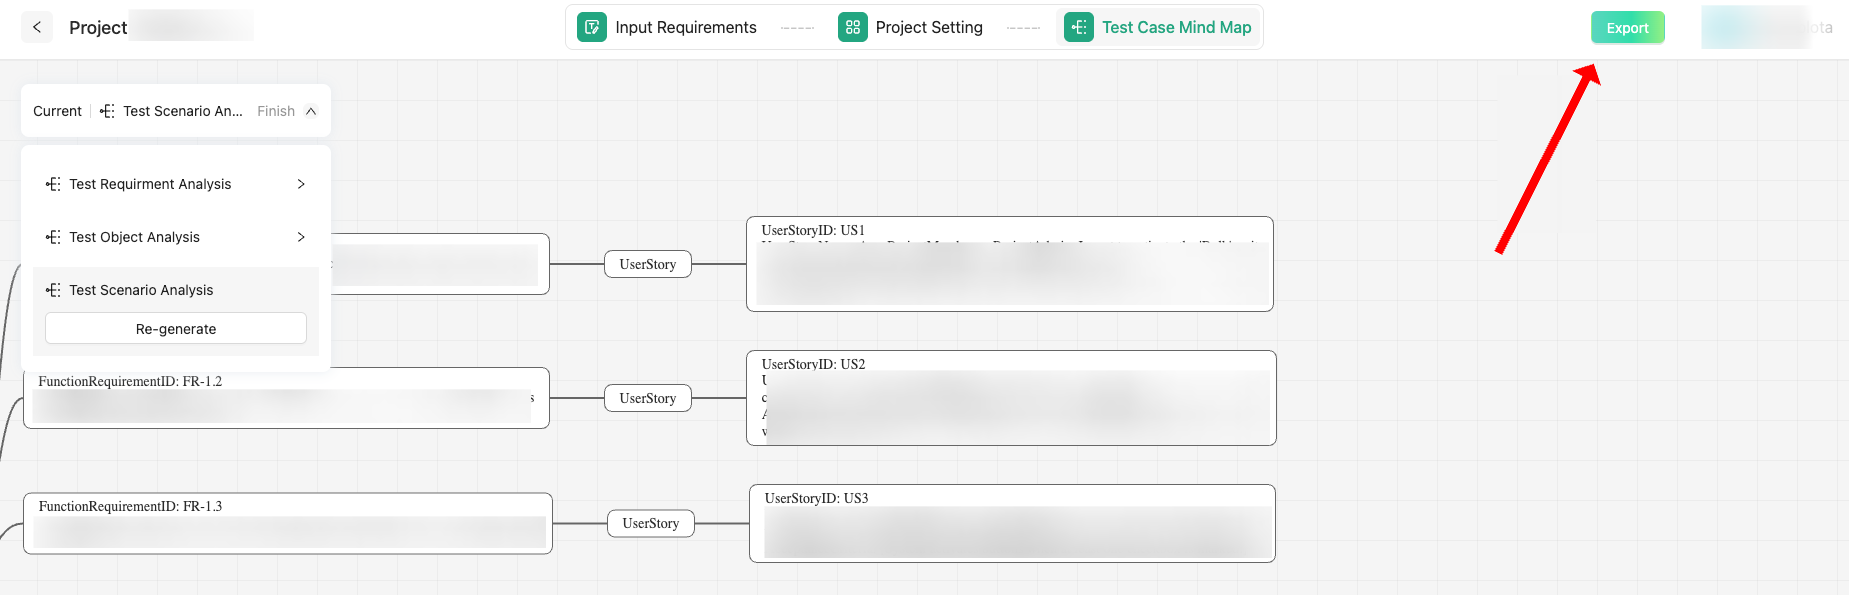
  • Generate test cases via Treeify
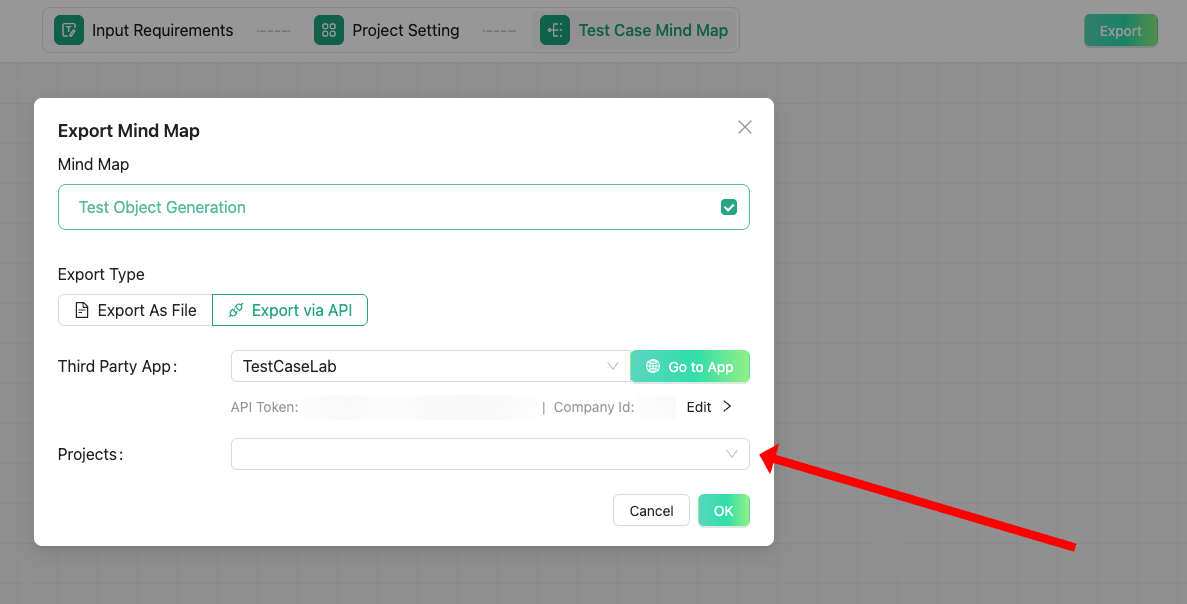
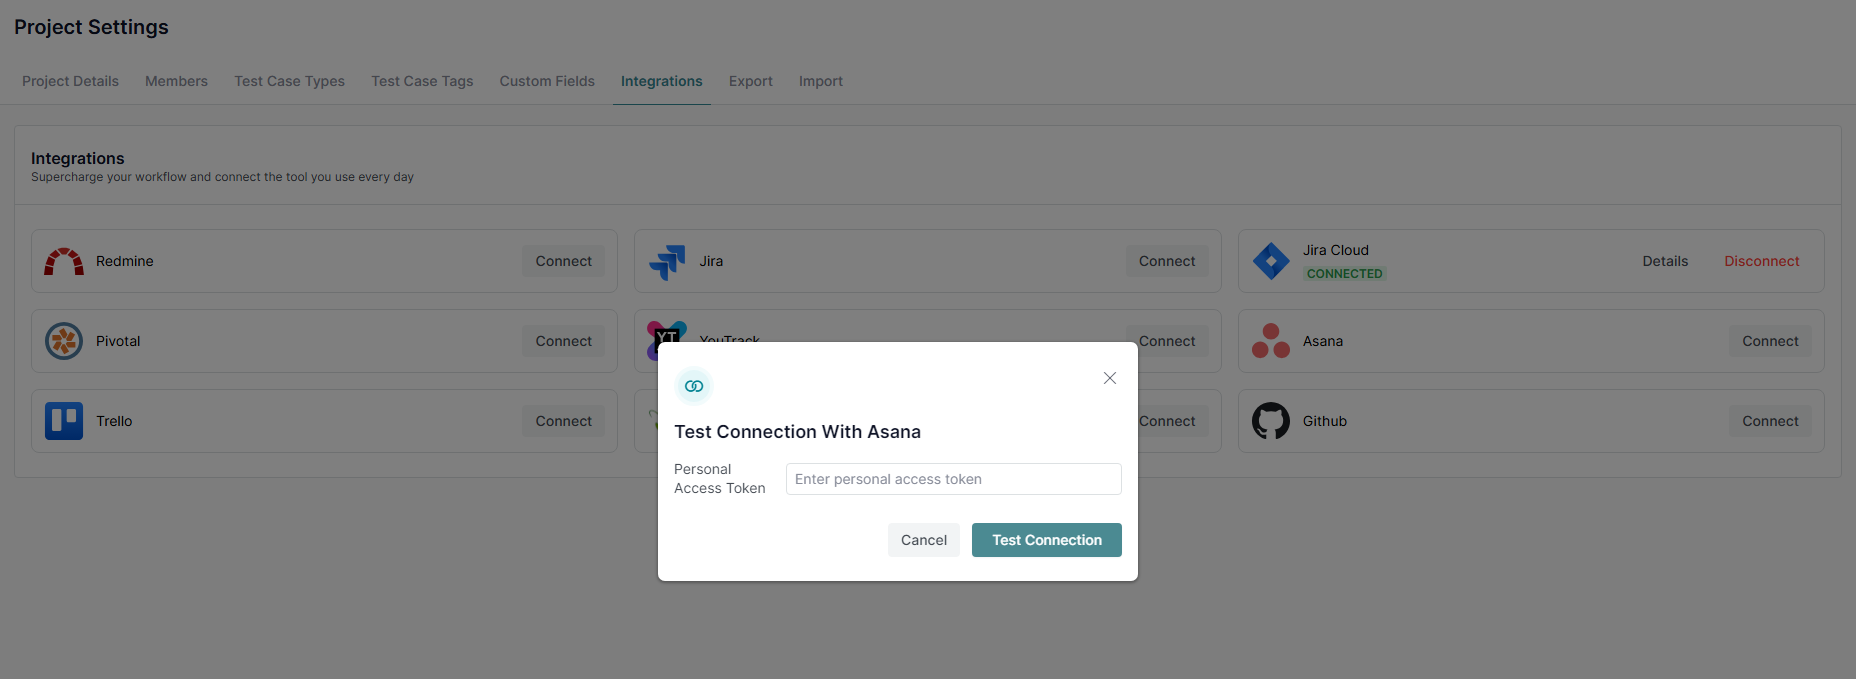
  • Navigate to the TestCaseLab export integration option.
  • Input:
    • Your API Token
    • Your Company ID
  • Confirm and export them directly to your selected TestCaseLab project.

    How to work with Treeify? Learn
    here.

Good to Know

  • Treeify is currently free to use, making it an ideal time to try it out with your team.
  • Need help? You can request 1-on-1 onboarding or reach out via email or the Treeify Discord community.
  • To learn more about the API, refer to TestCaseLab’s API documentation in the Help Center.
  • You can report any issues directly via the “Report a Bug” feature in Treeify. Since the tool is still in beta, your feedback will help the team enhance the user experience.

    Smarter Testing Starts Here

    This integration bridges the power of Treeify’s AI-assisted test generation with the structure and collaboration features of TestCaseLab. Whether you’re refining test coverage or scaling your QA team’s workflow, this setup helps you do it faster and more intelligently.

    Let your QA flow better — with AI and TestCaseLab.

    arrow right
    Integrate with GitHub - Log Issues from Your Tests
    icon calendar
    December 4, 2024

    With TestCaseLab It is possible to run tests and report bugs instantly to your favorite bug-tracking tool. If you're looking for a test case management tool that integrates with GitHub, try TestCaseLab. 

    The instructions below will help you set up the integration with the GitHub tool.

    1. Generate API token

    • First of all, you should log in to your GitHub account.

    Note: Make sure that you have an active project on your GitHub account to integrate it with your TestCaseLab project. 

    • Navigate to your GitHub account and click on your ‘Profile’ icon. Choose the  ‘Settings’ option from the menu.
    GitHub - Go to Settings
    • On the ‘Profile Settings’ page find ‘Developer Settings’, and click on it.
    GitHub - Developer Settings
    GitHub - Developer Settings
    • Click on the ‘Personal access tokens’ tab and choose the ‘Tokens (classic)’ option. 
    GitHub - Go to Tokens
    • Click on 'Generate new token' and choose the ‘Generate new token (classic)’ option.
    GitHub - Generate a new Token
    • Fill in the ‘Note’ field, and mark up all required checkboxes. Click on the 'Generate token' button.
    GitHub - Generate Token
    • Copy your Access token to the clipboard. 
    GitHub - Copy Token

    2. Set up Connection

    • After that, you need to navigate to your TestCaseLab Company Account, click on ‘Project Settings’ in the sidebar and go to the ‘Integrations’ tab.
    • Choose GitHub from the list of Bug tracking tools. 
    GitHub Integration Form
    • Paste your Personal access token, and click on the 'Test connection' button.
    • Choose your Project from the list, and confirm the action.
    • As long as there are no issues and the Connection is established, you can proceed with Integration and save the changes.

    A 'Connected' notification means your connection has been established without any issues, and you are able to report your defects directly to GitHub

    What’s Next?

    If you have any questions, our support team is here to assist you!

    arrow right
    Integrate with Mantis - Report Bugs Effortlessly
    icon calendar
    December 4, 2024

    The TestCaseLab tool lets you run tests and report bugs right away to your favorite bug-tracking system. TestCaseLab integrates with the Mantis bug-tracking tool, so you can manage defects easily.  

    The following instructions will guide you through setting up the Mantis integration.

    1. Generate API token

    • As a first step you should log in to your Mantis account. 
    • Navigate to your Mantis account and click on your ‘Profile’ icon. Choose the  ‘My account’ option from the menu.
    Mantis - Go to My Account
    • From the ‘My account’ tab go to the ‘API tokens’ tab.
    Mantis - Go to API Tokens
    • Fill in the ‘Token name’ field, and click on the 'Create API token' button. Copy your API token to the clipboard. 
    Mantis - Create API Token

    2. Set up Connection

    • After that, you need to navigate to your TestCaseLab Company Account, click on the ‘Project Settings’ in the sidebar and go to the ‘Integrations’ tab.
    • Choose the Mantis tool from the list of Bug tracking tools. 
    Mantis Integration Form
    • Paste your API Key to the ‘API Key’ field. 
    • Copy your Mantis URL, and paste it to the ‘URL’ field. Example: https://YOURNAME.mantishub.io/
    • Click on the 'Test connection' button, then choose your Project from the dropdown menu and confirm the action.

    You can report your defects directly to Mantis from TestCaseLab once you receive the 'Connected' notification.

    What’s Next?

    If you have any questions, our support team is here to assist you!

    arrow right
    Integrate with Asana - Manage Defects with Ease
    icon calendar
    December 4, 2024

    In software development, TestCaseLab simplifies and optimizes QA processes. Your favorite bug-tracking tool can be used to execute tests and report bugs immediately. You are welcome to try TestCaseLab if you are looking for a test management tool that integrates with Asana

    To learn how to set Asana test case management tool, follow the instructions below.

    1. Generate API token

    • First of all, you should log in to your Asana testing tool account to integrate TestCaseLab with Asana
    • Click on your ‘Profile’ icon and choose the ‘My Settings’ option.
    Asana - Go to My Settings
    • On the ‘Settings’ page navigate to the ‘Apps’ tab and click on the ‘Manage Developers Apps’ option.
    Asana - Go to Apps
    • Click on the 'Create new token' button.
    Asana - Create new Token
    • Fill in the ‘Name’ field, click on the ‘I agree to the API terms and conditions’ checkbox. After that, please confirm the action by clicking on the 'Create token' button.
    Asana - Create new Token
    • Copy your token by clicking on the 'Copy' button and close the modal window by clicking on the 'Done' button. 
    Asana - Copy Token

    2. Set up Connection

    • After that, you need to navigate to your TestCaseLab Company Account, click on the ‘Project Settings’ in the sidebar and go to the ‘Integrations’ tab. 
    • Choose the Asana test case management tool from the list of Bug tracking tools. 
    Asana Integration Form
    • Paste your Personal access token, and click on the 'Test connection' button.
    • Choose your Workspace and Project from the list, and confirm the action.

    The 'Connected' notification indicates that your connection has been established without any issues. From TestCaseLab, you can report your defects directly to Asana

    What’s Next?

    If you have any questions, our support team is here to assist you!

    arrow right
    Integrate with YouTrack - Create Defects Seamlessly
    icon calendar
    December 4, 2024

    By using the TestCaseLab tool, you can easily run tests and report bugs. The Youtrack bug-tracking tool is easily integrated with TestCaseLab.

    Here is a quick guide to configure the integration.

    1. Generate API token

    • As a first step, you should be logged in to your Youtrack test management account.
    • Click on your Profile icon in the header and then go to the ‘Profile’ page by clicking on the respective point from the menu.
    YouTrack - Go to Profile
    • Navigate to the ‘Account Security’ tab.
    YouTrack - Go to Account Security
    • Click on the 'New token' button. 
    YouTrack - New Token
    • In the token transition screen enter a Token name, choose a scope (you can choose from suggested by Youtrack), and click on the 'Create' button. 
    YouTrack - Create a new Token
    • Click on the 'Copy token' button.
    YouTrack - Copy Token

    2. Set up Connection

    • After that, you need to navigate to your TestCaseLab Company Account, click on the Project Settings via sidebar and go to the ‘Integrations’ tab.
    • Choose Youtrack from the list of Bug tracking tools. 
    YouTrack Integration Form
    • Paste your Personal access token to the ‘Personal access token’ field.
    • Navigate to your Youtrack account and copy your URL. Example: https://YOURNAME.youtrack.cloud
    • After that paste your Youtrack URL to the ‘URL’ field, and click on the 'Test connection' button.
    • Choose your Youtrack project from the projects list and confirm the action. 

    If you see a 'Connected' notification it means that your connection has been established without any issues and defects can be reported directly from TestCaseLab  to Youtrack.

    What’s Next?

    If you have any questions, our support team is here to assist you!

    arrow right
    Integrate with Pivotal - Simplify Defect Management
    icon calendar
    December 4, 2024

    It is easy to run tests and report bugs using the TestCaseLab test management system. 

    Set up integration with the Pivotal tracker using a short manual below.

    1. Generate API  token

    • To get started, log into your Pivotal account.
    • Сlick on your name in the header and choose the ‘Profile’’ option from the menu.
    Pivotal - Go to Profile
    • Scroll down the Profile page to the ‘Api token’ tab.
    Pivotal - API token
    Pivotal - API token
    • Click on the 'Create new token' button, and copy the created token to your clipboard.
    Pivotal - Create new API Token

    2. Set up Connection

    • After that, you need to navigate to your TestCaseLab Company Account, click on the ‘Project Settings' and go to the ‘Integrations’ tab.
    • Choose the Pivotal tool from the list of Bug tracking tools. 
    • Paste your API token to the ‘API key’ field, and click on the 'Test connection' button.
    • Chose a project from the projects list and confirm the action.
    Pivotal Integration Form

    Upon receiving a ‘Connected’ notification, your connection has been established without any issues. It means that defects can be reported directly to Pivotal.

    What’s Next?

    If you have any questions, our support team is here to assist you!

    arrow right
    Integrate with Jira (server-based) - Log Defects Efficiently
    icon calendar
    December 4, 2024

    Learn how to set Jira (server-based) integration following the instructions below.

    1. Log in to your Jira account

    First of all, you should log in to your Jira (Server Based) account to integrate TestCaseLab with Jira. 

    2. Set up Connection

    • Go to your TestCaseLab Company Account, and open your Project
    • Click on the Project Settings and navigate to the ‘Integrations’ tab
    • Choose the Jira issue-tracking tool from the list
    Jira Integration Form
    • In the respective field enter your Jira URL (required format: http://jira.YOURDOMAIN.com/).
    • Enter your Jira Username

    Note: In order to find your Jira Username please navigate to your Jira Account and click on your Profile

    Jira - Go to Profile
    • Copy your Username from the Summary tab:
    Jira - Username
    • Enter your Jira Password into the integration form. 
    • Confirm the action.

    You can check your connection by clicking on the 'Test Connection' button.
    If there are no issues and the Connection is established, you can proceed with Integration and save the changes.


    Once you receive a ‘Connected’ notification, it means your connection is established with no issues and you can report your defects to Jira directly from TestCaseLab.

    What’s Next?

    If you have questions or need assistance, our support team is always ready to help.

    arrow right
    Integrate with Redmine - Streamline Defect Reporting
    icon calendar
    December 4, 2024

    TestCaseLab is a simple and comfortable test management platform for running tests and reporting bugs.

    Easily integrate your favorite test case management tool with Redmine! The following list of actions is a short guide to help you get started.

    1. Generate API Key

    • In order to start the integration you should be logged in to the Redmine test case management tool as Admin.
    • From the main page click on the 'Administration' button in the header.
    Redmine - Go to Administration
    • Click on the ‘Settings’ link in the menu.
    Redmin - Go to Settings
    • Navigate to the ‘Api’ tab and mark the ‘Enable REST web service’ checkbox. Save changes by clicking on the 'Save' button. 
    Redmine - Enable REST web service
    • Navigate to the ‘My account’ page by clicking on the 'My account' button in the header. 
    Redmine - Go to My Account
    • Click on the 'Show' button in the side section, and copy your Personal access token to the clipboard. 
    Redmine - Copy API Key

    2. Set up Connection

    • After that, you need to navigate to your TestCaseLab Company Account, click on the Project Settings in the sidebar and go to the ‘Integrations’ tab.
    • Choose the Redmine tool from the list of Bug tracking tools. 
    • Paste your Personal Access Token to the ‘Personal Access Token’ field.
    • Go to your Redmine account and copy your URL. Example: https://YOURNAME.redmineup.com/
    • Paste your Redmine URL to the ‘URL’ field in TestCaseLab and click on the 'Test connection' button.
    • Choose your Redmine project from the project list and confirm the action.
    Redmine Integration Form

    You will receive a 'Connected' notification once your connection has been established. Redmine can receive defects directly.

    What’s Next?

    For further assistance, check our related guides or contact support—we’re here to help!

    arrow right
    Integrate with Trello - Report Defects Directly from TestCaseLab
    icon calendar
    December 4, 2024

    You can easily integrate your favorite test case management tool with the Trello testing tool! If you wondered how – take a look at the short manual below.

    First of all – you should have a Trello account.

    1. Generate API Key

    Trello - Generate a Token
    • Click on the 'Allow' button to confirm that you have read the policy and agree with the terms.
    Trello - Allow Access
    • Copy generated Personal Access Token to the clipboard.
    Trello - Personal API Token
    Trello - Personal Key

    2. Set up Connection

    • Go to your TestCaseLab Company Account, that is a perfect option of test management tools for Trello, and open your Project
    • Click on ‘Project Settings’ in the sidebar and navigate to the ‘Integrations’ tab.
    • ‍Choose the Trello issue-tracking tool from the list.
    • Paste your API key and Personal Access Token, and click on the 'Test Connection' button.
    • Choose your project from the list and confirm the action.
    Trello Integration Form

    If you receive a 'Connected' notification, your connection has been established without issues, and you can report defects directly to Trello.

    What’s Next?

    For further assistance, check our related guides or contact support—we’re here to help!

    arrow right
    Integrate with Jira Cloud - Optimize Your Workflow
    icon calendar
    December 4, 2024

    Learn how to set Jira Cloud test case management following the instructions below.

    1. Generate API token

    • First of all, you should log in to your Atlassian account to integrate TestCaseLab with Jira Cloud. 
    • Open your project in Jira.
    • Click on the ‘Gear’ icon on the main page and navigate to the ‘Atlassian account settings’ settings.
    Jira Cloud - Go to Atlassian Account Settings
    • Navigate to the ‘Security’ tab, and click on 'Create and manage API tokens' button.
    Security Tab
    • Click on 'Create Api Token' button.
    Create API token
    • Fill in the ‘Name’ field and click on the 'Create' button.
    Create API token
    • Copy your API token by clicking on 'Copy' button.

    2. Set up Connection

    • Go to your TestCaseLab Company Account, that is a perfect option of test management tools for Jira, and open your Project
    • Click on the Project Settings in the sidebar and navigate to the ‘Integrations’ tab
    • Choose the Jira Cloud issue-tracking tool from the list 
    • Enter your Jira Cloud URL (required format: http://YOURDOMAIN.atlassian.com/).
    • Enter your email address
    • Paste your Personal Access Token
    • Choose a Project from the dropdown list. 
    • And confirm the action.
    Example of Jira Cloud Integration Form

    You can check your connection by clicking on the 'Test Connection' button.
    If there are no issues and the Connection is established, you can proceed with Integration and save the changes.
    Once you receive a ‘Connected’ notification, it means your connection is established with no issues and you can report your defects to Jira Cloud directly from TestCaseLab

    What’s Next?

    For further assistance, check our related guides or contact support—we’re here to help!

    arrow right

    Organize Your Testing Process

    Start using TestCaseLab now as your test case management system and bring your Quality Assurance at the top-level!
    Get Started For Free
    No Credit Card Required
    Organize Your Testing Process