The TestCaseLab tool lets you run tests and report bugs right away to your favorite bug-tracking system. TestCaseLab integrates with the Mantis bug-tracking tool, so you can manage defects easily.
The following instructions will guide you through setting up the Mantis integration.
1. Generate API token
As a first step you should log in to your Mantis account.
Navigate to your Mantis account and click on your ‘Profile’ icon. Choose the ‘My account’ option from the menu.
Mantis - Go to My Account
From the ‘My account’ tab go to the ‘API tokens’ tab.
Mantis - Go to API Tokens
Fill in the ‘Token name’ field, and click on the 'Create API token' button. Copy your API token to the clipboard.
Mantis - Create API Token
2. Set up Connection
After that, you need to navigate to your TestCaseLab Company Account, click on the ‘Project Settings’ in the sidebar and go to the ‘Integrations’ tab.
Choose the Mantis tool from the list of Bug tracking tools.
Mantis Integration Form
Paste your API Key to the ‘API Key’ field.
Copy your Mantis URL, and paste it to the ‘URL’ field. Example: https://YOURNAME.mantishub.io/
Click on the 'Test connection' button, then choose your Project from the dropdown menu and confirm the action.
You can report your defects directly to Mantis from TestCaseLab once you receive the 'Connected' notification.
What’s Next?
If you have any questions, our support team is here to assist you!
Create & Manage Requirements - Build Traceability from Scope to Testing
July 1, 2026
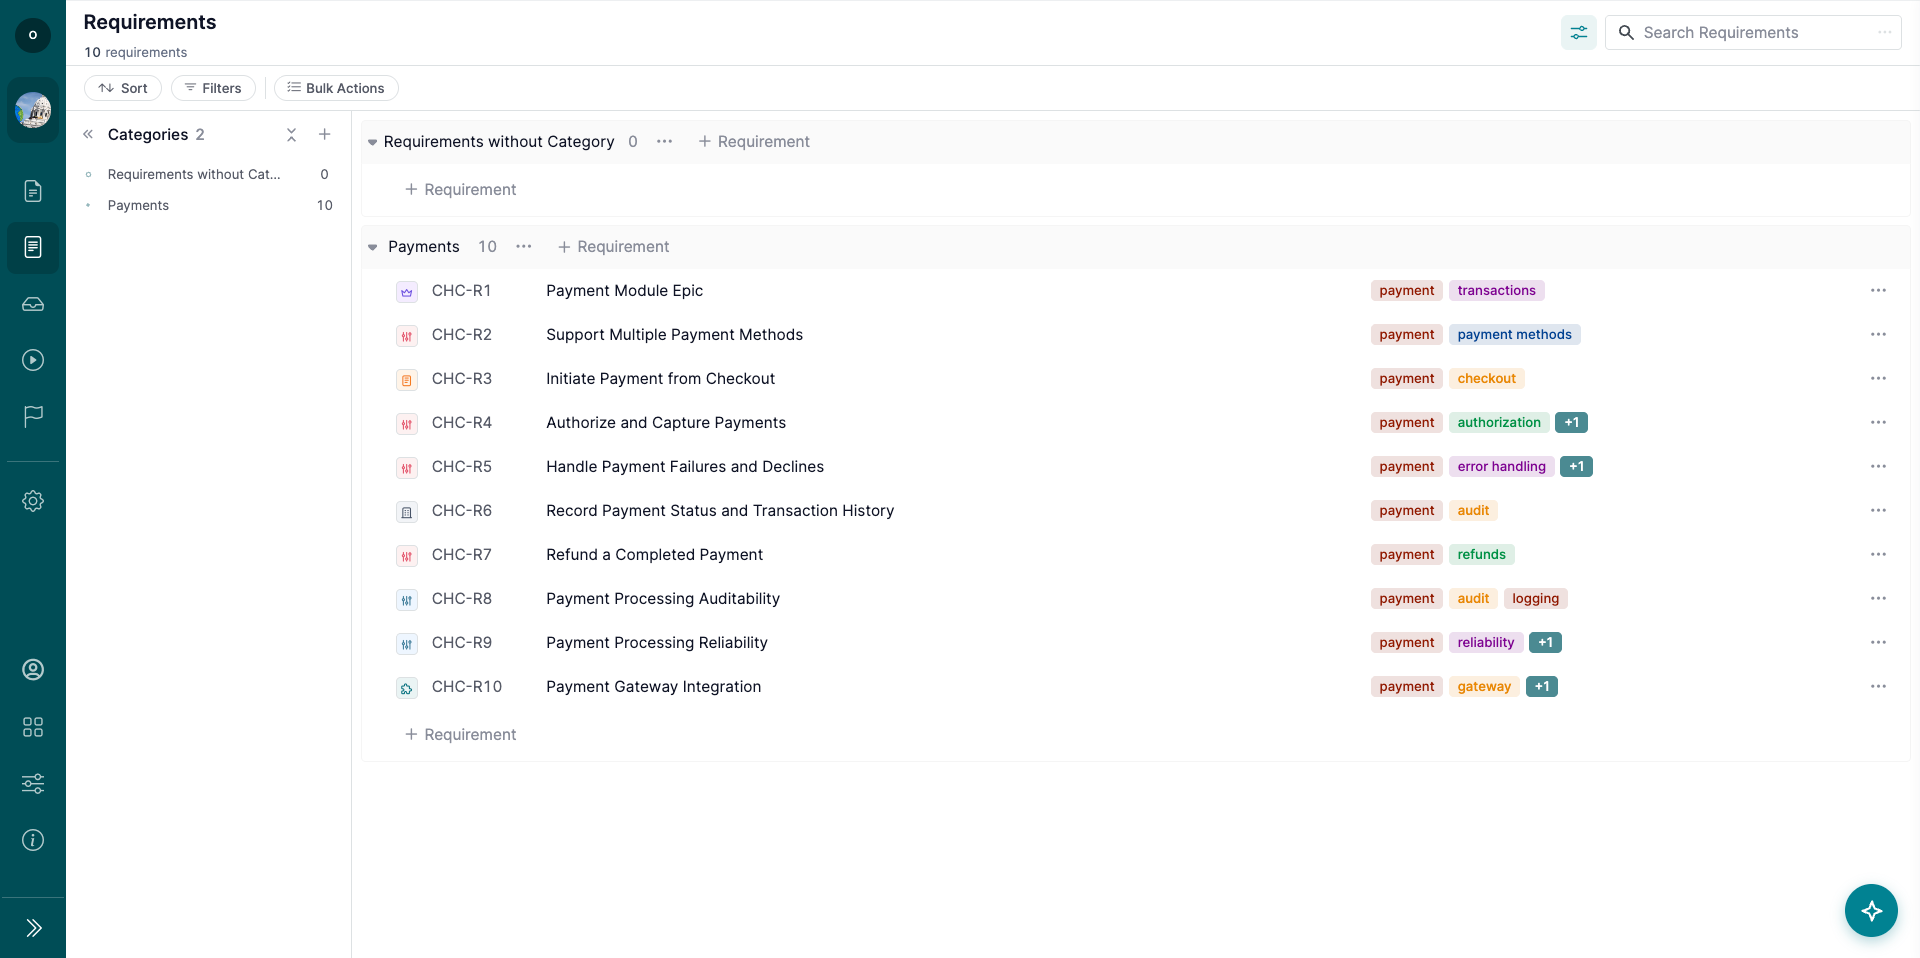
The Requirements page helps your team define, organize, and track product requirements inside a project.
Requirements can be linked to Test Cases, giving your team clear traceability from product scope to test coverage, execution, and defects.
1. Open the Requirements Page
To work with requirements:
Open your project.
Go to the Requirements page.
Use the page to create requirements, organize them by category, and link them to Test Cases.
The Requirements page includes:
Categories tree
Requirements list
Requirement details panel
Search
Sorting
Filters
Bulk Actions
2. Create Requirement Categories
Categories help organize requirements into logical groups.
To create a category:
Go to the Categories section.
Click the ‘+’ button.
Enter the category title.
Save the category.
You can create nested categories up to 4 levels deep.
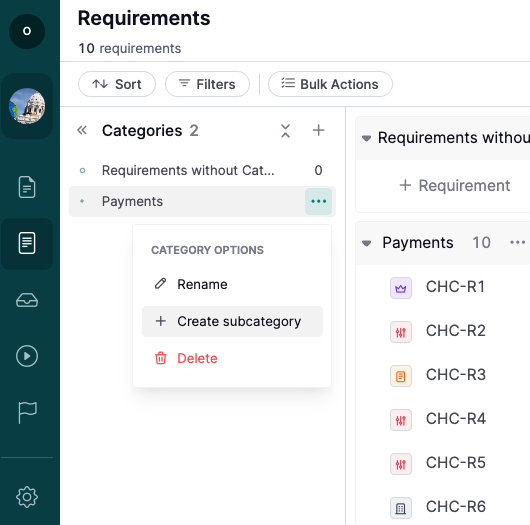
You can also:
Rename categories.
Create subcategories.
Rearrange categories with drag and drop.
Delete categories.
Note: Deleting a category does not delete the requirements inside it. Requirements are moved to the parent category or to ‘Requirements without Category’.
3. Create a Requirement
To create a requirement:
Select a category.
Click ‘+ Requirement.’
Enter the requirement title.
Click on the requirement to see Requirement Details.
In the Requirement Details set:
Requirement type
Requirement status
Add a description, tags, assignees, or attachments if needed.
Available requirement types include:
Epic
Feature
User Story
Use Case
Functional Requirement
Non-Functional Requirement
Business Requirement
Note: ‘User Story’ is the default requirement type.
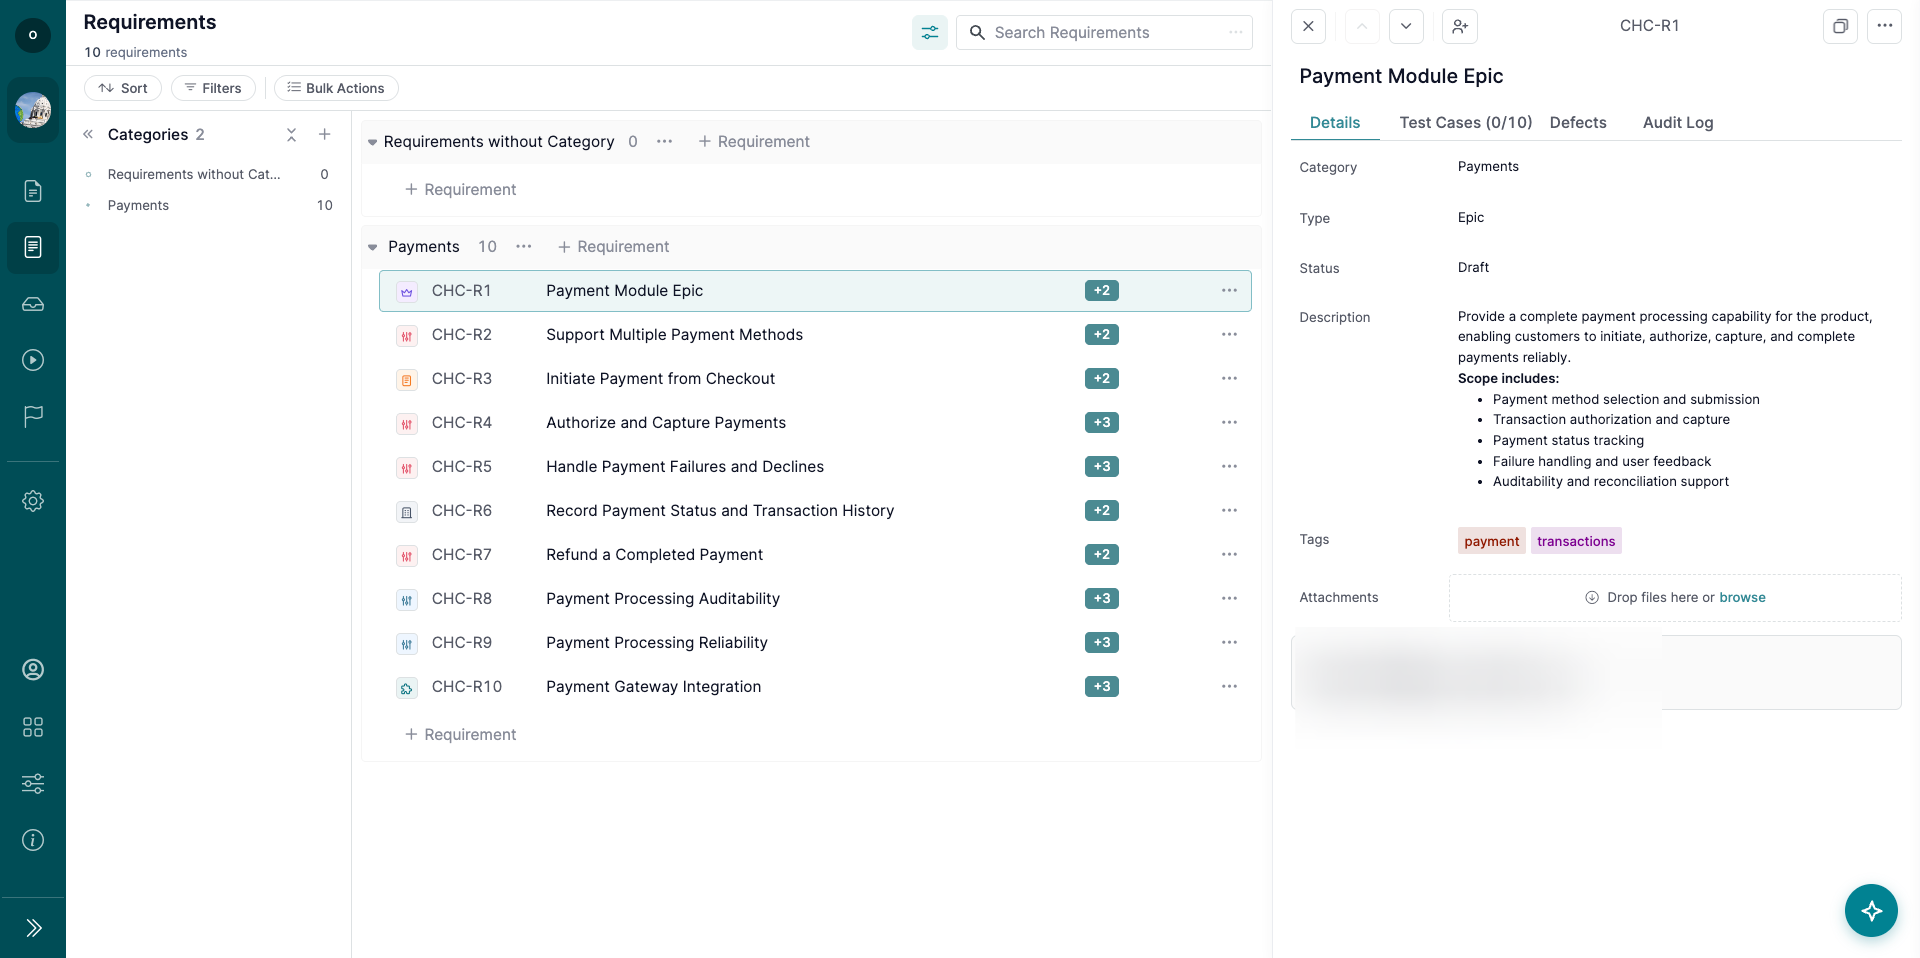
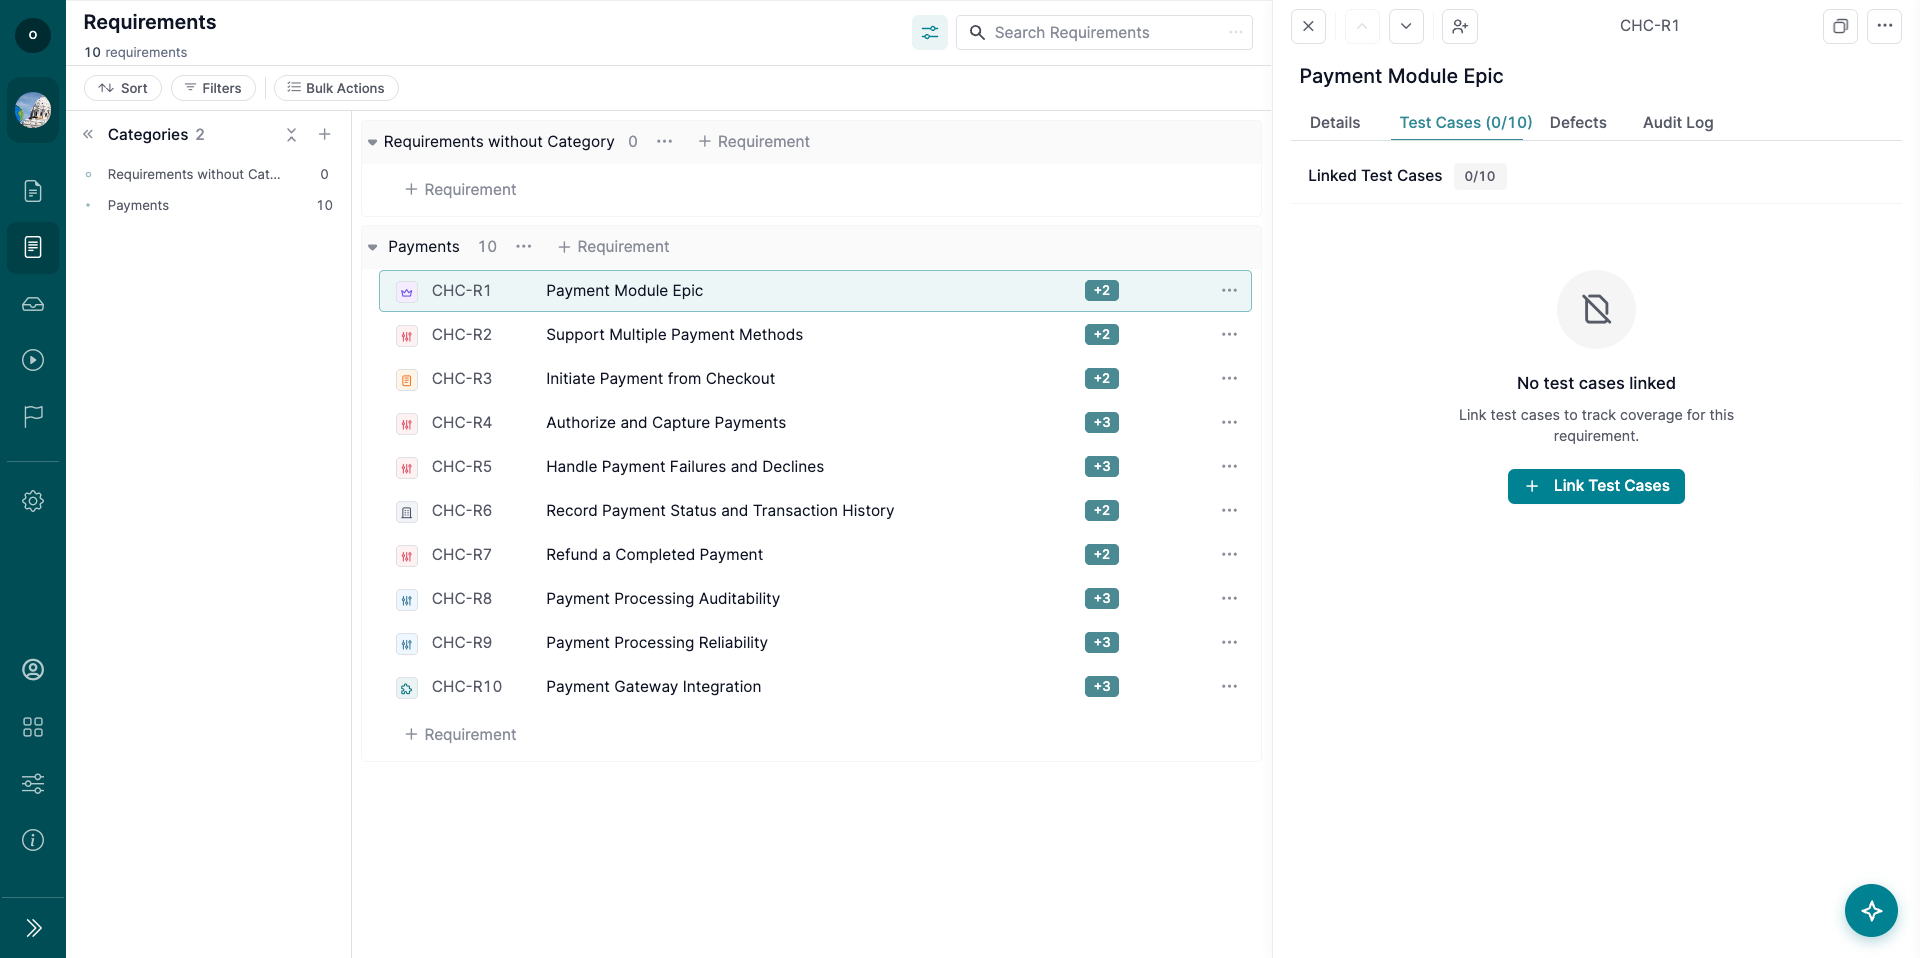
4. Manage Requirement Details
Click a requirement row to open the Requirement Details panel.
From the details panel, you can view and update:
Title
Category
Type
Description
Status
Tags
Assignees
Attachments
Metadata
The details panel also includes tabs for:
Details
Test Cases
Defects
Audit Log
Note: Requirement descriptions support plain text and markdown.
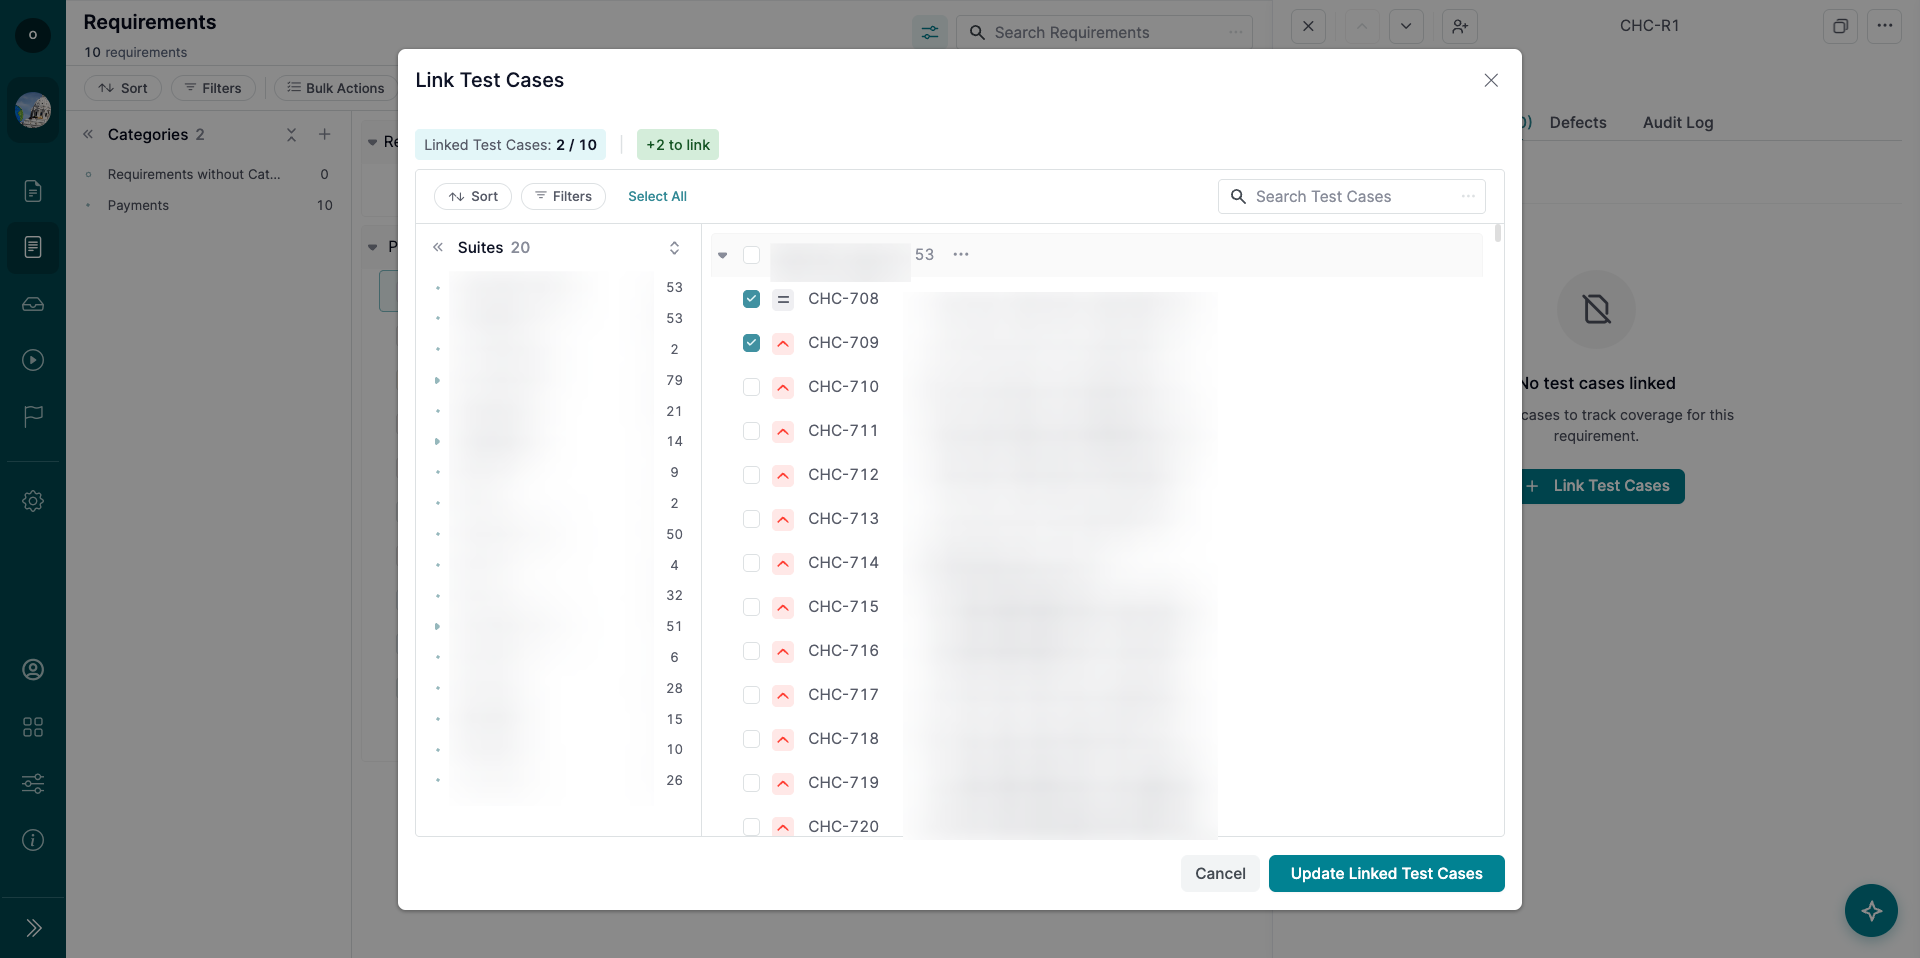
5. Link Requirements to Test Cases
Use the Test Cases tab to link requirements with related Test Cases.
To link Test Cases:
Open a requirement.
Go to the Test Cases tab.
Search for Test Cases by title or key.
Select the Test Cases you want to link.
Linked Test Cases are synchronized both ways. If you link a Test Case from the requirement, the requirement also appears in the Test Case’s Related Requirements field.
Note: Up to 10 Test Cases can be linked to one requirement.
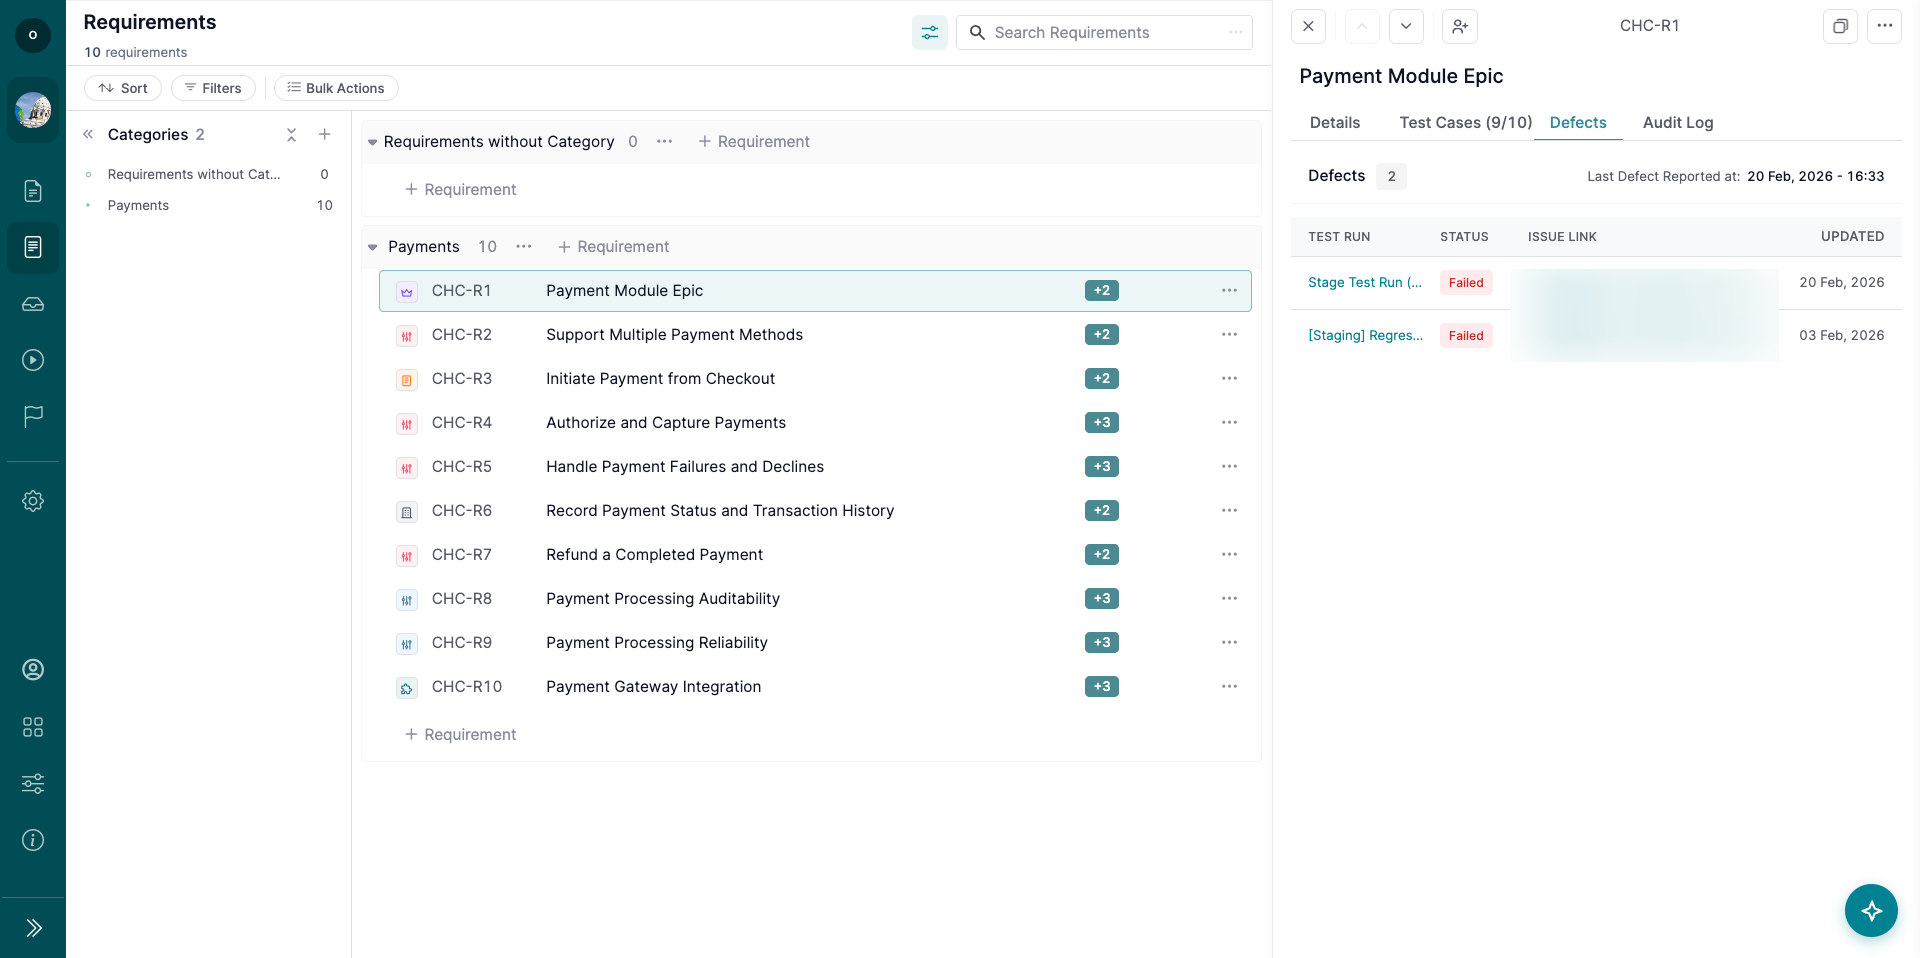
6. Track Defects from Linked Test Cases
The Defects tab shows defects connected to test results from linked Test Cases.
You can view:
Last tested date
Defect count
Test Run
Test Result status
External defect link
Timestamp
Use this tab to understand whether a requirement has known issues based on related test execution.
7. Use Requirement Filters and Search
Use filters to narrow down the Requirements list.
Available filters include:
Assignee
Category
Status
Type
Tags
Orphaned requirements
You can also search by:
Requirement title
Requirement key
Requirement details
Note: An orphaned requirement is a requirement that has no linked Test Cases.
8. Use Bulk Actions
Bulk Actions help update multiple requirements at once.
Available Bulk Actions include:
Edit
Duplicate
Delete
Assign
Status update
Bulk Actions follow the same behavior and confirmation patterns as Test Cases.
9. Import and Export Requirements
You can import requirements from CSV, including:
Categories
Requirement Title
Requirement Description
Status
Type
Tags
You can also export requirements to CSV.
10. View Requirement History
The Audit Log tab shows changes made to the requirement.
Tracked changes include:
Field updates
Status changes
Tag changes
Attachment changes
Test Case linking and unlinking
Requirement deletion and restoration
What’s Next?
Use Requirements to connect product scope with test coverage and execution results. For additional help, check related guides or contact support—we’re here to help!
Project Milestones help you organize Test Runs around release goals, testing windows, or QA deadlines. Use milestones to group related Test Runs, track progress, and quickly identify missed deadlines.
Milestones are optional. You can continue using Test Runs without milestones if your workflow does not require deadline tracking.
1. Create a Project Milestone
To create a milestone, you have to be a Project Administrator. Please follow the instructions:
Open your project.
Go to the Milestones page.
Click the ‘+ Milestone’ button.
Fill out the milestone details:
Title: Enter a clear milestone name.
Description: Add optional context, links, or release notes.
Start Date: Set the beginning of the testing window, if needed.
Due Date: Set the deadline for the milestone, if needed.
Test Runs: Select the Test Runs that should belong to the milestone. You'll be able to add Test Runs later.
Save the milestone.
Note: Project Milestones are created at the project level and do not apply across multiple projects.
2. Assign Test Runs to a Milestone
You can assign Test Runs to a milestone from:
The Milestone details page.
Test Run settings or Test Run details.
A milestone can include multiple Test Runs. Each Test Run can be assigned to one milestone at a time.
3. Understand Due Date Logic
If a milestone has a Due Date, assigned Test Runs inherit that due date.
When a Test Run inherits a due date from a milestone:
The due date is shown on the Test Run.
The due date is read-only on the Test Run.
The milestone is shown as the source of the due date.
If a Test Run is not assigned to a milestone, you can set a manual due date directly on the Test Run.
Note: If no milestone is assigned and no manual due date is set, the Test Run has no due date by default.
4. Track Missed Deadlines
A Test Run is considered missed when:
The due date has passed.
The Test Run is not Completed.
Missed deadlines are highlighted in the Test Runs list and on the Test Run details page.
If the due date comes from a milestone, the Test Run will show the milestone as the source.
5. View Milestone Progress
The Milestones list helps you monitor testing progress across time-bound goals.
The list includes:
Title
Start Date
Due Date
Test Run status summary
Completion progress
Test Runs count
Use filters to focus on milestones by status, date range, or missed Test Runs.
6. Open Milestone Details
The Milestone details page gives a full overview of milestone progress.
You can view:
Milestone title and status.
Start and due dates.
Total Test Runs list.
From the Test Runs section, you can open a Test Run, edit it, or remove it from the milestone.
7. Manage Milestones
Project Administrators can:
Edit milestone details.
Archive milestones.
Restore archived milestones.
Delete milestones.
Assign or remove Test Runs.
Other project roles have read-only access to milestones.
What’s Next?
Use Project Milestones to organize testing around releases, deadlines, or regression cycles. For additional help, check related guides or contact support—we’re here to help!
Integrate with Treeify - Streamline Test Case Creation
July 25, 2025
If you're looking to generate test cases using AI and send them directly to your TestCaseLab project, Treeify makes the process simple and effective. With Treeify’s AI-assisted workflows, you can create test scenarios in minutes — and with our integration, export them to your TestCaseLab workspace in just a few clicks.
This guide will walk you through how to connect Treeify to your TestCaseLab account and start exporting test cases right away.
What You'll Need
To export AI-generated test cases from Treeify to TestCaseLab, you’ll need:
API Token
Company ID
These three values are required to enable secure and accurate test case transfers. Follow the steps below to find them.
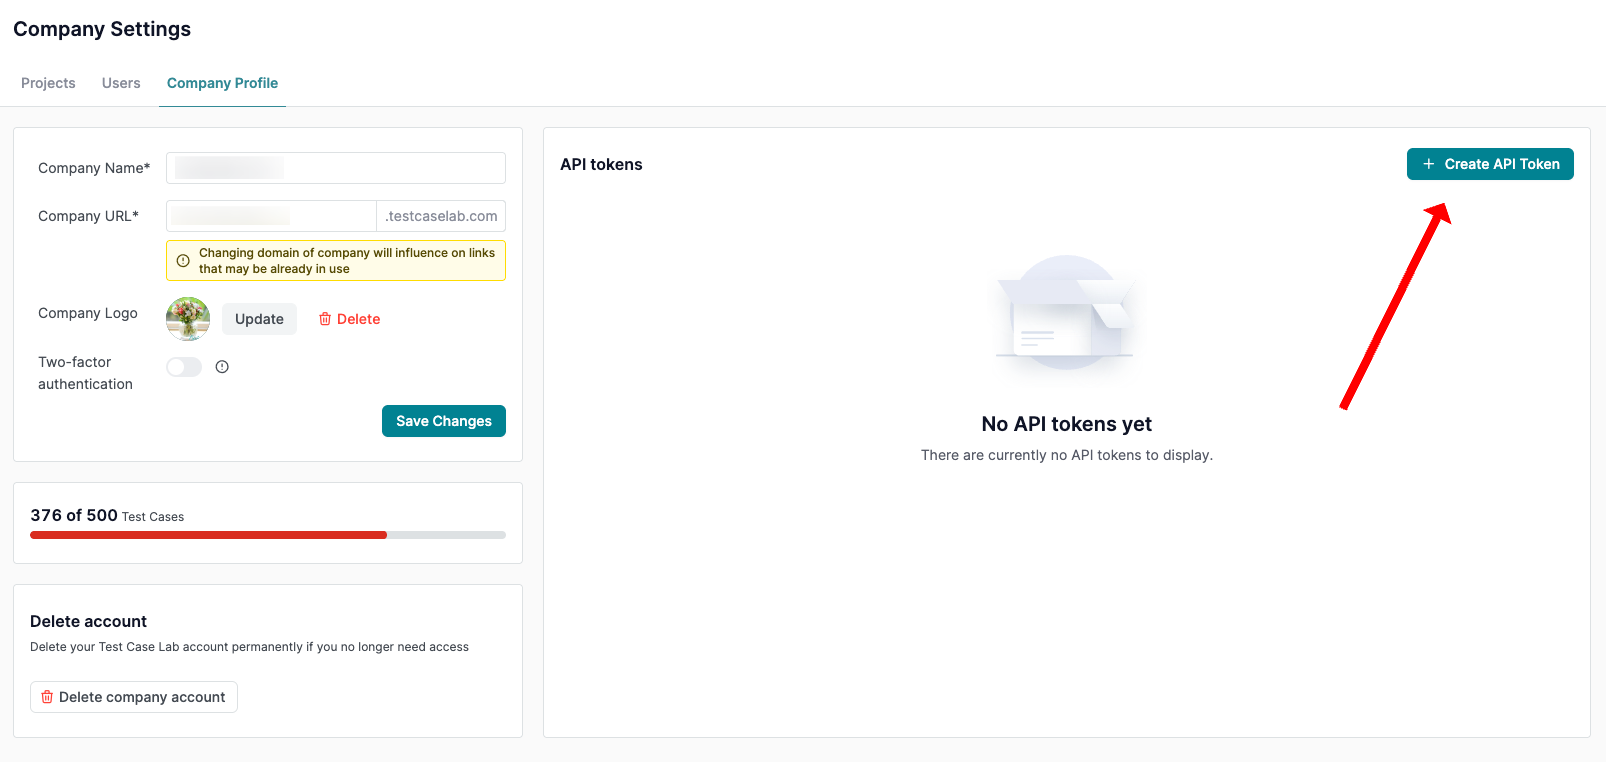
1. Get Your API Token
Ask your Company Admin in TestCaseLab to generate an API token.
Go to Company Settings > Company Profile.
Find the API Tokens section.
Create and copy the token.
API tokens allow you to integrate TestCaseLab with external tools like Treeify securely. Only Company Admins have access to manage them.
2. Find Your Company ID
You’ll use the API token with a tool like Postman to retrieve your Company ID.
Get Company ID
Send a GET request to:https://app.testcaselab.com/api/v2/companies
Include your API Token in the Authorization header:Authorization: Bearer YOUR_API_TOKEN
Example Response:
[
{
"id": 123,
"name": "Your Company Name",
"subdomain": "yourcompany"
}
]
Copy the id value — that’s your Company ID.
3. Connect Treeify and Start Generating Test Cases
Once you have all the data — API Token, Company ID — you are ready to start in Treeify.
Sign in to your Treeify personal account (note: company-wide accounts are not yet supported).
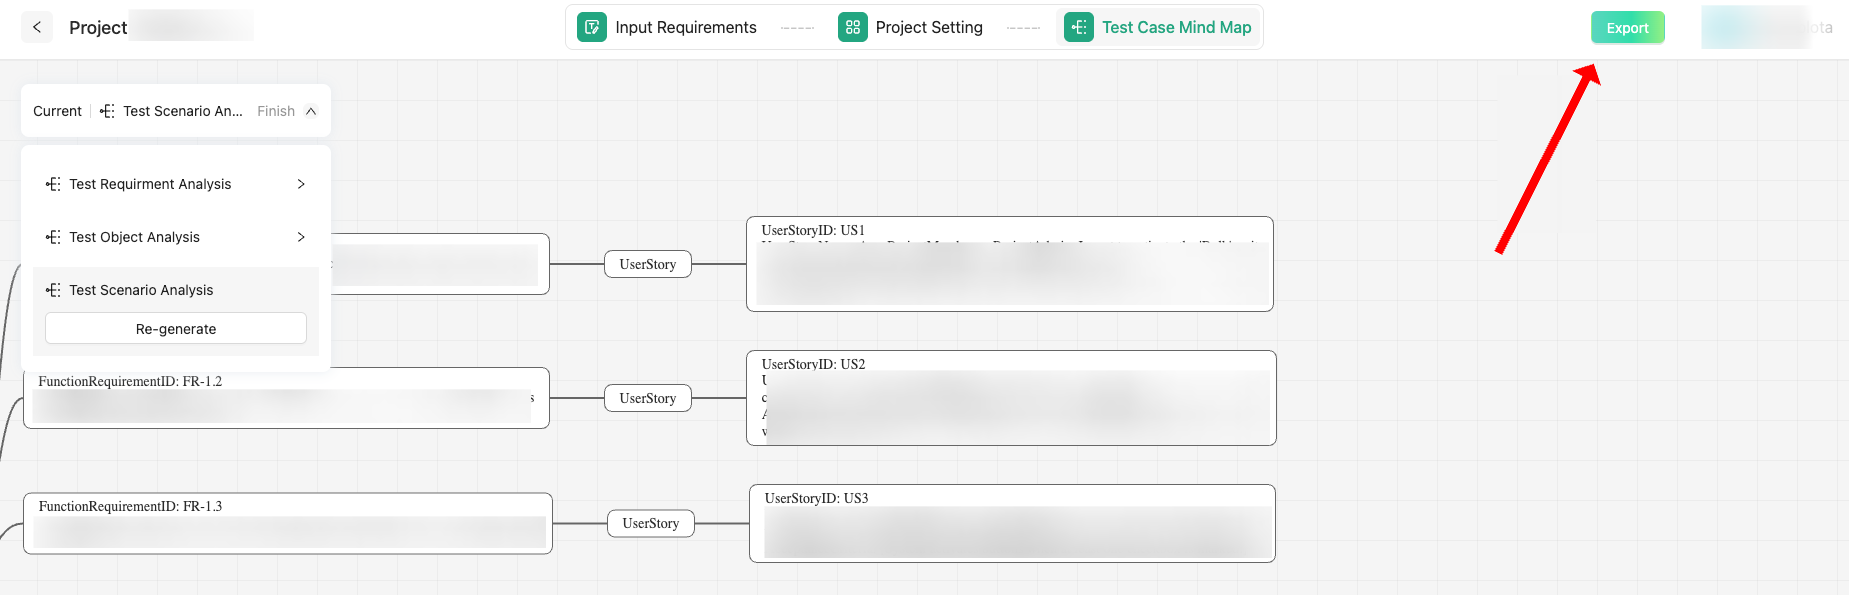
Generate test cases via Treeify
Navigate to the TestCaseLab export integration option.
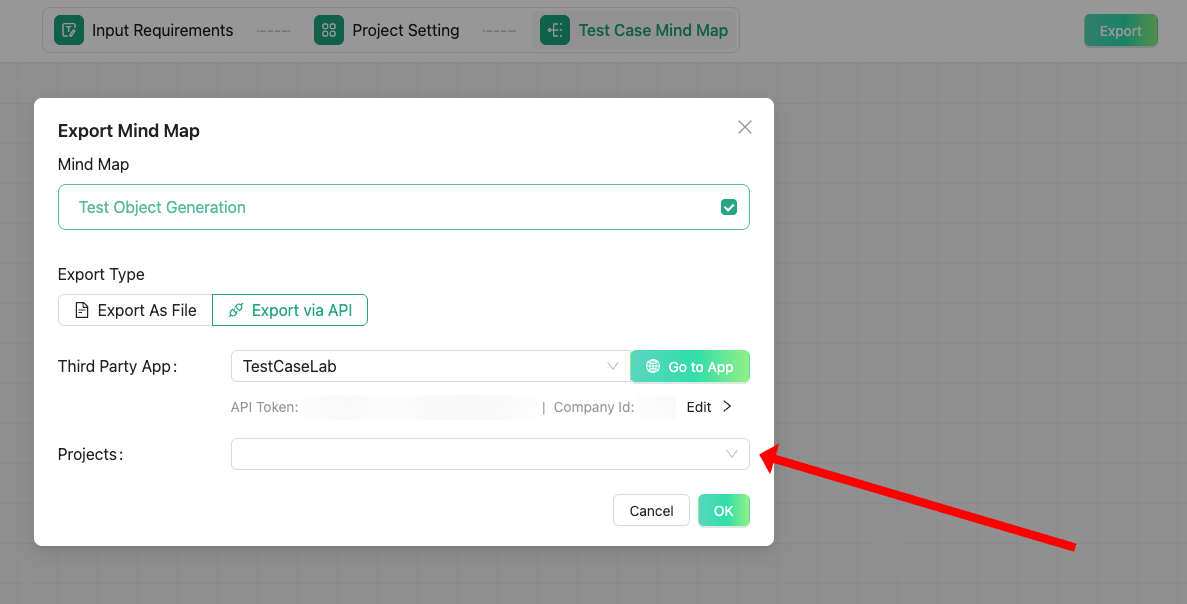
Input:
Your API Token
Your Company ID
Confirm and export them directly to your selected TestCaseLab project.
How to work with Treeify? Learn
here.
Good to Know
Treeify is currently free to use, making it an ideal time to try it out with your team.
Need help? You can request 1-on-1 onboarding or reach out via email or the Treeify Discord community.
To learn more about the API, refer to TestCaseLab’s API documentation in the Help Center.
You can report any issues directly via the “Report a Bug” feature in Treeify. Since the tool is still in beta, your feedback will help the team enhance the user experience.
Smarter Testing Starts Here
This integration bridges the power of Treeify’s AI-assisted test generation with the structure and collaboration features of TestCaseLab. Whether you’re refining test coverage or scaling your QA team’s workflow, this setup helps you do it faster and more intelligently.
Let your QA flow better — with AI and TestCaseLab.