please wait

Blog

Make the most out of your experience and check
articles about TestCaseLab functionality

blog image

Create & Manage a Test Plan - Build Your Testing Framework

calendar
December 4, 2024

Create a Test Plan

Creating a Test Plan allows you to organize and prepare reusable templates for efficient Test Runs. Follow these steps to set up a Test Plan for your project.

Learn what is a Test Plan here.

1. Go to the Test Plans Page

Navigate to the Test Plans page in your project.
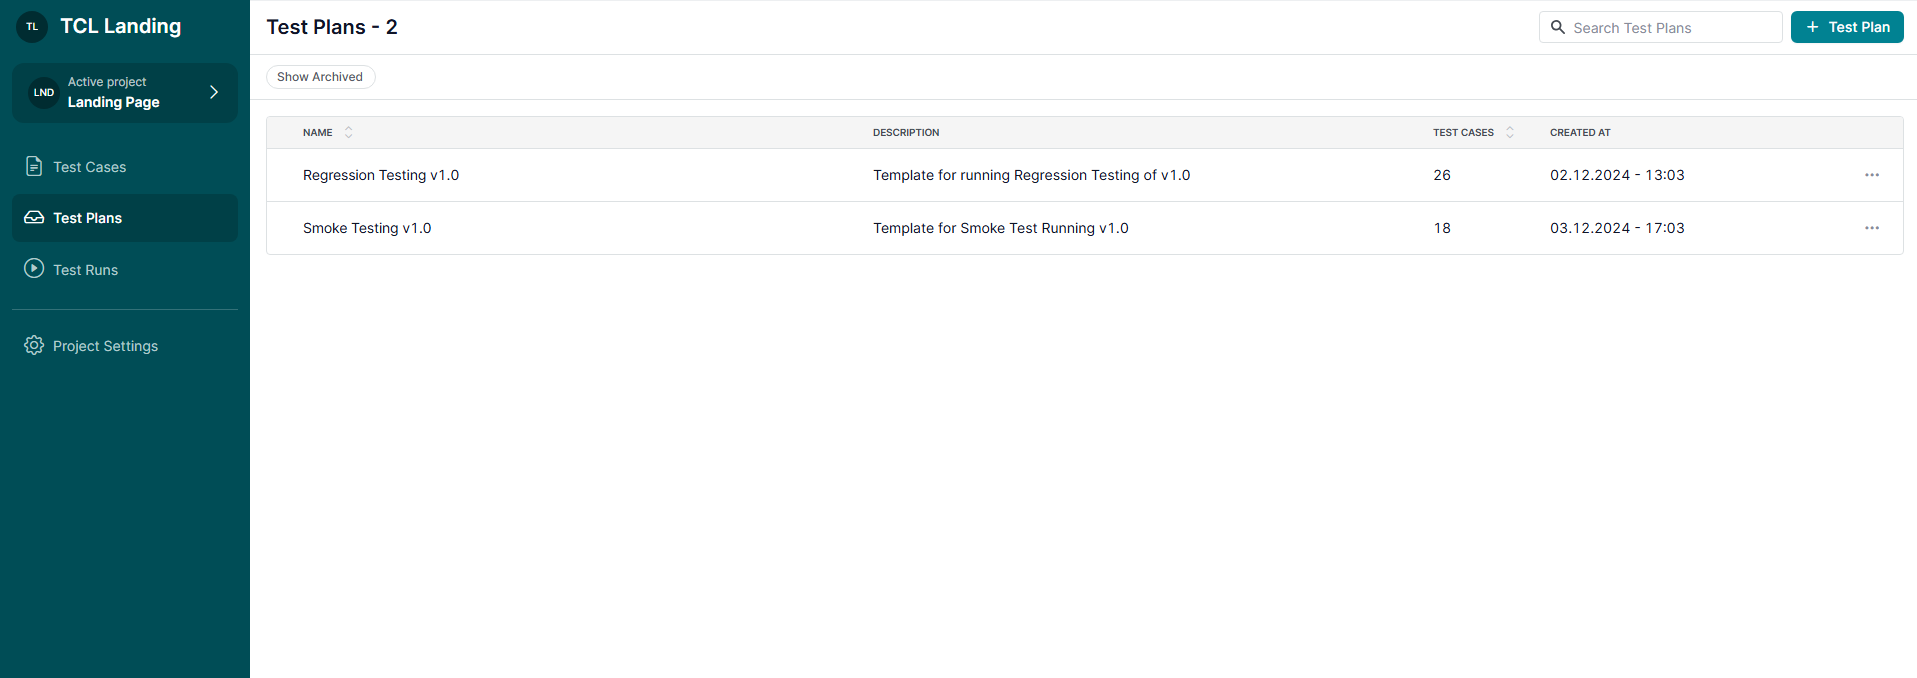
Test Plans

2. Click the '+ Test Plan' Button

Select the ‘+ Test Plan’ button to open the Test Plan creation form.

3. Fill Out the Test Plan Form

  • Title: Enter a unique and descriptive name for your Test Plan.
  • Description: Provide a brief description outlining the purpose or scope of the Test Plan.
  • Include Test Cases: Add the test cases you want to include.
    • You can update the Test Plan details and modify the included test cases at any time after creation.
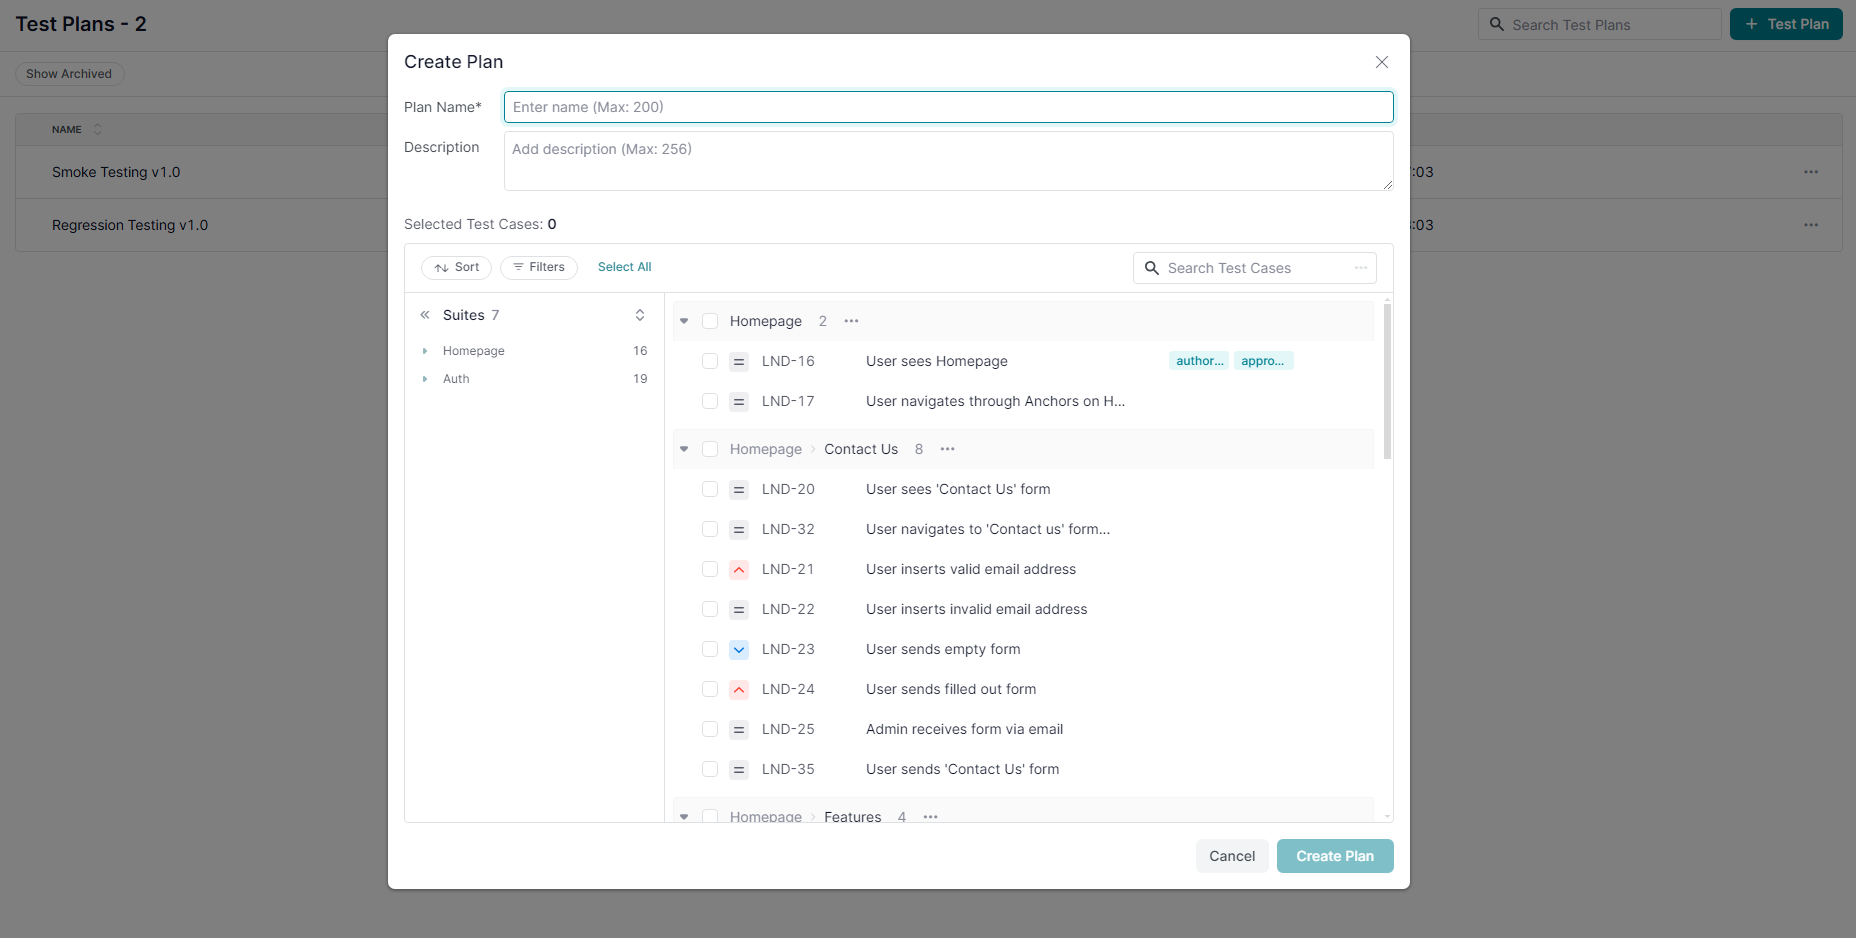
Create a Test Plan

Manage a Test Plan

Managing Test Plans allows you to customize test cases and adapt workflows to fit your testing needs. Follow this guide to efficiently manage and update Test Plans.

1. Test Plan View Modes

Test Plans display test cases in two modes for flexible management:

  • Grouped-by-Suite View Mode:
    • Test cases are grouped by Suites, reflecting the original project structure.
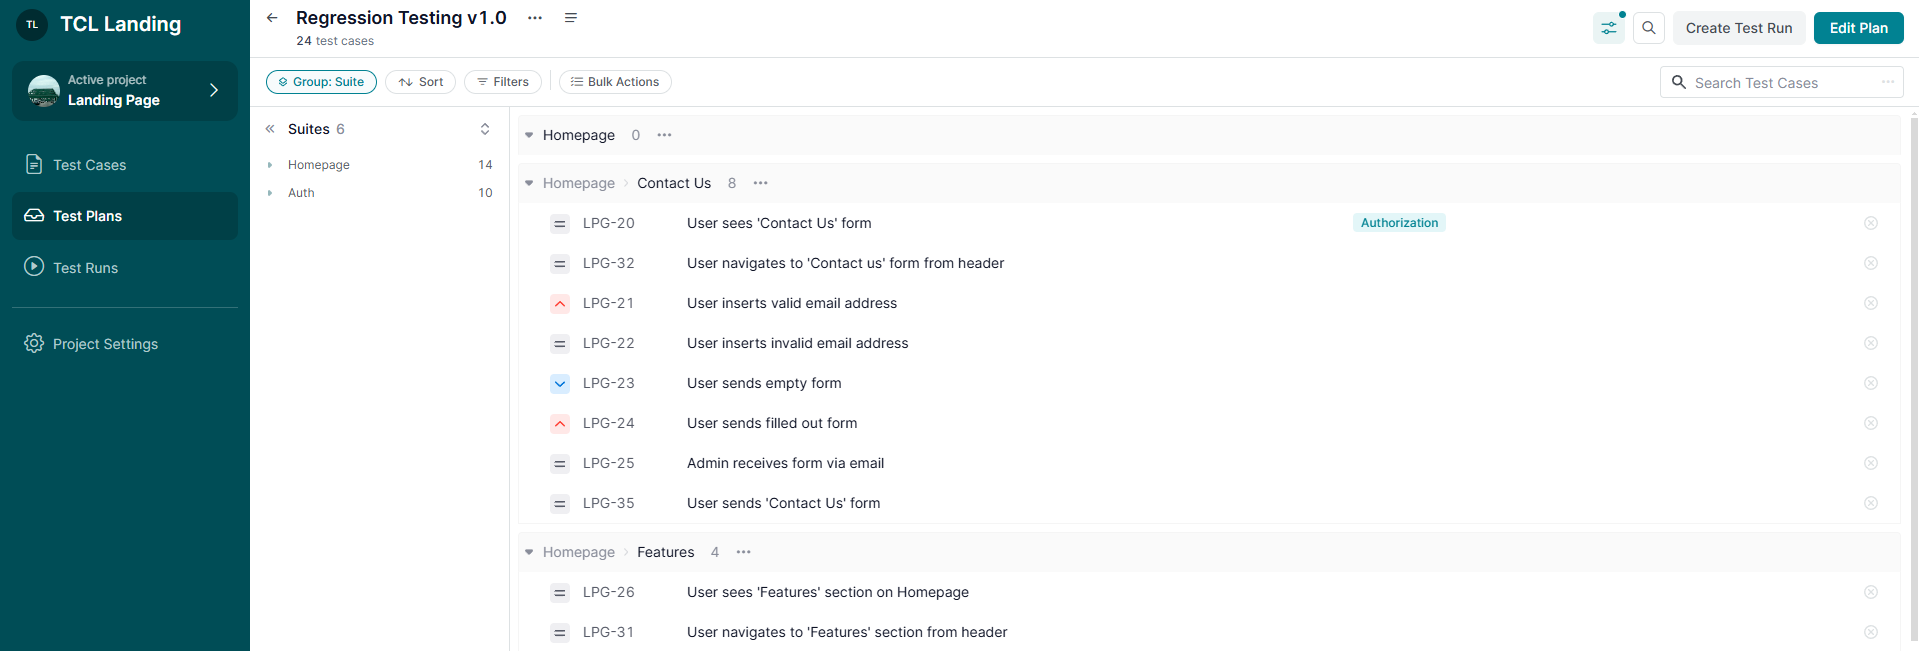
Grouped-by-Suite View Mode
  • Checklist View Mode:
    • Displays a flat list of test cases.
Checklist View Mode

2. Rearrange Test Cases

  • Grouped-by-Suite View Mode:
    • Test cases remain grouped by Suites.
    • Rearranging is limited to Project Administrators and impacts the project-wide arrangement (available from the Test Cases page).
  • Checklist View Mode:
    • Drag&drop test cases to reorder them for testing workflows (available for all Project Members).

Note: Changes in this view do not affect the original order in Grouped-by-Suite View Mode.
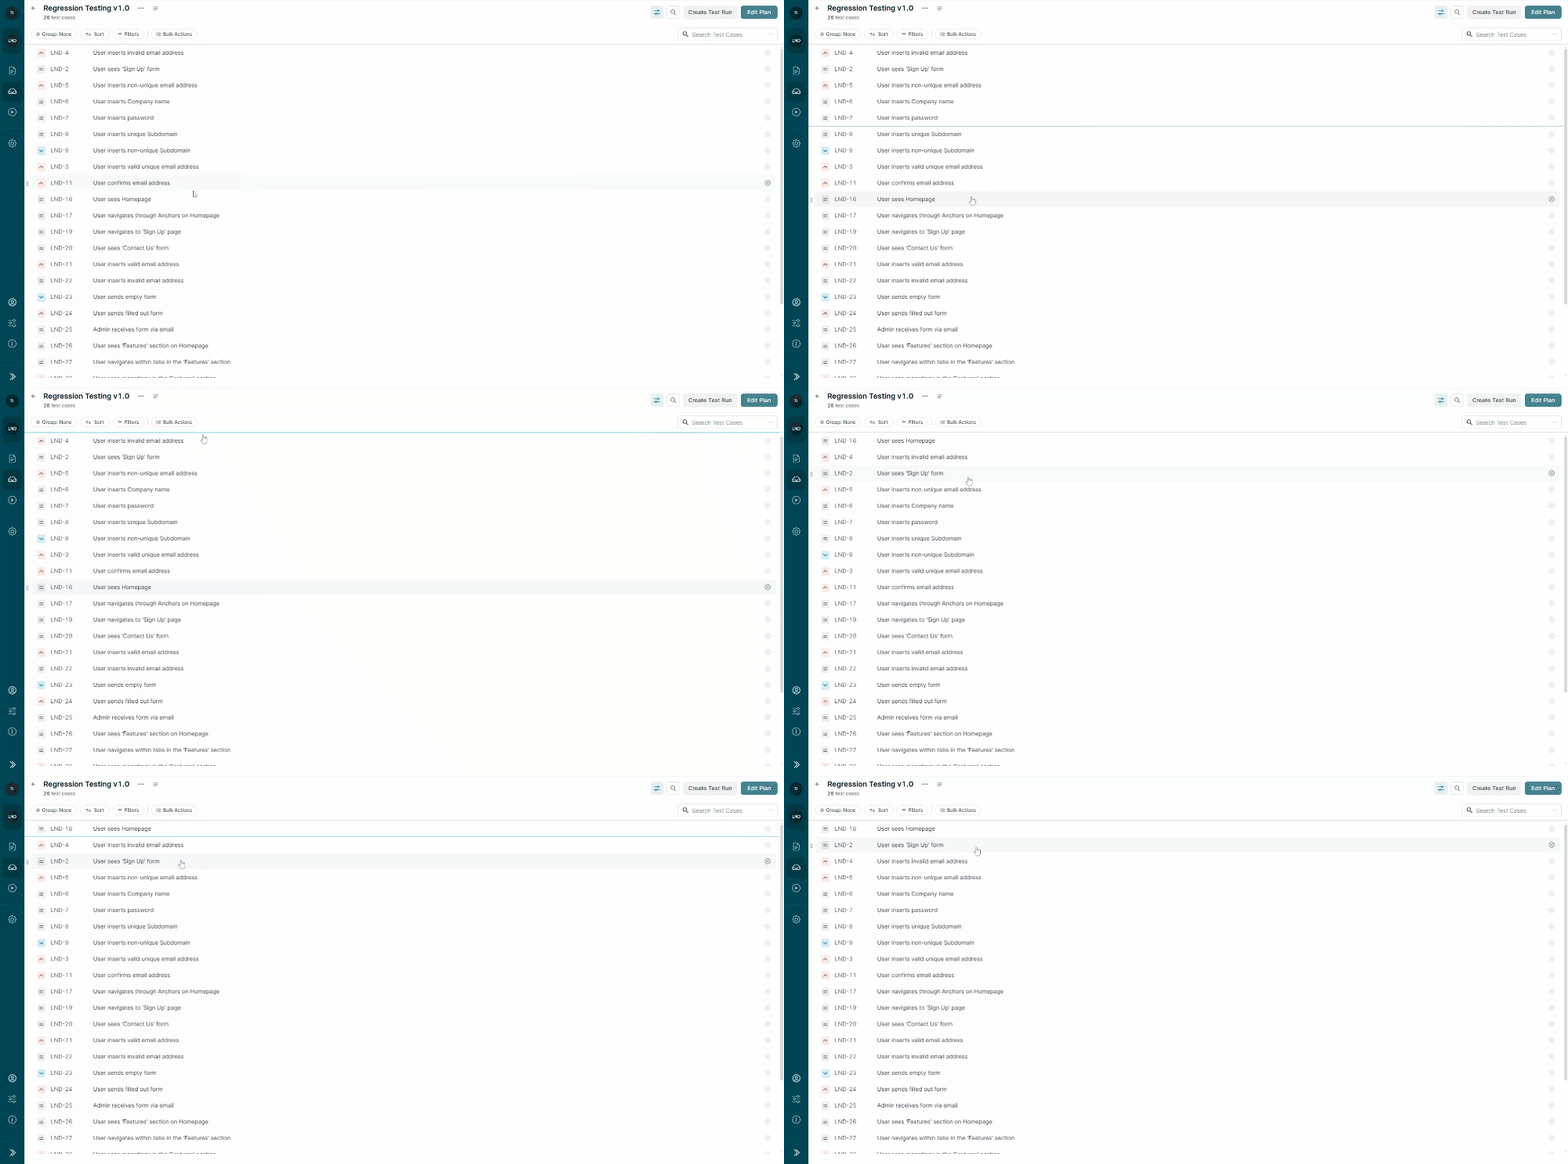
Drag&Drop Test Cases in a Checklist View Mode

3. Edit a Test Plan

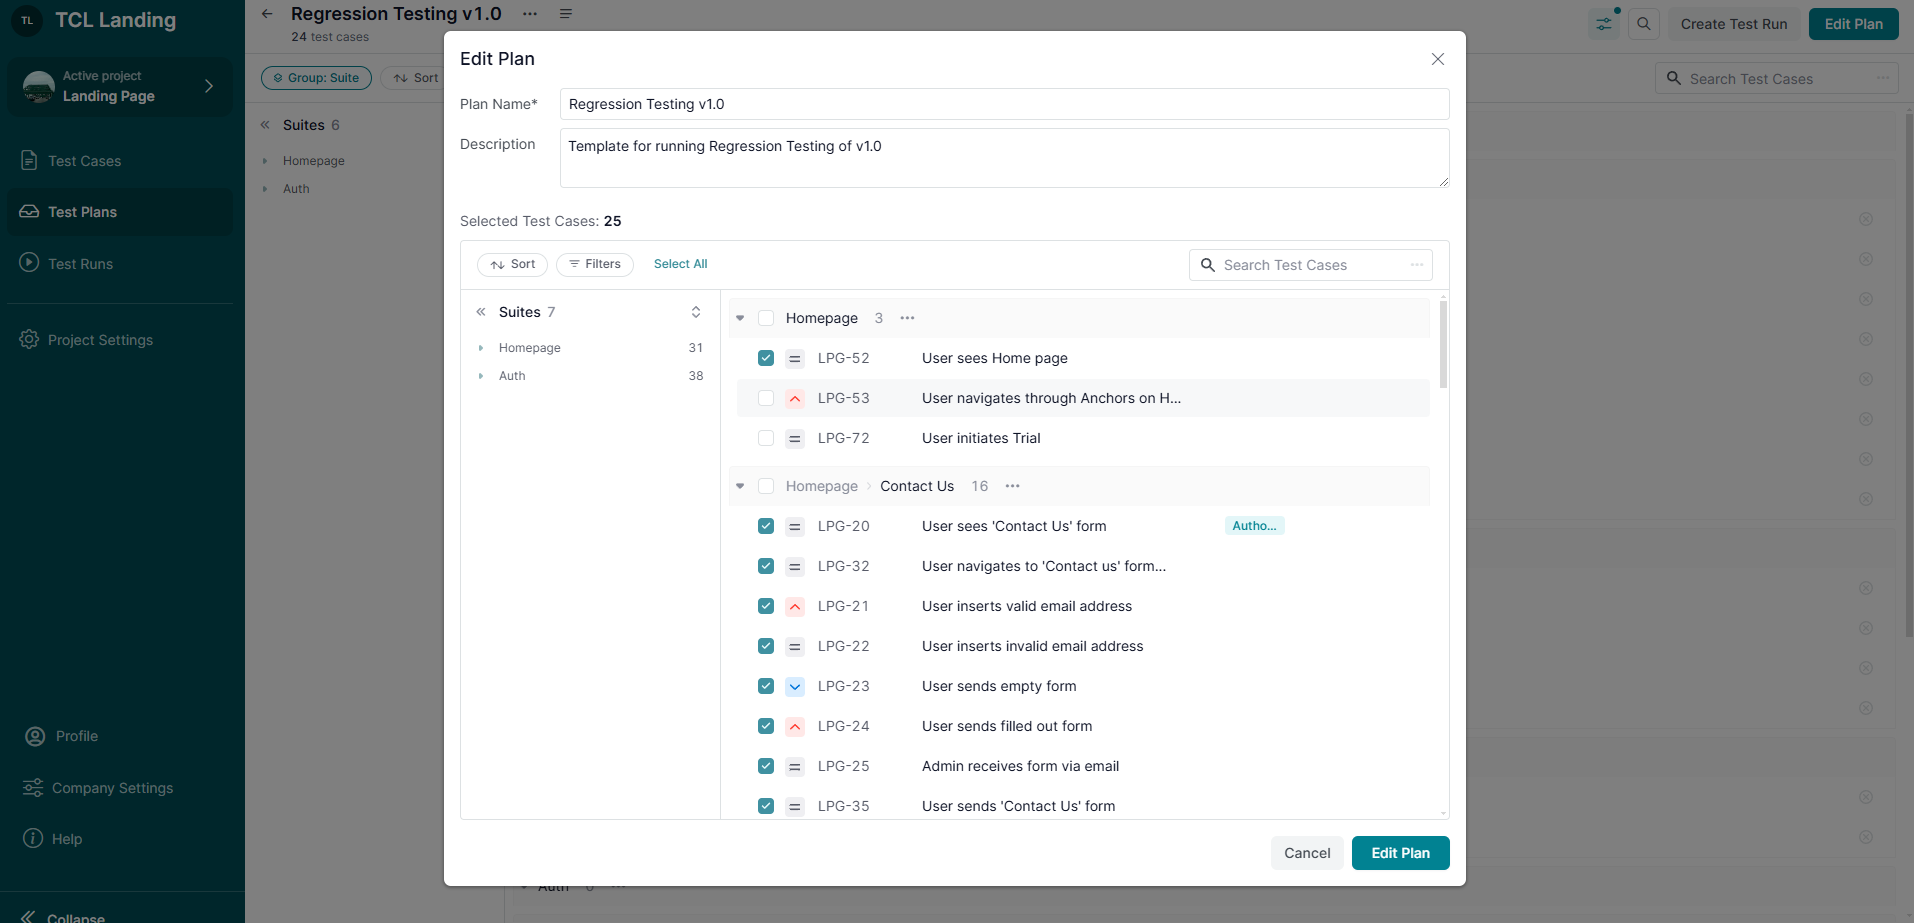
  • Open the ‘Edit Plan’ modal to:
    • Update the Title or Description of the Test Plan.
    • Include or exclude test cases to refine the content.

Note: New test cases added to a Test Plan will appear at the bottom of the list in the Checklist view mode.
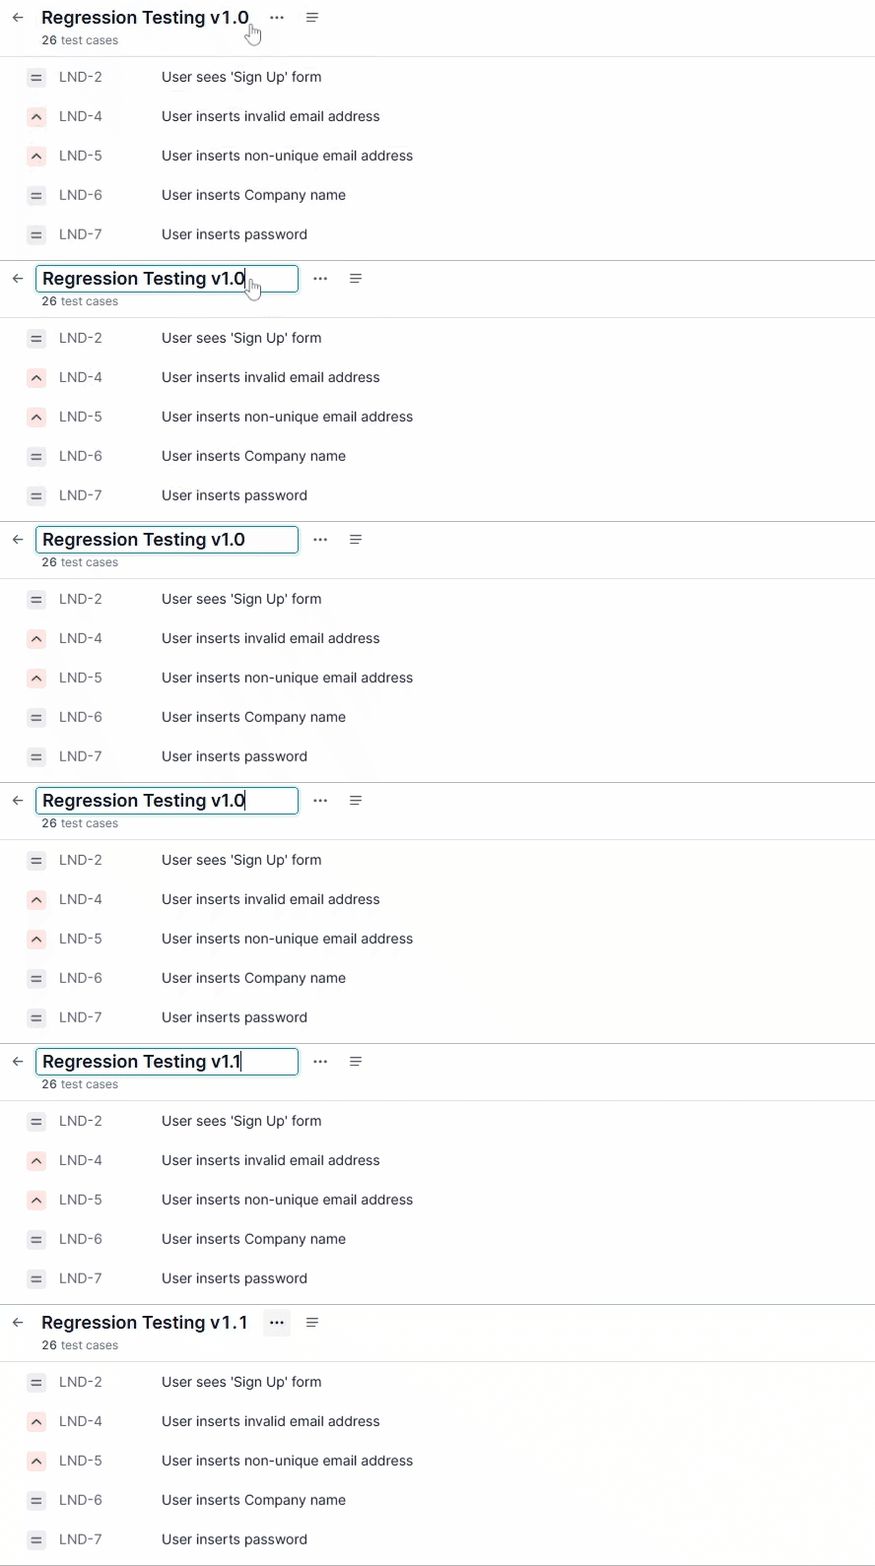
Quick Update a Test Plan title
Edit a Test Plan via Form

What’s Next?

Customizing Test Plans ensures your testing workflows are efficient and organized. For additional assistance, check related guides or contact support. We’re here to help!

arrow right
blog image

Manage a Test Plans List - Prepare for Organized Execution

calendar
December 4, 2024

Test Plans are reusable templates that streamline the preparation of Test Runs. Proper management of your Test Plans ensures your team stays organized and ready for efficient testing.

Learn what is a Test Plan here.

1. Create a Test Plan

  • Go to the Test Plans page.
  • Click the ‘+ Test Plan’ button to add a new Test Plan.
Create a Test Plan

2. Reorder Test Plans

Use drag&drop functionality to rearrange Test Plans and organize them as needed.

Drag&Drop Test Plans

3. Sort Test Plans

Sort Test Plans by:

  • Name
  • Amount of Test Cases included in the plan.

4. Archive and Restore Test Plans

  • Archive Test Plans: Temporarily remove Test Plans from active use.
  • Restore Test Plans: Bring archived Test Plans back into active use when needed.

5. Delete Test Plans

Permanently delete Test Plans that are no longer required.

Note: Deleted Test Plans cannot be restored.

6. Duplicate Test Plans

Create a copy of an existing Test Plan to reuse its structure and included test cases for planning new testing activities.

7. Export Test Plans

Export a Test Plan to a CSV file for:

  • Sharing with team members.
  • Creating a backup.

Note: Exported files can be imported back into the same project or another project.

Learn more about importing Test Cases here.

Test Plan's Options

8. Use Bulk Actions

Bulk Actions help you manage multiple Test Plans at once.

To use Bulk Actions:

  • Click on 'Bulk Actions' to see checkboxes next to each Test Plan
  • Select one or more Test Plans using the checkboxes in the list.
  • The ‘Bulk Actions’ menu will appear.
  • Choose the action you need.

Available Bulk Actions for Test Plans:

  • Archive
  • Unarchive
  • Delete
  • Export to CSV
  • Duplicate
  • Create Test Run

Note: You can select up to 1000 Test Plans in one bulk action.

What’s Next?

By managing your Test Plans effectively, you ensure that your team has well-organized templates ready for efficient Test Run creation. For further assistance, check out related guides or contact support—we’re here to help!
arrow right
blog image

What is a Test Plan in TestCaseLab - Plan for Consistent Testing

calendar
December 4, 2024

A Test Plan in TestCaseLab is a reusable template that organizes a specific set of test cases for streamlined testing activities. It acts as a blueprint for creating Test Runs, enabling teams to prepare structured and repeatable test case groups efficiently.

  • Simplify Test Run preparation by pre-organizing test cases.
  • Maintain consistency in test case selection and order across different Test Runs.
  • Ensure a structured testing approach, minimizing the risk of missing critical areas.
Test Plan

Key Features of a Test Plan

1. Purpose

A Test Plan defines a collection of test cases that are executed together during a Test Run.

Learn what is a Test Run here.

2. Reusability

Test Plans serve as reusable templates, allowing you to:

  • Use the same Test Plan to create multiple Test Runs.
  • Avoid the need to reselect or rearrange test cases for each new Test Run.

3. Customization

Customize Test Plans by:

  • Adding Test Cases: Include test cases relevant to the testing objective.
  • Updating Details: Modify the Test Plan’s title, description, or included test cases anytime.
  • Reordering Test Cases: Arrange test cases in Checklist View Mode using drag-and-drop for a custom sequence without altering their order in a Grouped-by-Suite View Mode.

4. Organization

Group test cases logically within Test Plans, often by features, components, or testing phases, to enhance organization and clarity.

5. Integration with Test Runs

Test Plans serve as the foundation for Test Runs, simplifying preparation by providing a pre-arranged set of test cases.

Read more about creating Test Runs based on Test Plans.

Create a Test Run based on a Test Plan

6. Flexibility in View Modes

Test Plans offer two modes for working with test cases:

  • Grouped-by-Suite View Mode:
    • Displays test cases grouped by Suites, reflecting the original project structure established on the Test Cases page.

Note: Only Project Administrators can rearrange test case ordering in this view mode (from the Test Cases page).

Grouped-by-Suite View Mode
  • Checklist View Mode:
    • Provides a list of test cases without grouping by Suites.
    • Allows any Project Member to reorder test cases via drag&drop for convenience.

Note 1: Rearranging test cases in the Checklist view mode in the specific Test Plan does not impact the original ordering of the test cases in the Grouped-by-Suite view mode. 

Note 2: Rearranging test cases in the Checklist view mode doesn’t affect the ordering of the test cases in other Test Plans.

Note 3: Rearranging test cases in the Checklist view mode doesn’t affect the ordering of the test cases in Test Runs created based on this Test Plan before this update.

Checklist View Mode

7. Reporting Compatibility

  • Export Test Plans to CSV files for sharing or backup purposes.
  • Imported files can be reused within the same project or transferred to another project.
Export a Test Plan

What’s Next?

For more information, check related guides or contact support—we’re happy to assist!

arrow right
blog image

Manage a Test Cases List - Keep Your Repository Organized

calendar
December 4, 2024

The Test Cases page is your central hub for creating, organizing, and maintaining test cases within a project. Follow this guide to manage and update your test cases effectively.

Learn what is a Test Case here.

1. Rearrange Test Cases

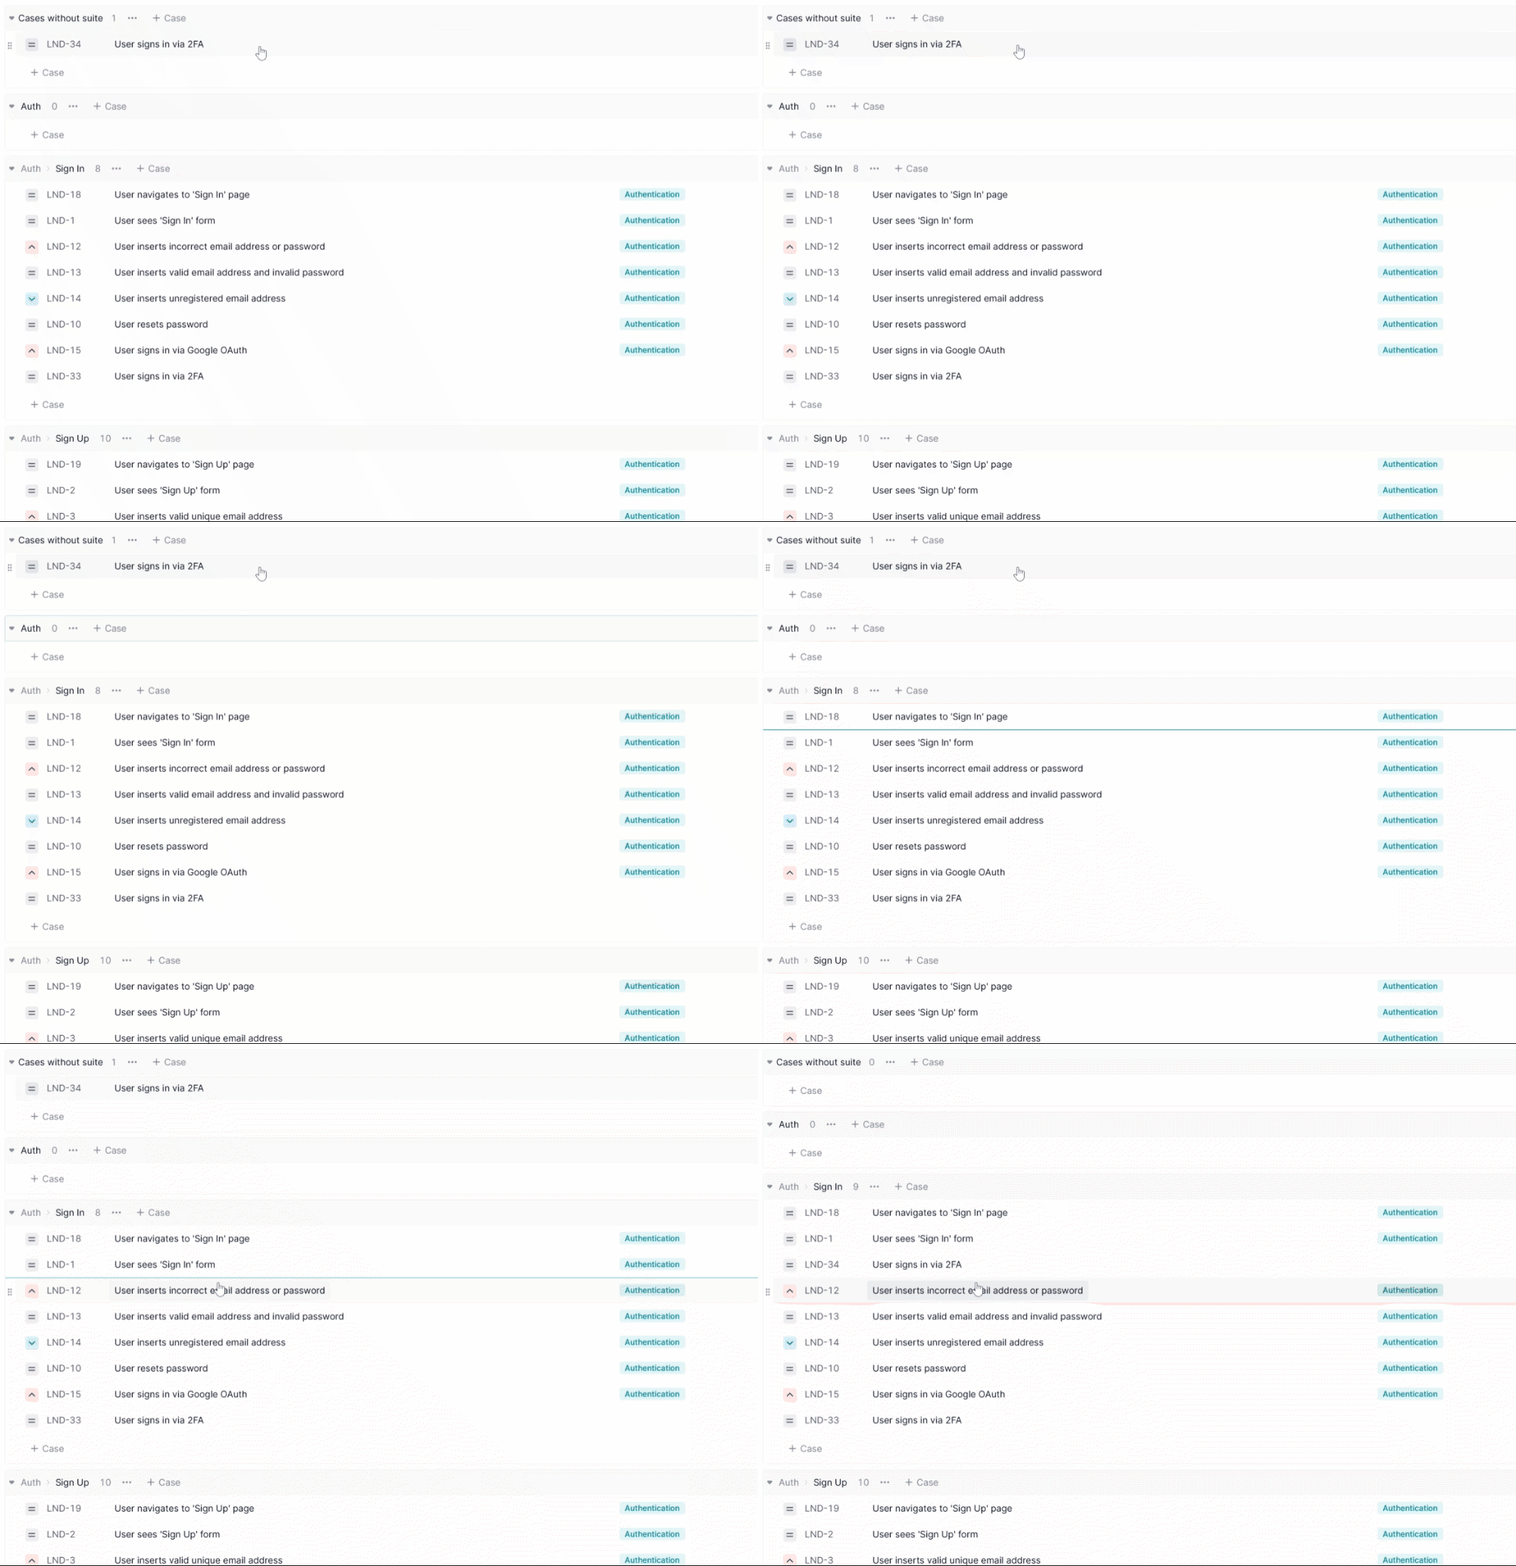
Test cases are grouped by suites in the list, and their order within a suite can be changed via drag&drop to ensure a logical sequence of test cases within this suite. Rearranging test cases using drag&drop affects the default sorting (when no sorting is applied), ensuring a consistent structure across the team.

Note: Only Project Administrators can drag and drop test cases to rearrange them within the list.

Drag&Drop Test Cases

2. Sort Test Cases

  • Click the ‘Control Panel’ button in the header and click the ‘Sorting’ button
  • Sort the test cases list by:
    • Title
    • Creation Date and Time
    • Last Update Date and Time

Note: Sorting is applied within each Suite separately.

'Control Panel' button
Sort Test Cases

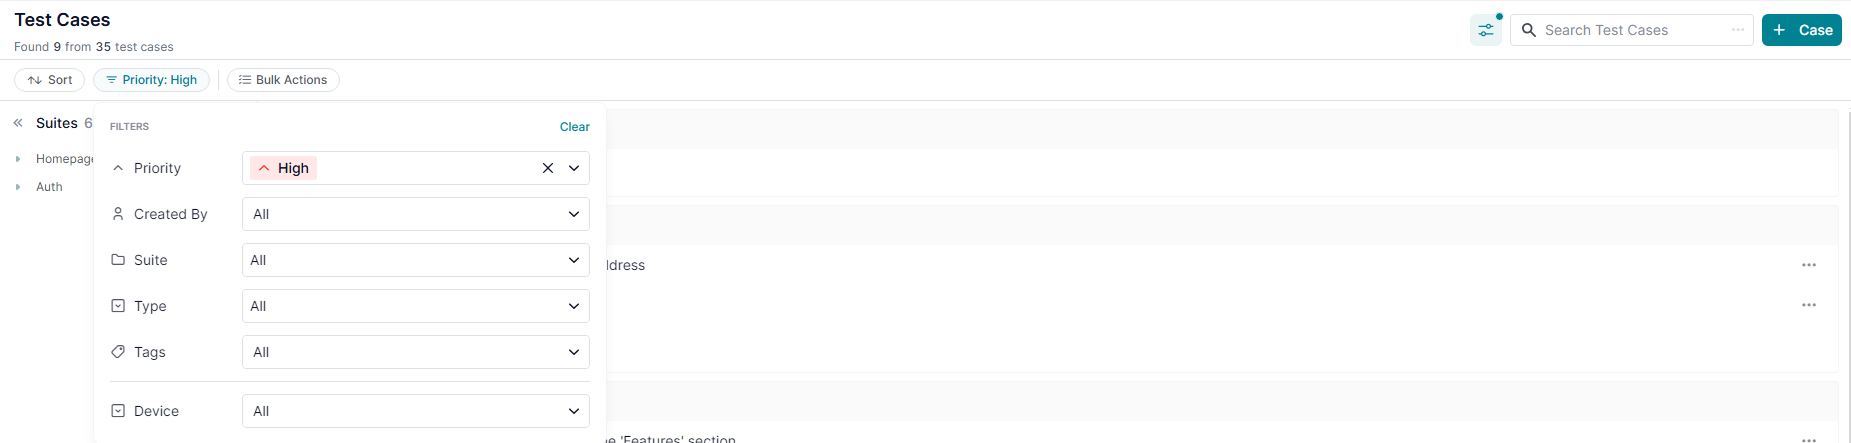
3. Filter Test Cases

  • Click the ‘Control Panel’ button in the header and click the ‘Filters’ button
  • Apply filters to narrow down the list based on:
    • Priority
    • Creator
    • Suite
    • Type
    • Tags
    • Custom Dropdown Field

Note: Click on a tag in the Test Cases List or Test Case Details to filter by it directly.

Filter Test Cases

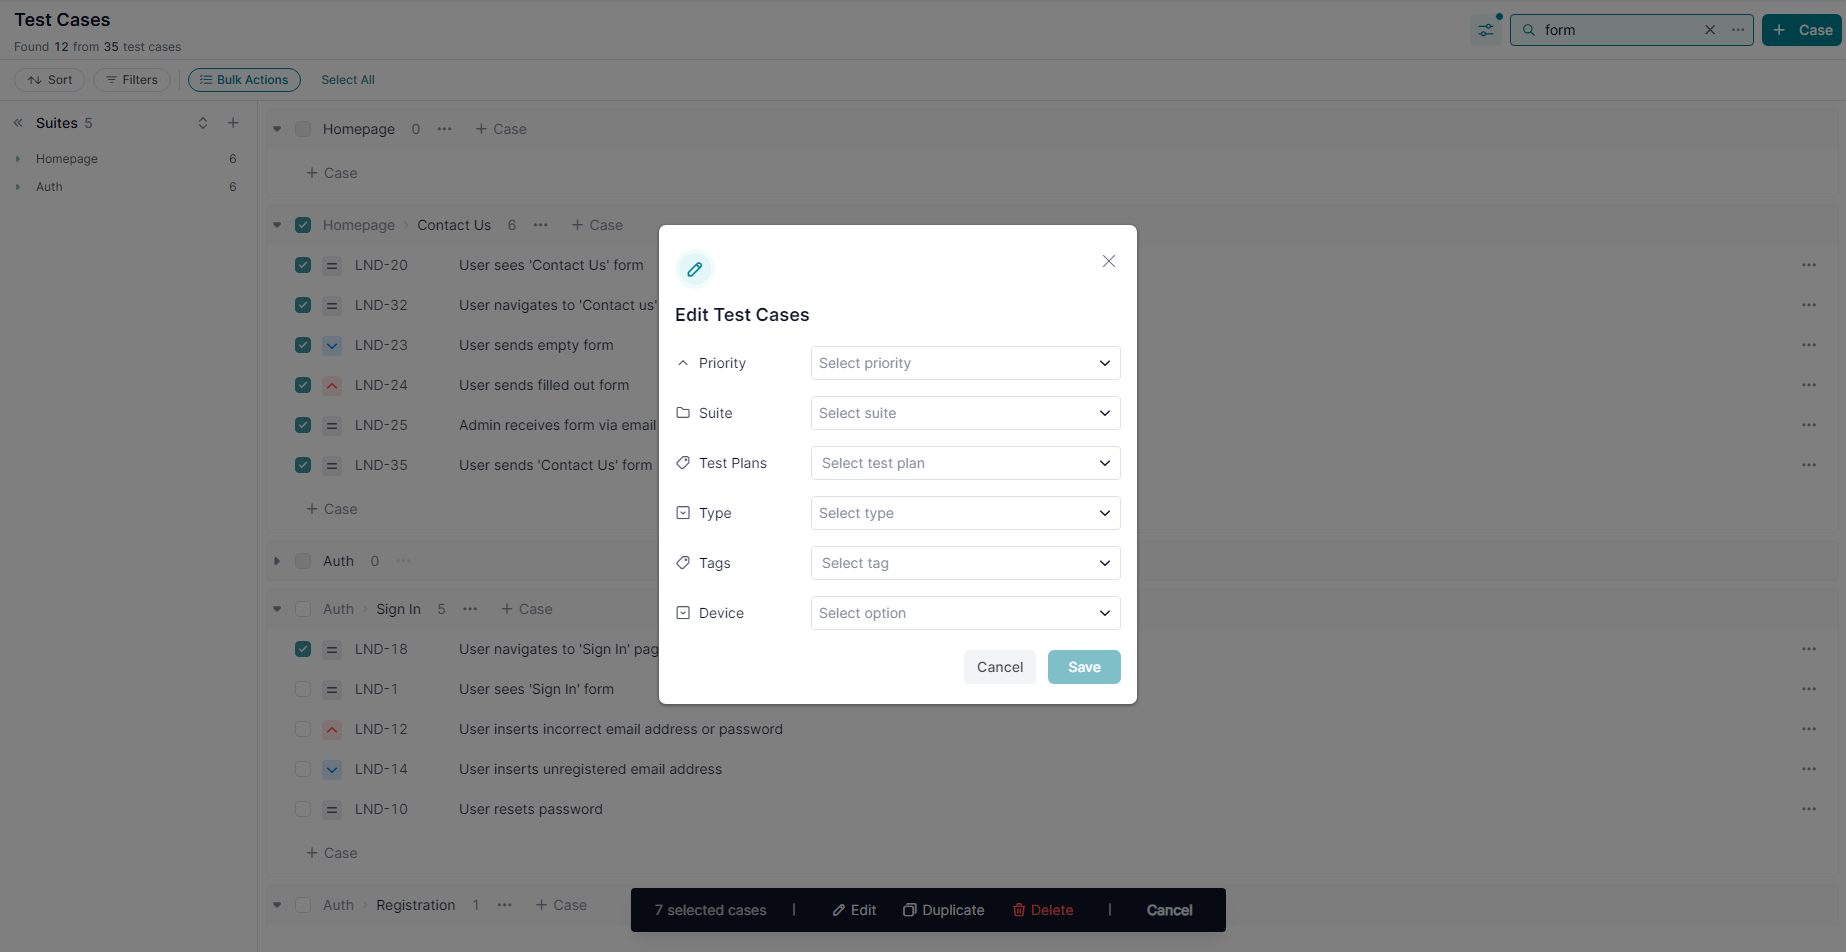
4. Bulk Manage Test Cases

  • Activate Bulk Select Mode: Click the ‘Control Panel’ button in the header and click ‘Bulk Actions’ to enable selection.
  • Select Test Cases:
    • Check the box next to individual test cases.
    • Select all test cases within a Suite by checking the Suite’s box.
    • Use ‘Select All’ to choose all test cases in the project.
  • Bulk Actions Available:
    • Bulk Update: Change or erase values for fields such as
      • Priority
      • Suite
      • Test Plans
      • Type
      • Tags
      • Custom Dropdown Fields.
    • Bulk Duplicate: Create copies of selected test cases.
    • Bulk Delete: Remove multiple test cases.

Note: Deleted test cases can be restored from the Dashboard > Activity Stream by clicking ‘Undo’ for each deletion entry.

Bulk Update Test Cases

5. Search the Test Cases List

Search by Test Case Title, Test Case Details, or both simultaneously to quickly locate relevant test cases.

Search Test Cases

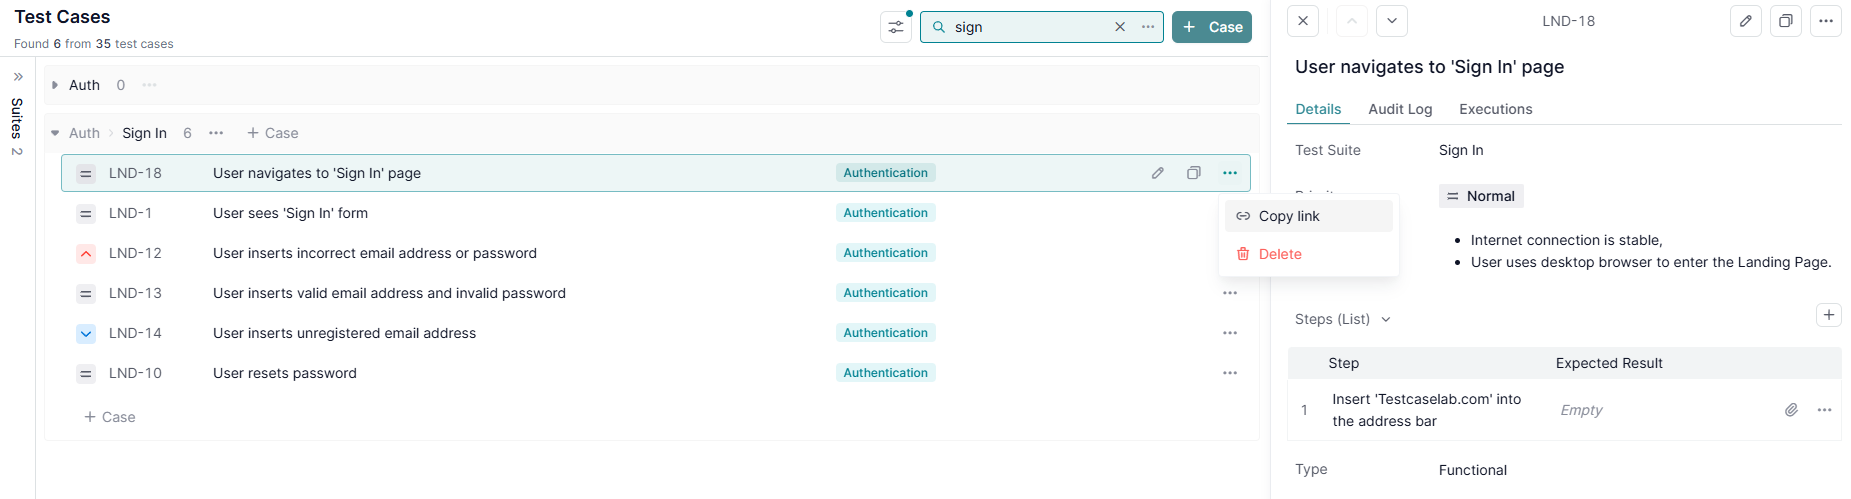
6. Copy Test Case Links

Click the ‘Copy link’ button for the Test Case in the Test Cases List or Test Case Details to share a direct link with team members.

Copy Link to Test Case

7. Duplicate a Test Case

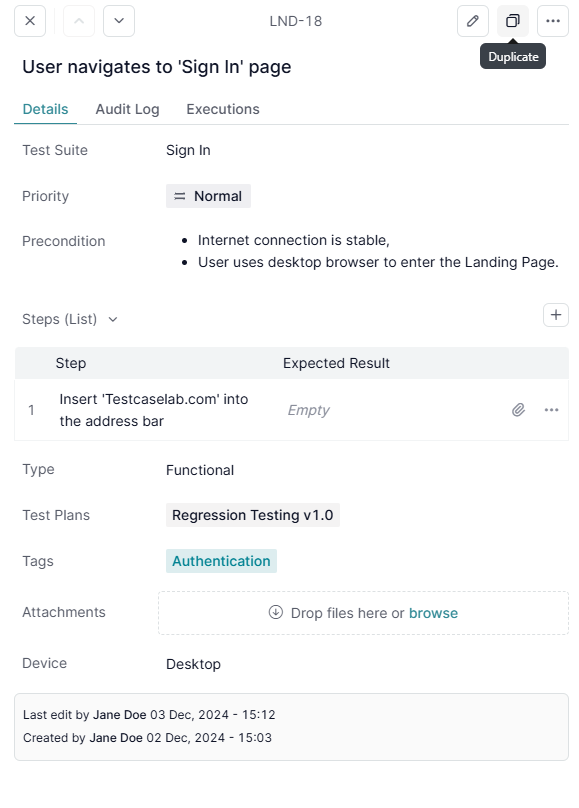
Use the ‘Duplicate’ button for the Test Case in the Test Cases List or Test Case Details to duplicate a single test case.

Duplicate a Test Case

What’s Next?

Efficiently managing the test cases list helps your team navigate and update test cases quickly. For further assistance, check related guides or contact support—we’re here to help!

arrow right
blog image

Create & Manage Suites - Group and Structure Your Test Cases

calendar
December 4, 2024

Suites are essential for organizing your test case repository into logical categories. With up to 4 levels of subsuites, you can structure your test cases to align with your project’s needs.

Learn what is a Suite here.

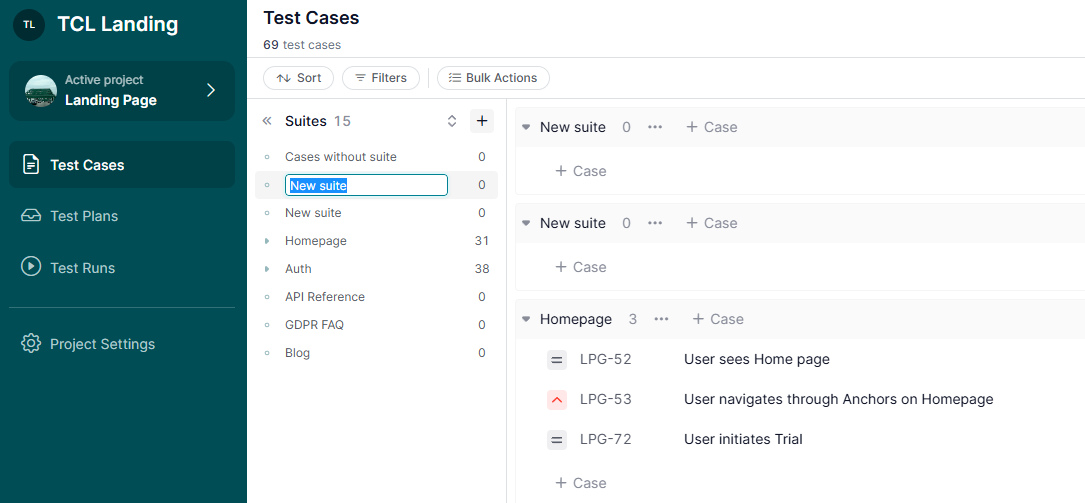
1. Create a Suite

  • Navigate to the Test Cases page.
  • Click the ‘+’ button in the Suites section to add a new Suite.
Create a Suite

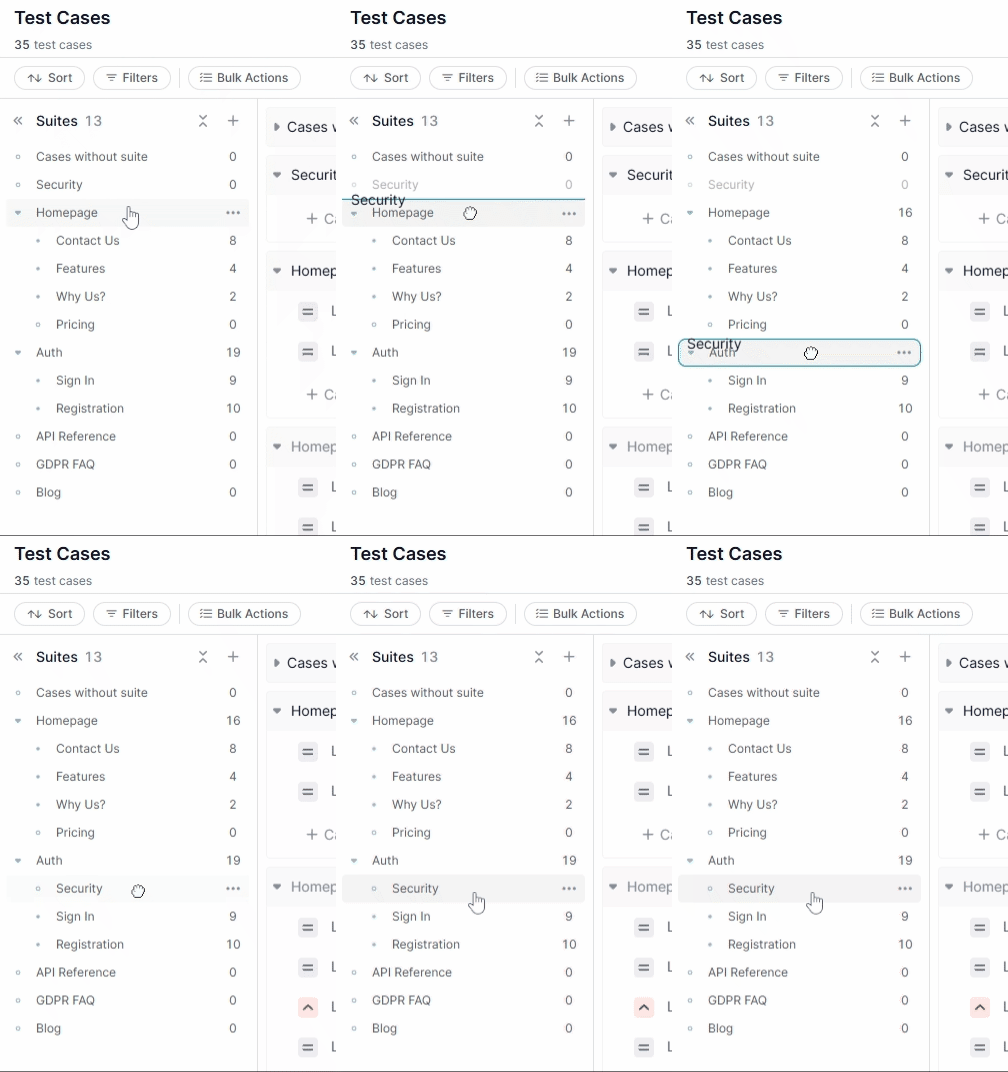
2. Restructure Suites

Use drag-and-drop in the Suites section to rearrange Suites or restructure the hierarchy of your repository.

Drag&Drop a Suite

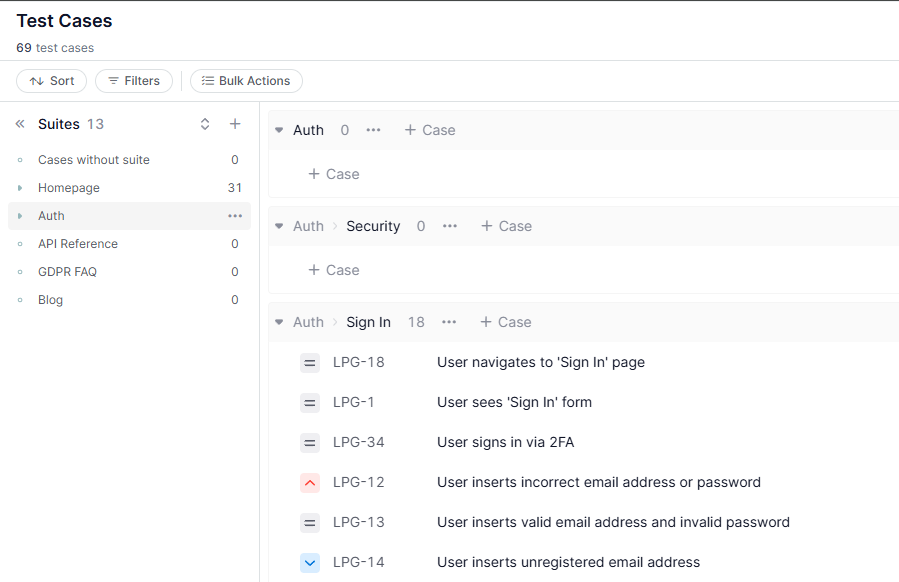
3. Access Test Cases in a Suite

Click on a Suite in the Suites section to view all test cases assigned to it.

Quick scroll to a Suite with Test Cases

4. Rename a Suite

Rename a Suite using one of these methods:

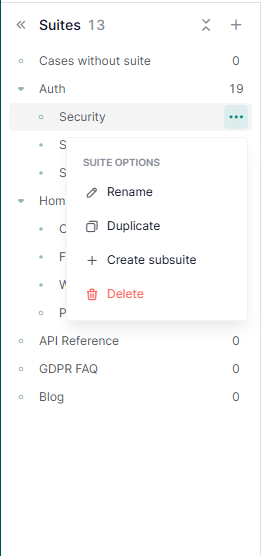
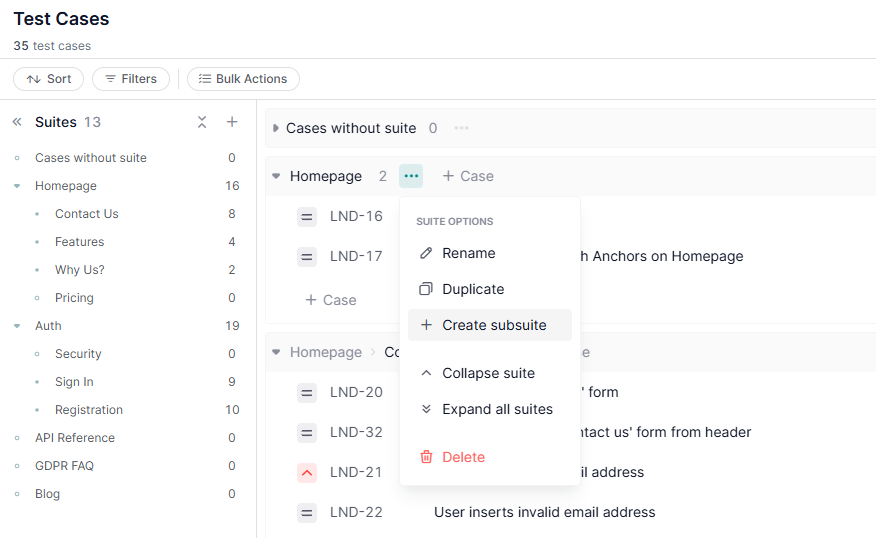
  • Click the three-dot menu in the Suites section and select ‘Rename’.
Suite options
  • Click on the Suite title in the Test Cases List and edit the name in-line.
Rename a Suite in-line

5. Duplicate a Suite

To duplicate a Suite:

  • Use the three-dot menu in the Suites section and select ‘Duplicate.’
  • Both the Suite and its associated test cases will be copied.

6. Delete a Suite

To permanently delete a Suite:

  • Use the three-dot menu in the Suites section and select ‘Delete.’
  • Both the Suite and its test cases will be removed.

Note: This action is irreversible.

7. Create a Subsuite

Use the three-dot menu in the Suites section to create a subsuite under an existing Suite.

Create a Subsuite

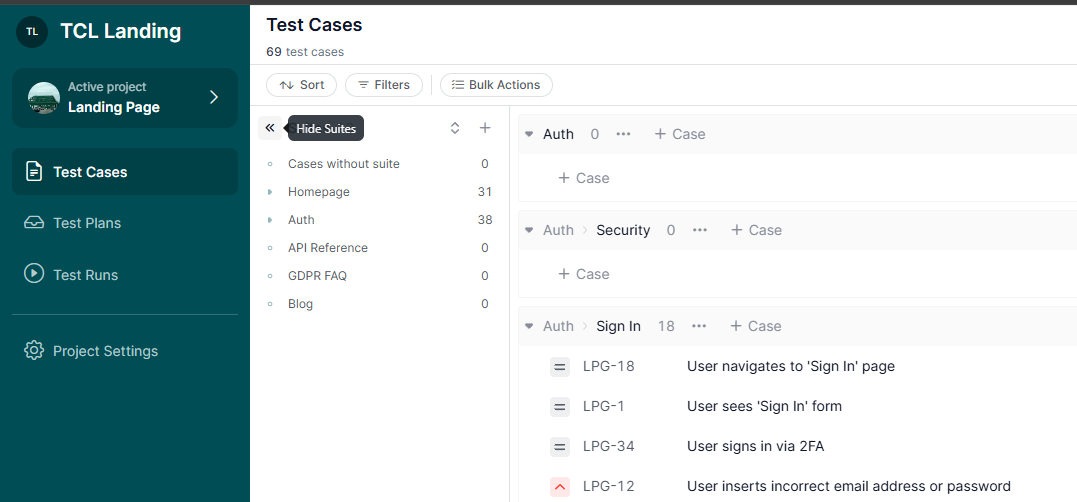
8. Customize the Suites Section

  • Collapse or expand Suites for better navigation.
  • Hide the Suites section when you need to focus on the Test Cases List.
Hide and Show Suites section

What’s Next?

Managing Suites effectively ensures your test case repository stays organized and easy to navigate. For further assistance, check related guides or contact support. We’re happy to help!

arrow right
blog image

What is a Suite in TestCaseLab - Organize Your Repository

calendar
December 4, 2024

A Suite in TestCaseLab acts as a category or folder to organize test cases within a project. Suites provide a logical structure to your test case repository, making it easier to manage, navigate, and execute tests efficiently. 

  • Categorize test cases to align with your project’s structure or testing strategy.
  • Quickly locate and manage test cases by grouping them logically.
  • Handle large projects effectively with multiple levels of grouping for test cases.
Suites for Test Cases

Key Features of a Suite

1. Purpose

  • Organize test cases into logical groups, such as by features, modules, or testing phases.
  • Simplify locating and managing test cases within a structured framework.

2. Hierarchical Organization

  • Create up to 4 levels of subsuites within a project.
  • Mirror your system’s structure or testing process by organizing test cases hierarchically.

Working with Suites and Test Cases

1. Grouping Test Cases

Suites group test cases in the Test Cases List, allowing you to quickly locate test cases assigned to a specific Suite.

Quick Scroll to Suite

2. Filters

Apply filters to view only the test cases from selected Suites, making it easier to focus on specific areas of testing.

Filter by Suite

3. Visibility Options

Collapse, expand, or hide the Suites Section to customize your workspace and improve navigation.

Hide/Show the Suites section

Learn more about Suite management here.

What’s Next?

For additional assistance, explore related guides or contact support.

arrow right
blog image

What is a Test Case in TestCaseLab - Understand the Basics

calendar
December 4, 2024

A Test Case in TestCaseLab is a detailed and structured description of a testing scenario. It outlines the steps, conditions, and expected outcomes required to verify a specific feature or functionality of your system. Test Cases form the foundation of the testing process, ensuring consistency, thoroughness, and quality in your testing efforts.

Test Cases

Key Features of a Test Case

1. Purpose

Defines the scope of a single test, describing:

  • What to test: The feature or functionality under examination.
  • How to test it: The steps and conditions needed for execution.
  • The expected result: The desired outcome after execution.

2. Components of a Test Case

Each Test Case in TestCaseLab includes the following details:

  • Title: A concise name for the test case.
  • Priority: Indicates importance (e.g., High, Medium, Low).
  • Type: Categorization of the test case (customizable in Project Settings).
  • Preconditions: Requirements or setups needed before starting the test.
  • Steps: Detailed actions to perform the test.some text
    • Write steps using text mode or step table mode.
    • Include up to two attachments per step for clarity.
  • Expected Results: The desired outcome after completing the steps.
  • Tags: Labels to help organize and filter test cases.
  • Requirements: Relation to existing requirements created in the Requirements page
  • Custom Fields: Extra fields for project-specific details (customizable in Project Settings).
  • Attachments: Additional files or images to support the test case.

Learn more about Test Case management here.

3. Flexibility in Editing

Modify all fields of a test case in Test Case Details via edit-in-place functionality or dive deep into thorough editing of a test case via the Edit Case Form.

4. Reusability

Test Cases are reused across multiple Test Plans and Test Runs, ensuring efficiency and consistency.

5. Organization

  • Group Test Cases into Suites for better management.
  • Use filters, tags, and custom fields to locate and organize test cases easily.

Learn more about Suites here.

What's Next?

Test Cases are essential for ensuring the quality and reliability of your system. For further assistance, explore related articles or contact support—we’re here to help!
arrow right
blog image

Manage a Test Case Template - Customize for Your Team’s Needs

calendar
December 4, 2024

Customizing your test case template ensures your project workflow matches your team's unique needs. Follow these steps to configure test case types, tags, and custom fields.

Learn what is a Test Case here.

1. Access Project Settings

  • Go to the project where you want to customize the test case template.
  • Navigate to Project Settings to begin customization.

Note: Only Project Administrators can access Project Settings.

Go to Project Settings

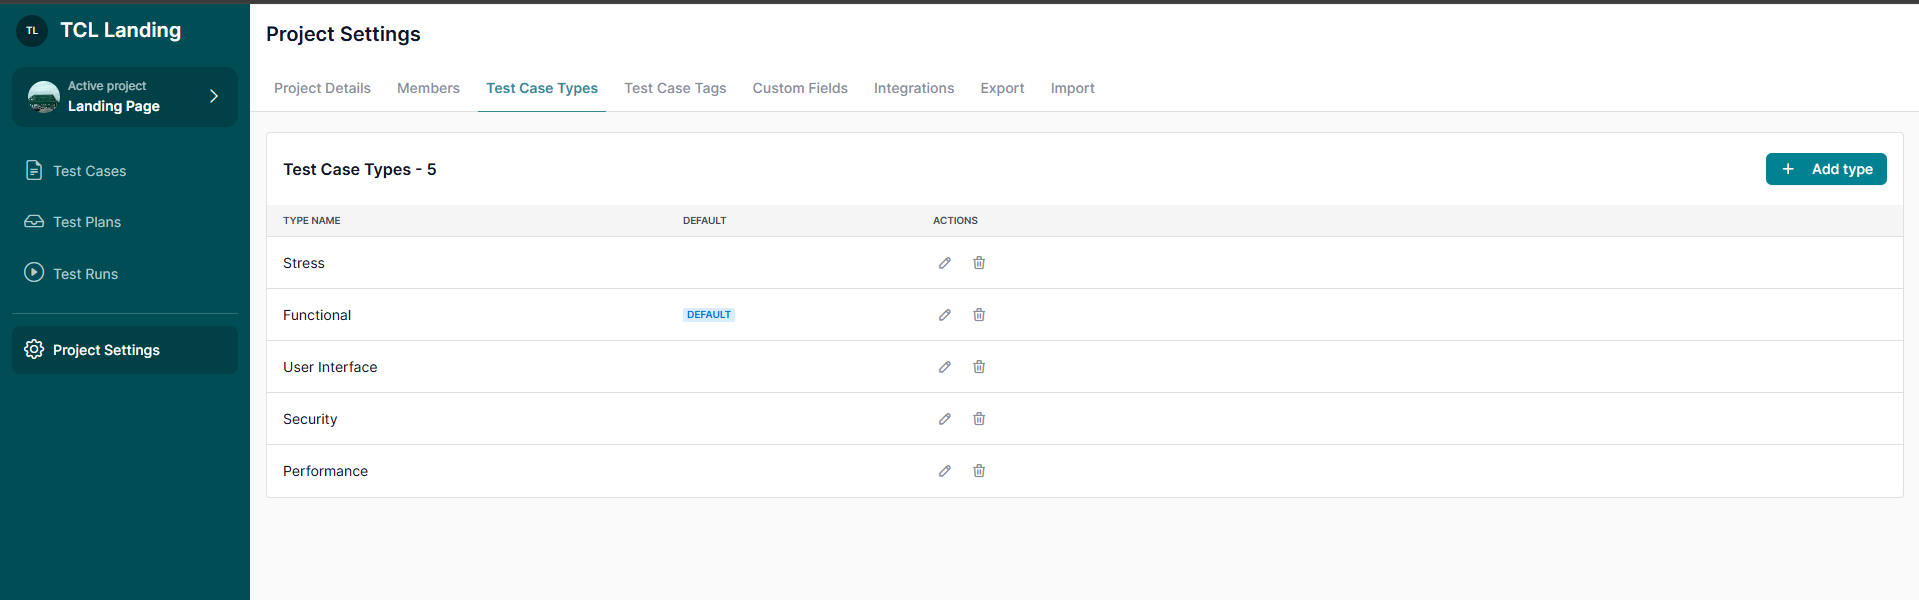
2. Manage Test Case Types

Types allow you to filter and organize test cases, making it easier to locate specific cases.

  • Open the Test Case Types page in Project Settings.
  • Use the predefined list of types or add your own based on your project needs (e.g., Approved, Pending Approval, Draft).
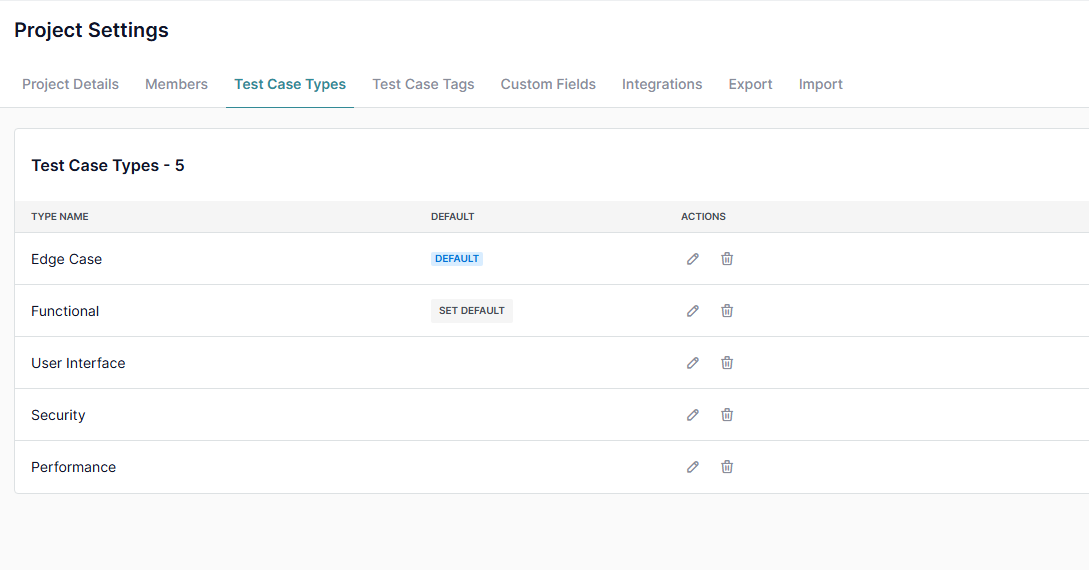
  • Set a default type for new test cases. 

Note: The Type assigned by default to a Test Case can be updated individually in the Test Case Details.

Create a Test Case Type
Set a Test Case Type as 'Default'

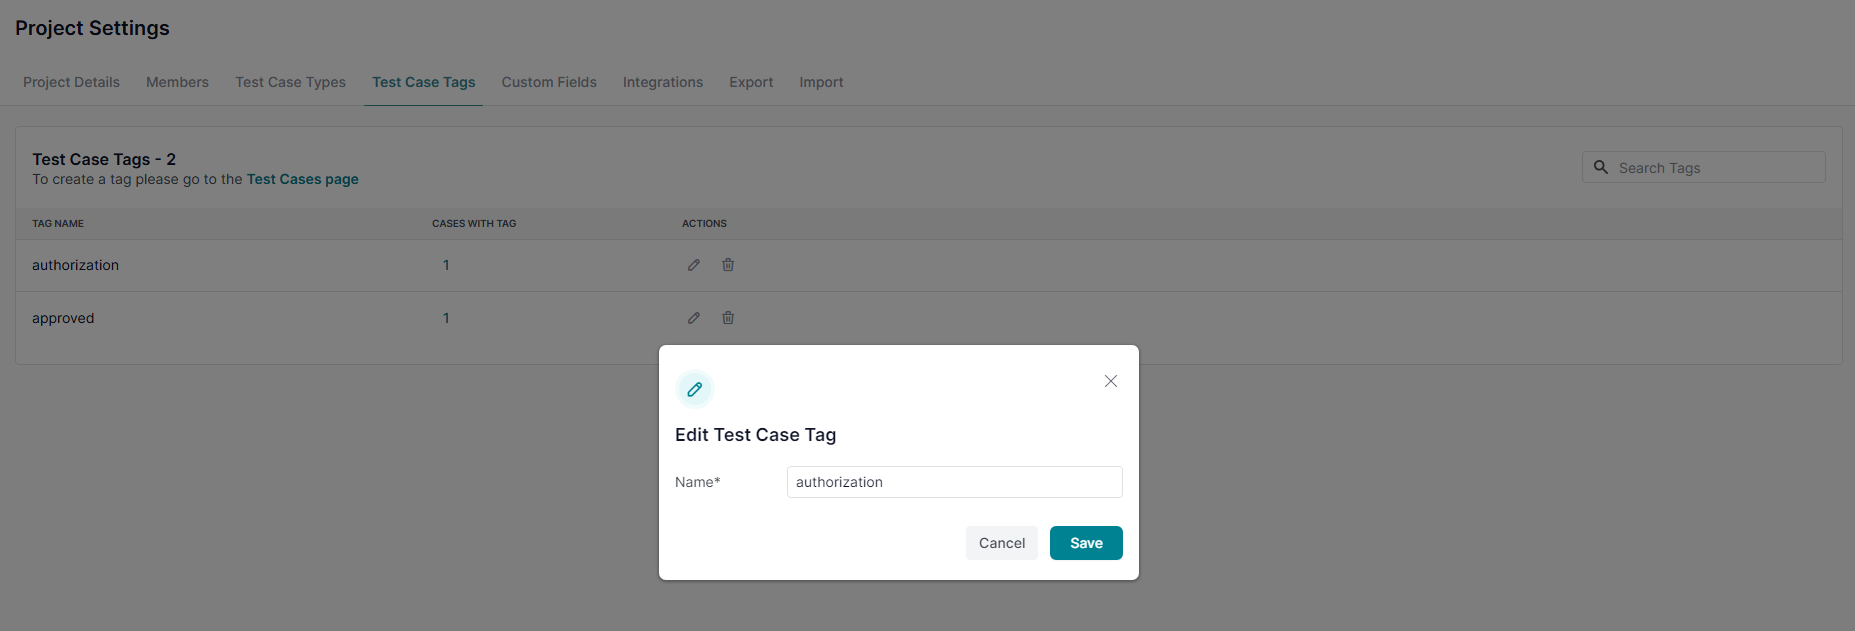
3. Manage Test Case Tags

Tags help filter the test case list, enabling quick and easy navigation.

  • Go to Project Settings > Test Case Tags to manage your tags:
    • Rename tags to keep them relevant.
    • Delete tags that are no longer needed.

Note 1: Creating tags is available while editing a test case by typing into the ‘Tags’ field.

Note 2: Use the test case list filter to filter by tag, or simply click on a tag to apply the filter directly.

Create a Tag via Test Cases
Update a Tag

4. Add Custom Fields

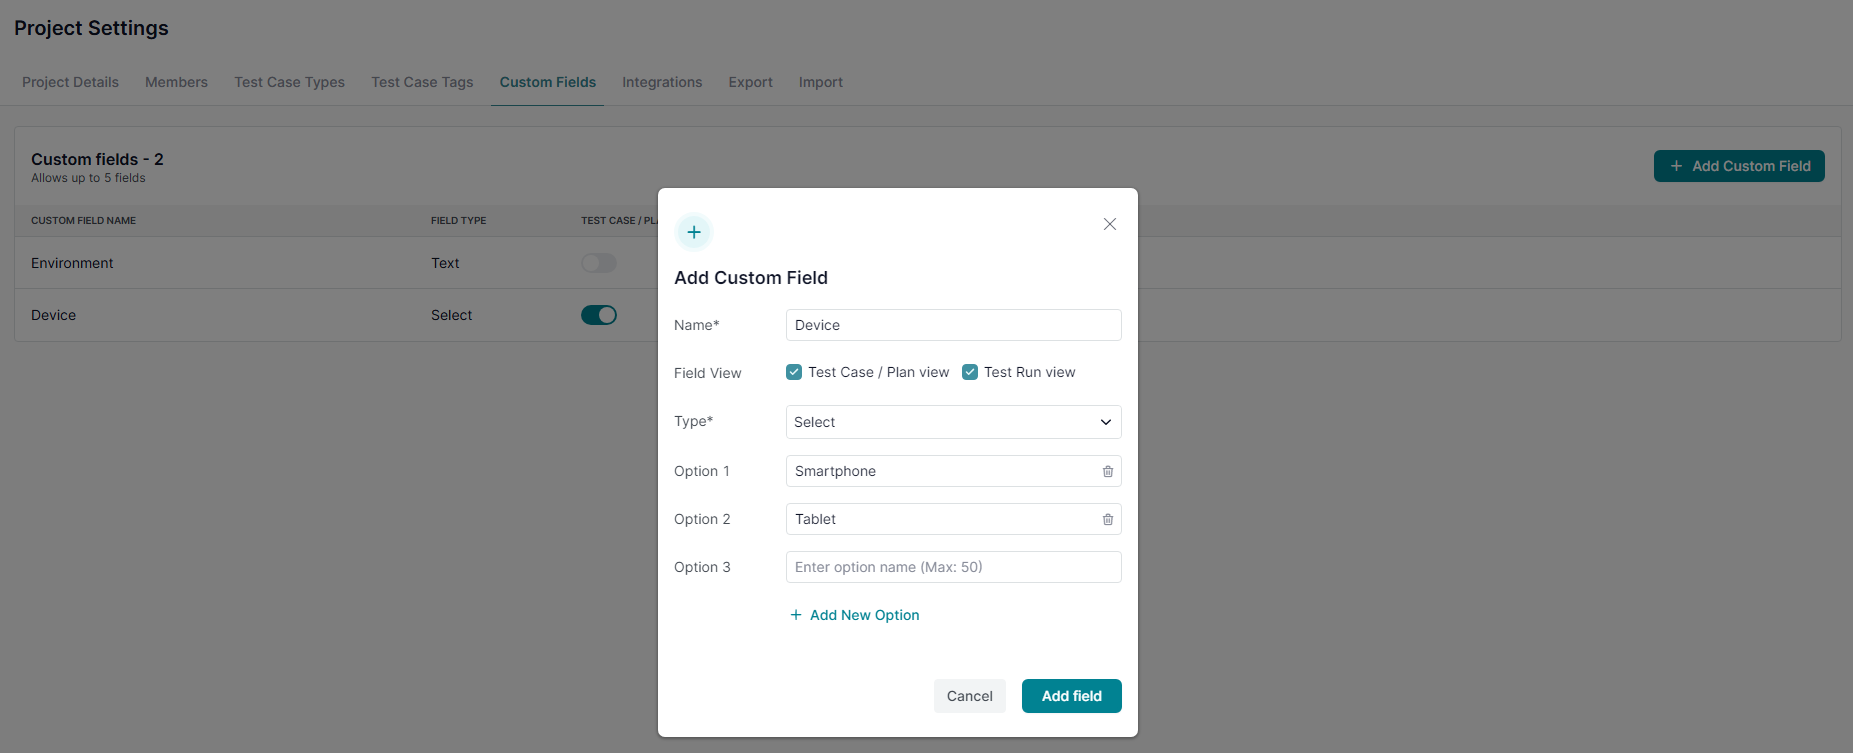
Expand your Test Case Template by adding extra fields (text areas and dropdowns).

  • Navigate to Custom Fields in Project Settings.
  • Create up to 5 custom fields for your project:
    • Text Fields: Add free-text information.
    • Dropdown Fields: Define options for categorization.
  • Control visibility of fields on project pages:
    • Show or hide fields on the Test Cases and Test Plan pages.
    • Show or hide fields on the Test Run page.

Examples: Specify details such as devices, versions, browsers, and environments using custom fields.

Note 1: You can filter test cases by dropdown values while working with the test cases list.

Note 2: Custom fields are always visible on the Edit Test Case page for universal editing.

Create a Custom Field

What’s Next?

Customizing your test case template simplifies test management and enhances team collaboration. If you need additional guidance, check out our related articles or contact support. We’re happy to assist!

arrow right
blog image

Integrate with GitHub - Log Issues from Your Tests

calendar
December 4, 2024

With TestCaseLab It is possible to run tests and report bugs instantly to your favorite bug-tracking tool. If you're looking for a test case management tool that integrates with GitHub, try TestCaseLab. 

The instructions below will help you set up the integration with the GitHub tool.

1. Generate API token

  • First of all, you should log in to your GitHub account.

Note: Make sure that you have an active project on your GitHub account to integrate it with your TestCaseLab project. 

  • Navigate to your GitHub account and click on your ‘Profile’ icon. Choose the  ‘Settings’ option from the menu.
GitHub - Go to Settings
  • On the ‘Profile Settings’ page find ‘Developer Settings’, and click on it.
GitHub - Developer Settings
  • Click on the ‘Personal access tokens’ tab and choose the ‘Tokens (classic)’ option. 
GitHub - Go to Tokens
  • Click on 'Generate new token' and choose the ‘Generate new token (classic)’ option.
GitHub - Generate a new Token
  • Fill in the ‘Note’ field, and mark up all required checkboxes. Click on the 'Generate token' button.
GitHub - Generate Token
  • Copy your Access token to the clipboard. 
GitHub - Copy Token

2. Set up Connection

  • After that, you need to navigate to your TestCaseLab Company Account, click on ‘Project Settings’ in the sidebar and go to the ‘Integrations’ tab.
  • Choose GitHub from the list of Bug tracking tools. 
GitHub Integration Form
  • Paste your Personal access token, and click on the 'Test connection' button.
  • Choose your Project from the list, and confirm the action.
  • As long as there are no issues and the Connection is established, you can proceed with Integration and save the changes.

A 'Connected' notification means your connection has been established without any issues, and you are able to report your defects directly to GitHub

What’s Next?

If you have any questions, our support team is here to assist you!

arrow right

Organize Your Testing Process

Start using TestCaseLab now as your test case management system and bring your Quality Assurance at the top-level!
Get Started For Free
No Credit Card Required
Organize Your Testing Process