please wait

Blog

Make the most out of your experience and check
articles about TestCaseLab functionality

blog image

Import & Export Test Cases - Efficiently Manage Data

calendar
December 4, 2024

Import Test Cases into a Project

Importing test cases allows you to quickly populate your project and start managing them efficiently. Follow these simple steps to upload your test cases using a CSV file.

1. Download the CSV Template

  • Go to the project where you want to import test cases.
  • Navigate to the Project Settings > Import
  • Download the provided CSV file sample to use as a template for your test case data.

Note: Only Project Administrators can access Project Settings.

Download CSV Template

2. Open the Sample CSV File

  • Locate the downloaded example.csv file on your computer.
  • Open the file to view a few sample test cases and understand the required structure for importing.
CSV template for import of Test Cases

3. Fill in the CSV File

  • Add your test cases to the file, following the provided structure.
  • Ensure the following required fields are completed:
    • Title: Enter the name of each test case.
    • Priority: Specify the importance of the test case (e.g., High, Medium, Low).
  • Once all test cases are added, save the file.

4. Upload the CSV File

  • Return to TestCaseLab and navigate to the project where the test cases will be imported.
  • Select the prepared CSV file and upload it to import your test cases into the project.
Upload a CSV file

Export Test Cases from a Project

Exporting test cases allows you to back up, share, or re-import your data efficiently. Follow these steps to download your test cases in CSV format.

1. Initiate Export

  • Navigate to the project containing the test cases you want to export.
  • Navigate to the Project Settings > Export
  • Select the Export option to start the download process.

Note: Only Project Administrators can access Project Settings.

Go to Export page

2. CSV Document Structure

The exported CSV file includes the following information:

Default Fields:

  • Title: Name of the test case.
  • Description: Detailed information (precondition) of the test case.
  • Steps: Steps to execute the test case.
  • Expected Results: Anticipated outcomes for the test case.
  • Priority: Importance level (e.g., High, Medium, Low).
  • Types: Types of test cases.
  • Key: Unique identifier for each test case.
  • Category: Hierarchical Suite path (e.g., Feature -> Sub-feature).
  • Tags: Tags assigned to the test case.
  • Created At: Date and time the test case was created.
  • Created By: User who created the test case.
  • Last Edit At: Date and time of the last edit.
  • Last Edit By: User who made the last edit.

Custom Fields:

Any additional fields configured in your project, such as:

  • Custom Text: Text fields specific to your test cases.
  • Custom Dropdown: Dropdown values defined for your project.
Example of CSV file with exported Test Cases

3. Download the File

  • Save the exported CSV file to your computer.
  • Use it for analysis, sharing with team members, or as a template for importing test cases back into TestCaseLab.

What’s Next?

Leverage the exported file for easy data management and collaboration. If you need guidance on importing test cases, check out our related articles or contact support—we’re happy to assist!

arrow right
blog image

Invite & Manage Project Members - Build and Assign Teams

calendar
December 4, 2024

Invite Project Members

Inviting team members to your project ensures smooth collaboration and proper access for everyone involved. Follow these steps to invite and manage members effectively.

1. Invite Members from Company Settings

As a Company Owner or Administrator:

  • Navigate to Company Settings > Users to invite users to the Company Account.
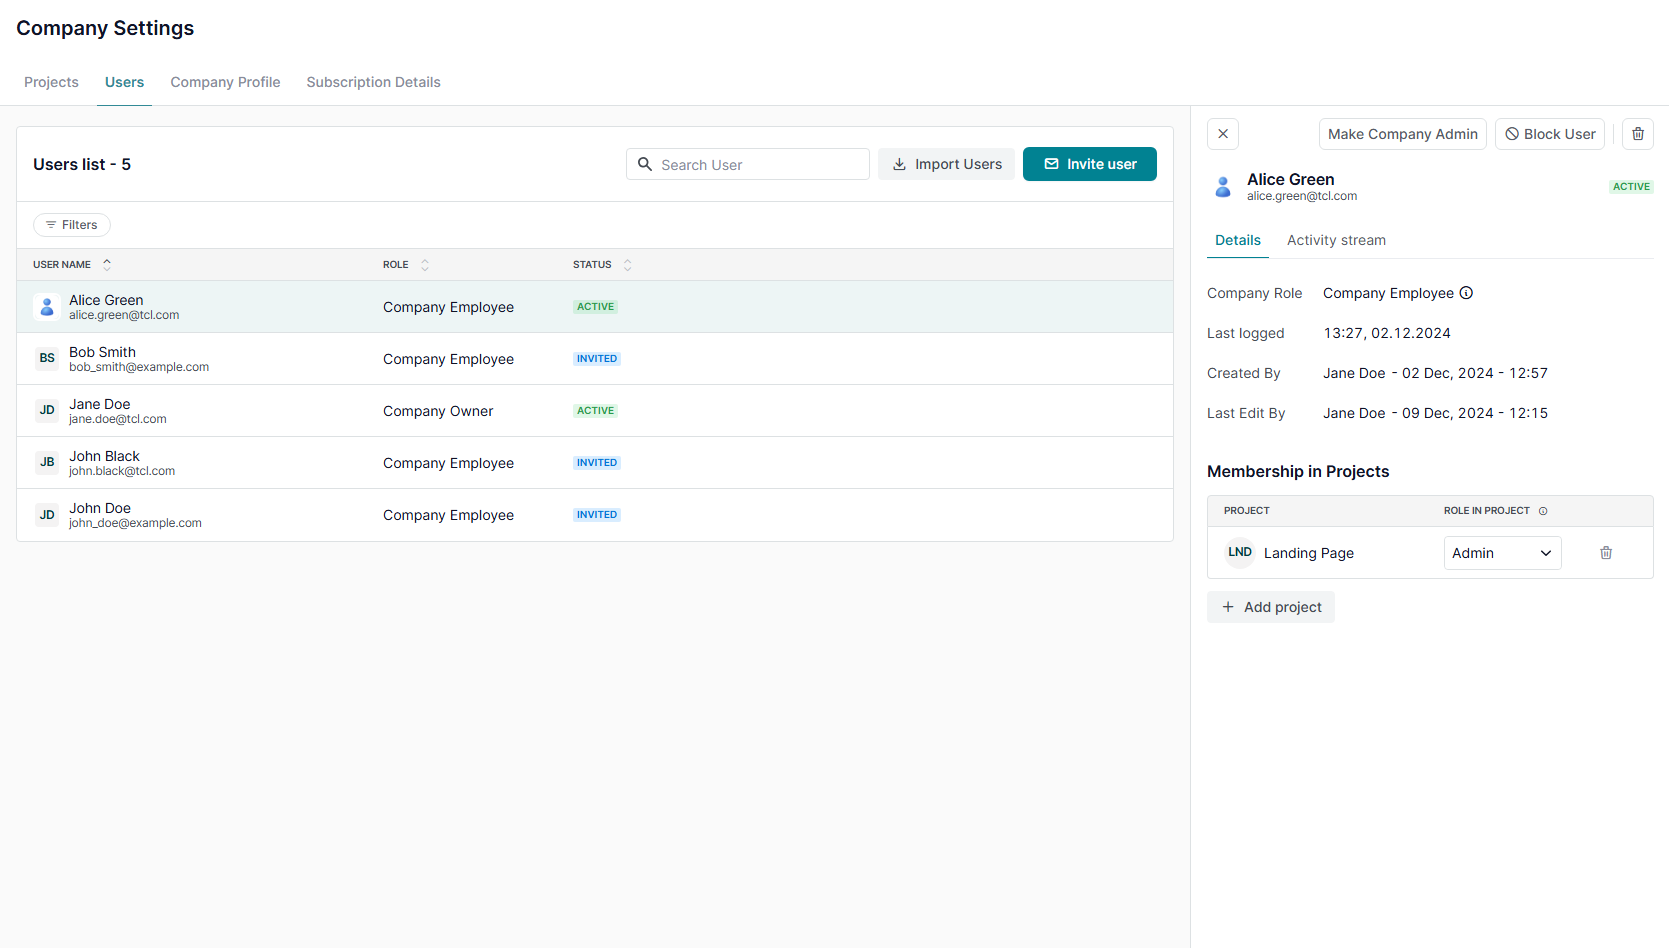
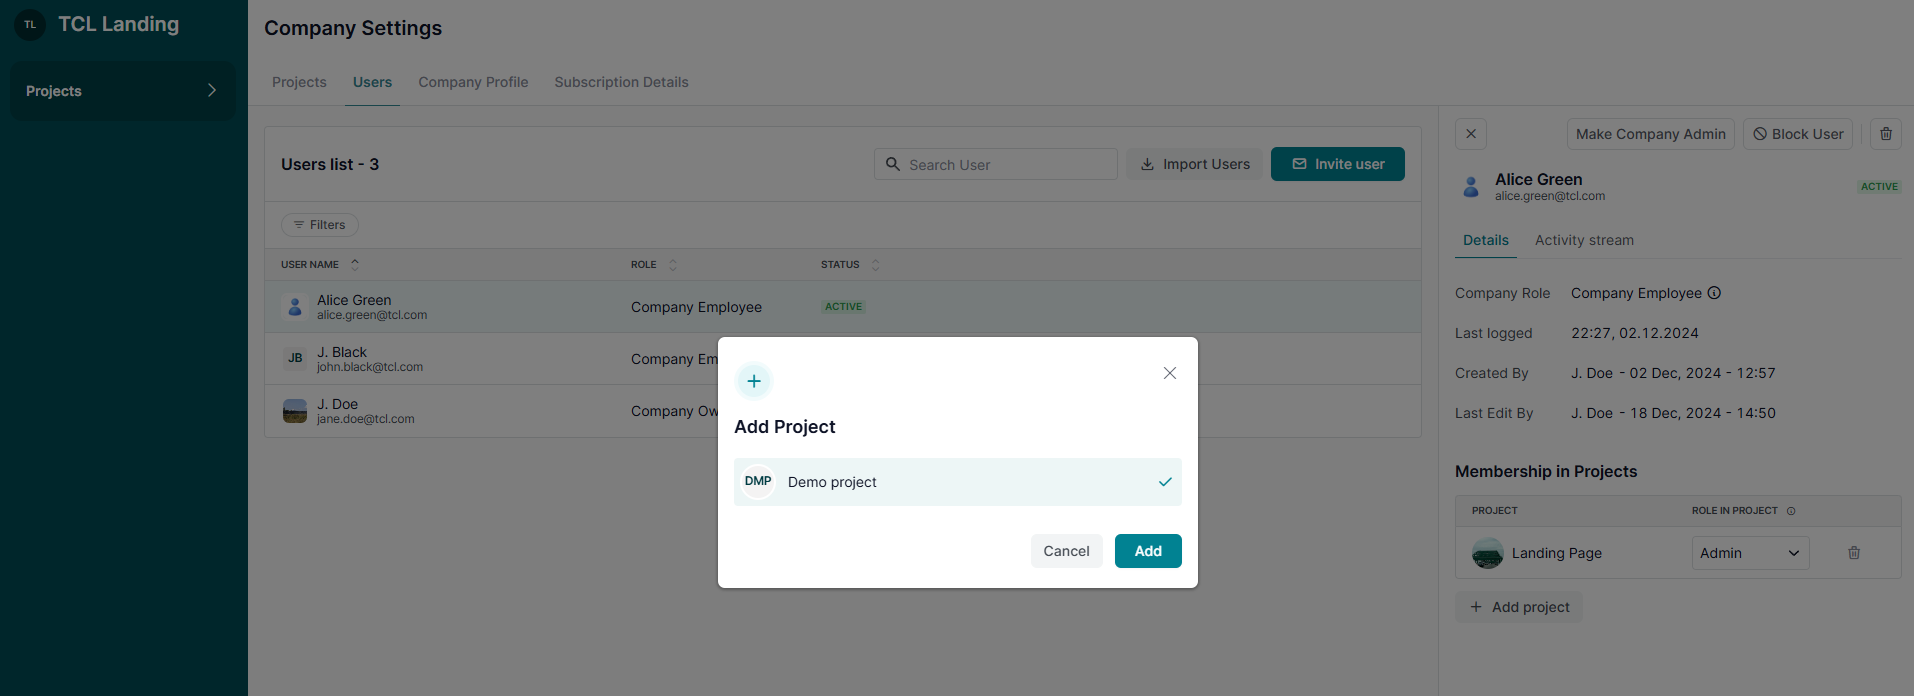
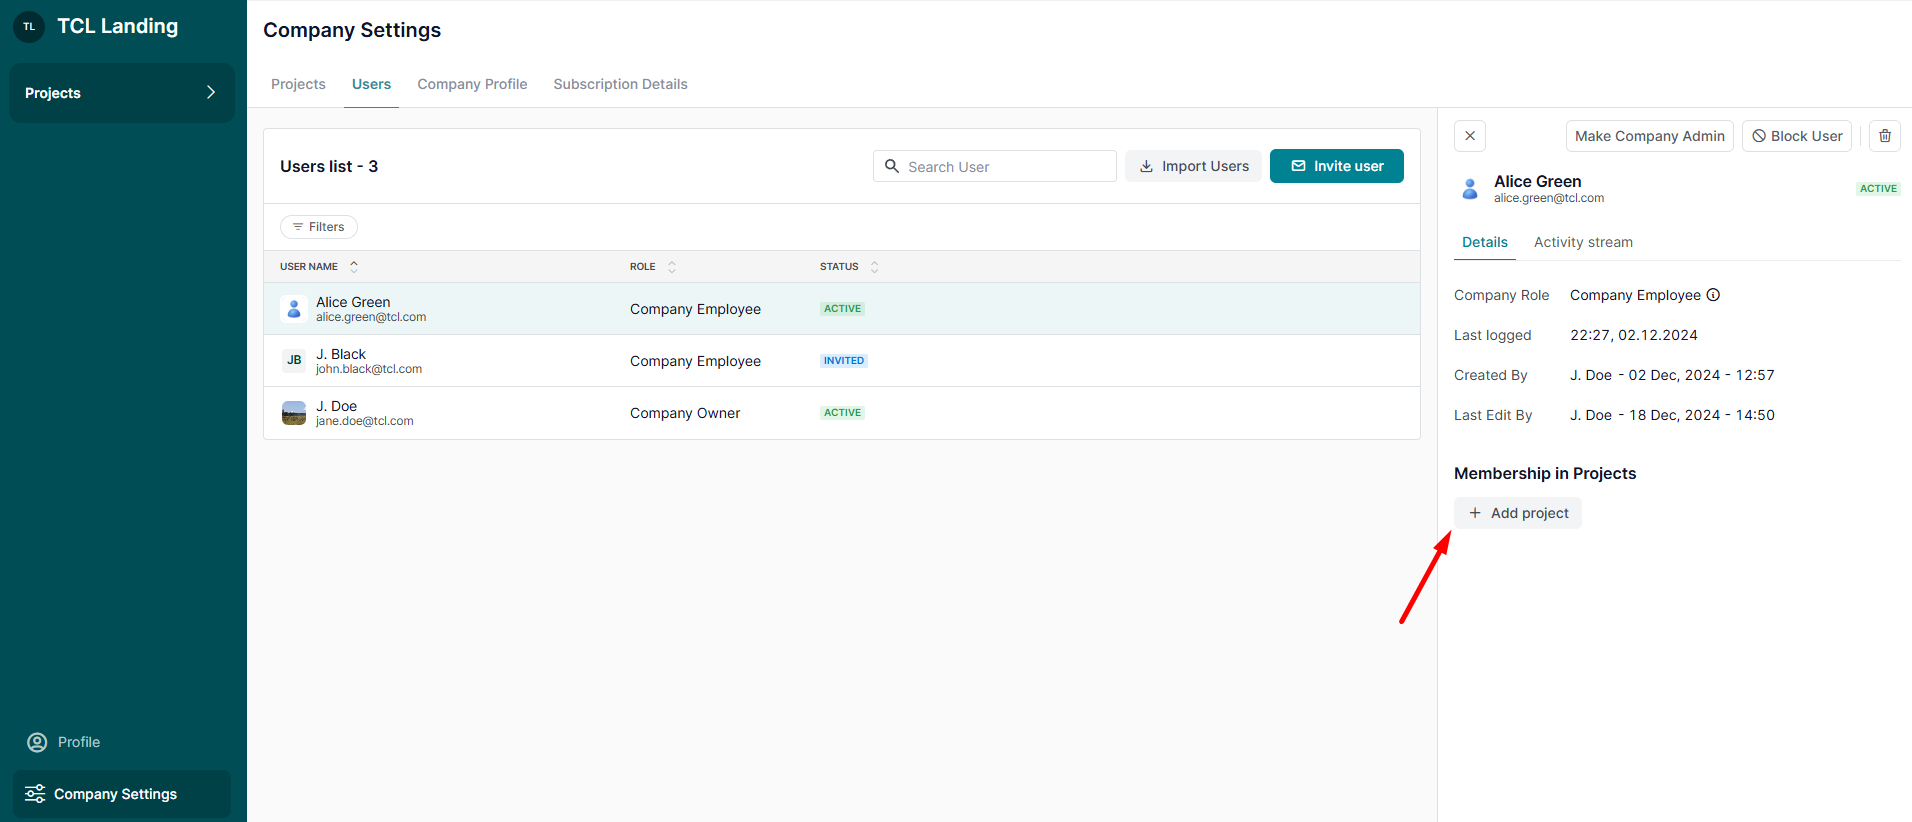
  • Once users are added, you can assign them to specific projects in User Details  via '+ Add Project' button.
User Details

2. Add Members from Project Settings

As a Project Administrator:

  • Go to the specific project and navigate to Project Settings > Members.
  • On the Members page click ‘Add Member.’
  • Select one or more users from the list of Active members in your Company Account.
  • Use search to quickly find the users you want to add.
  • Selected users will appear in the field as chips.
Add a Project Member

3. Assign a Project Role

Choose the project role that should be applied to all selected users:

  • Project Administrator:
    • Full access to Project Settings and all project pages, including Test Cases, Requirements, Test Plan, Milestones, and Test Run.
  • Project Member:
    • Access to work on test cases and manage test plans and runs.
  • Project Viewer:
    • View-only access, suitable for stakeholders who need oversight without editing permissions.

Note: The selected role is applied to all users added in the same action. To assign different roles, add users separately or update their roles after they are added.

Project Roles

4. Add Selected Members

After selecting users and choosing a role:

  • Click ‘Add Member’ to add the selected users to the project.
  • The modal will close after submission.
  • The Members list will refresh and show newly added users.

If some users cannot be added, valid users will still be added successfully. You will see a notification with the users who were not added.

5. Invite New Users

The ‘Invite new user’ link remains available and works separately from adding existing company users to a project.

Use it when the person you need is not yet part of your Company Account.

Note: Bulk adding project members works only for existing company users. Inviting new users is handled through the existing invite flow.

Manage a Project Member

Managing project members helps ensure everyone has the correct level of access to contribute effectively. Here’s how you can manage project members using Company and Project Settings.

1. Manage Project Members from Company Settings

As a Company Administrator:

  • Navigate to Company Settings > Users to manage all users within the Company Account, including their project assignments.

2. Manage Project Members from Project Settings

As a Project Administrator:

  • Open the project and go to Project Settings > Members to directly manage members assigned to that specific project.

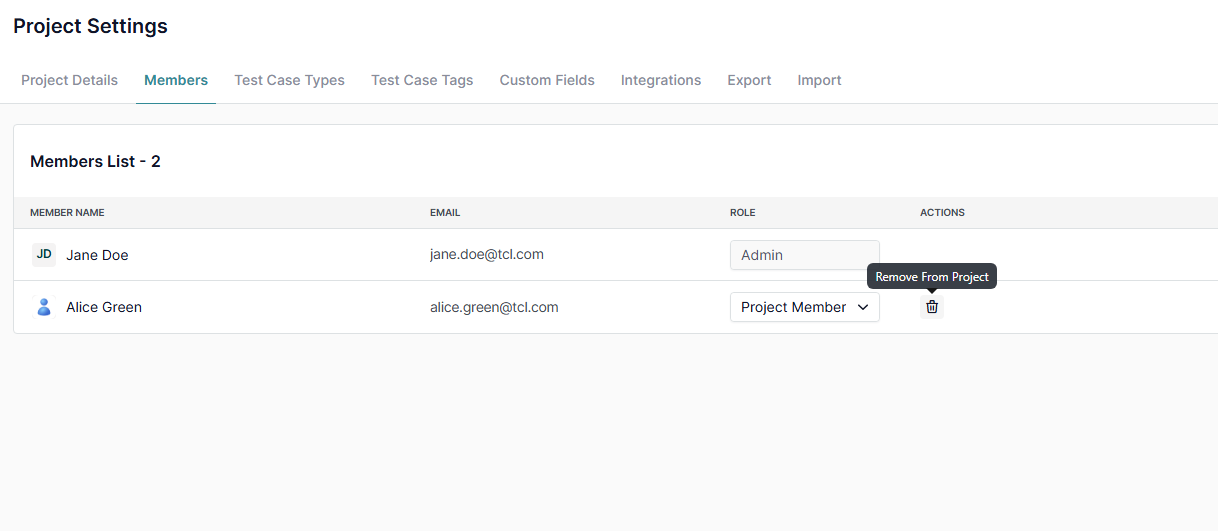
3. Remove a Project Member

On the Members page:

  • Select the member you wish to remove.
  • Confirm the removal to revoke their access to the project.
Remove User from a Project

4. Change a Project Role

Update a member’s role by:

  • Selecting a new role from the dropdown menu.
  • Assigning roles based on their responsibilities (e.g., Administrator, Member, Viewer).

What’s Next?

Effectively managing project members ensures proper access control and smooth collaboration. For additional help, check related guides or reach out to our support team—we’re happy to assist!

arrow right
blog image

Create & Manage a Project - Start and Organize Your Testing Efforts

calendar
December 4, 2024

Create a Project

Organizing your testing efforts starts with creating a project. Follow this guide to set up a new project and invite your team members.

1. Access Projects

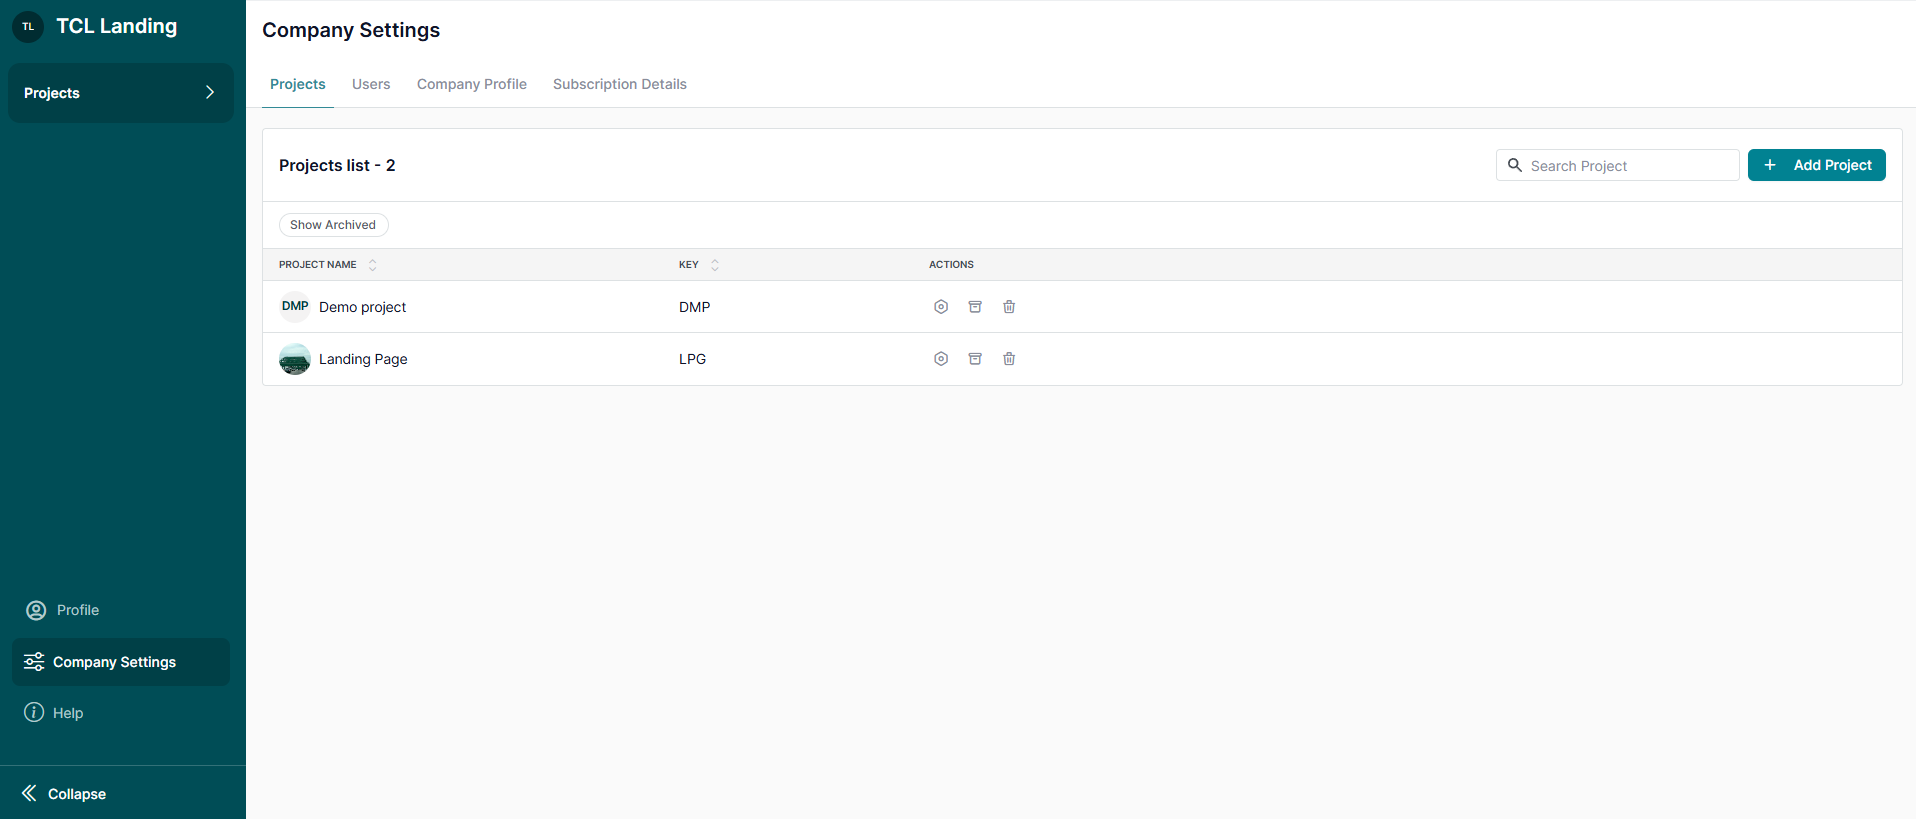
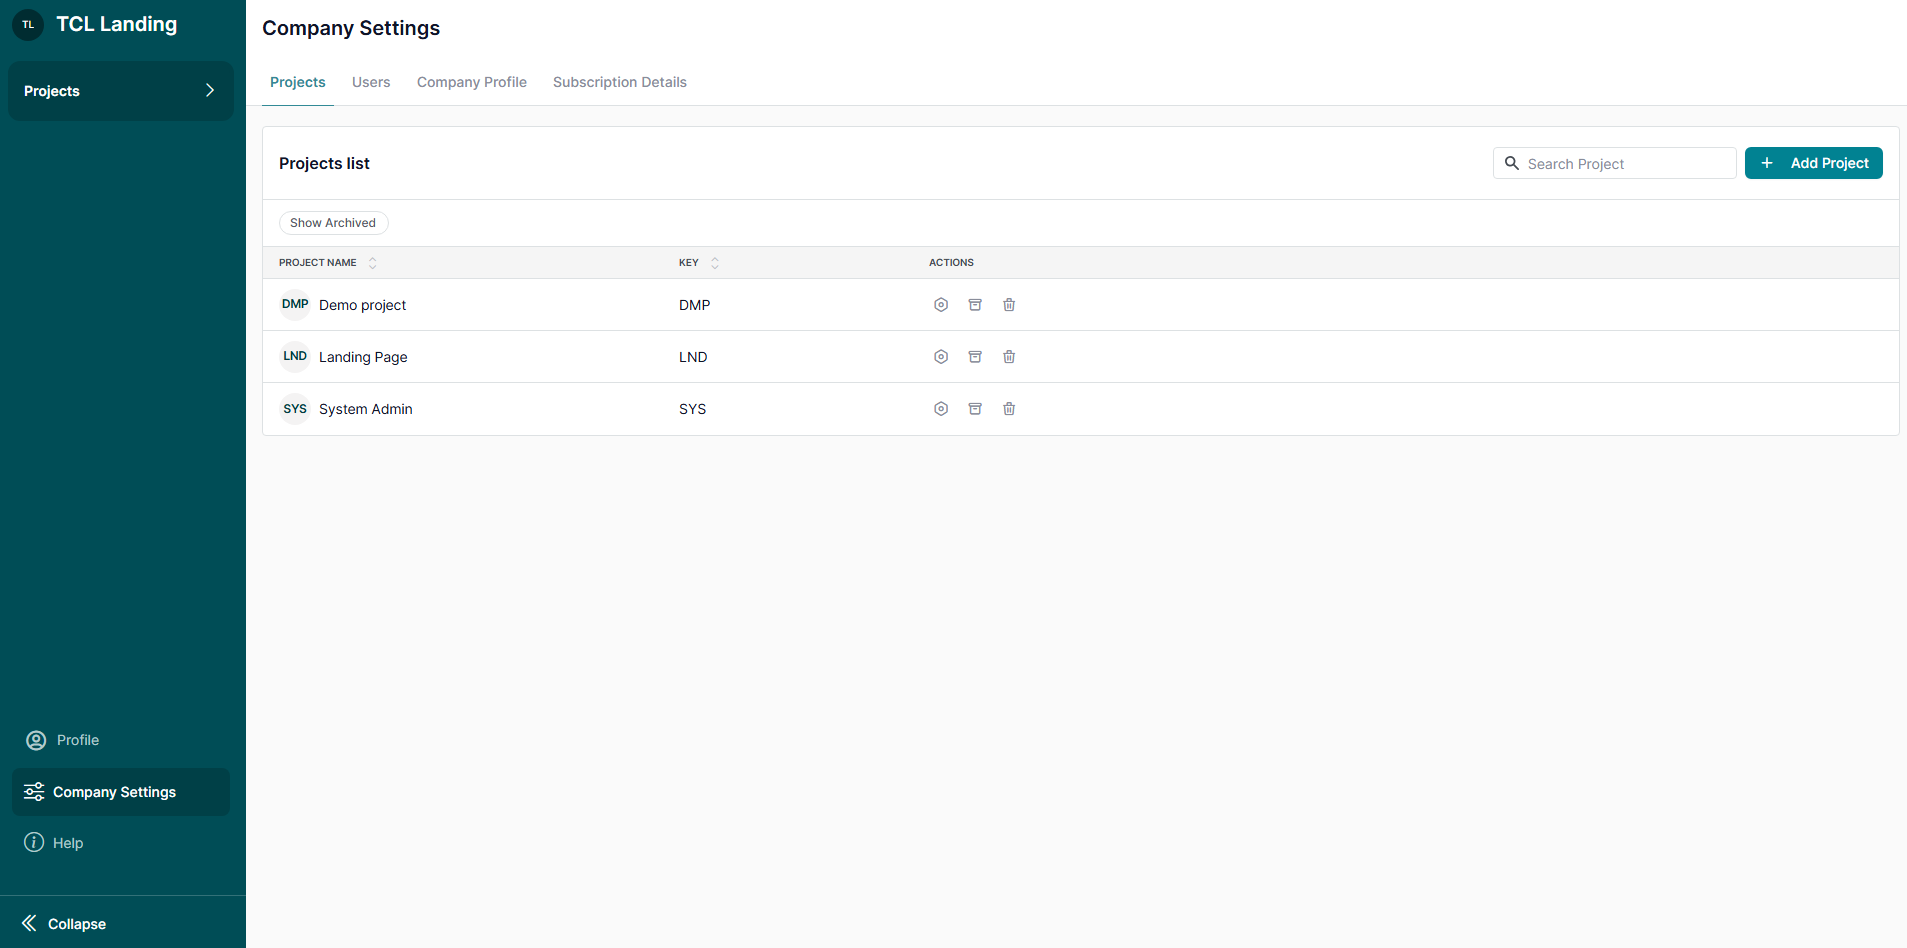
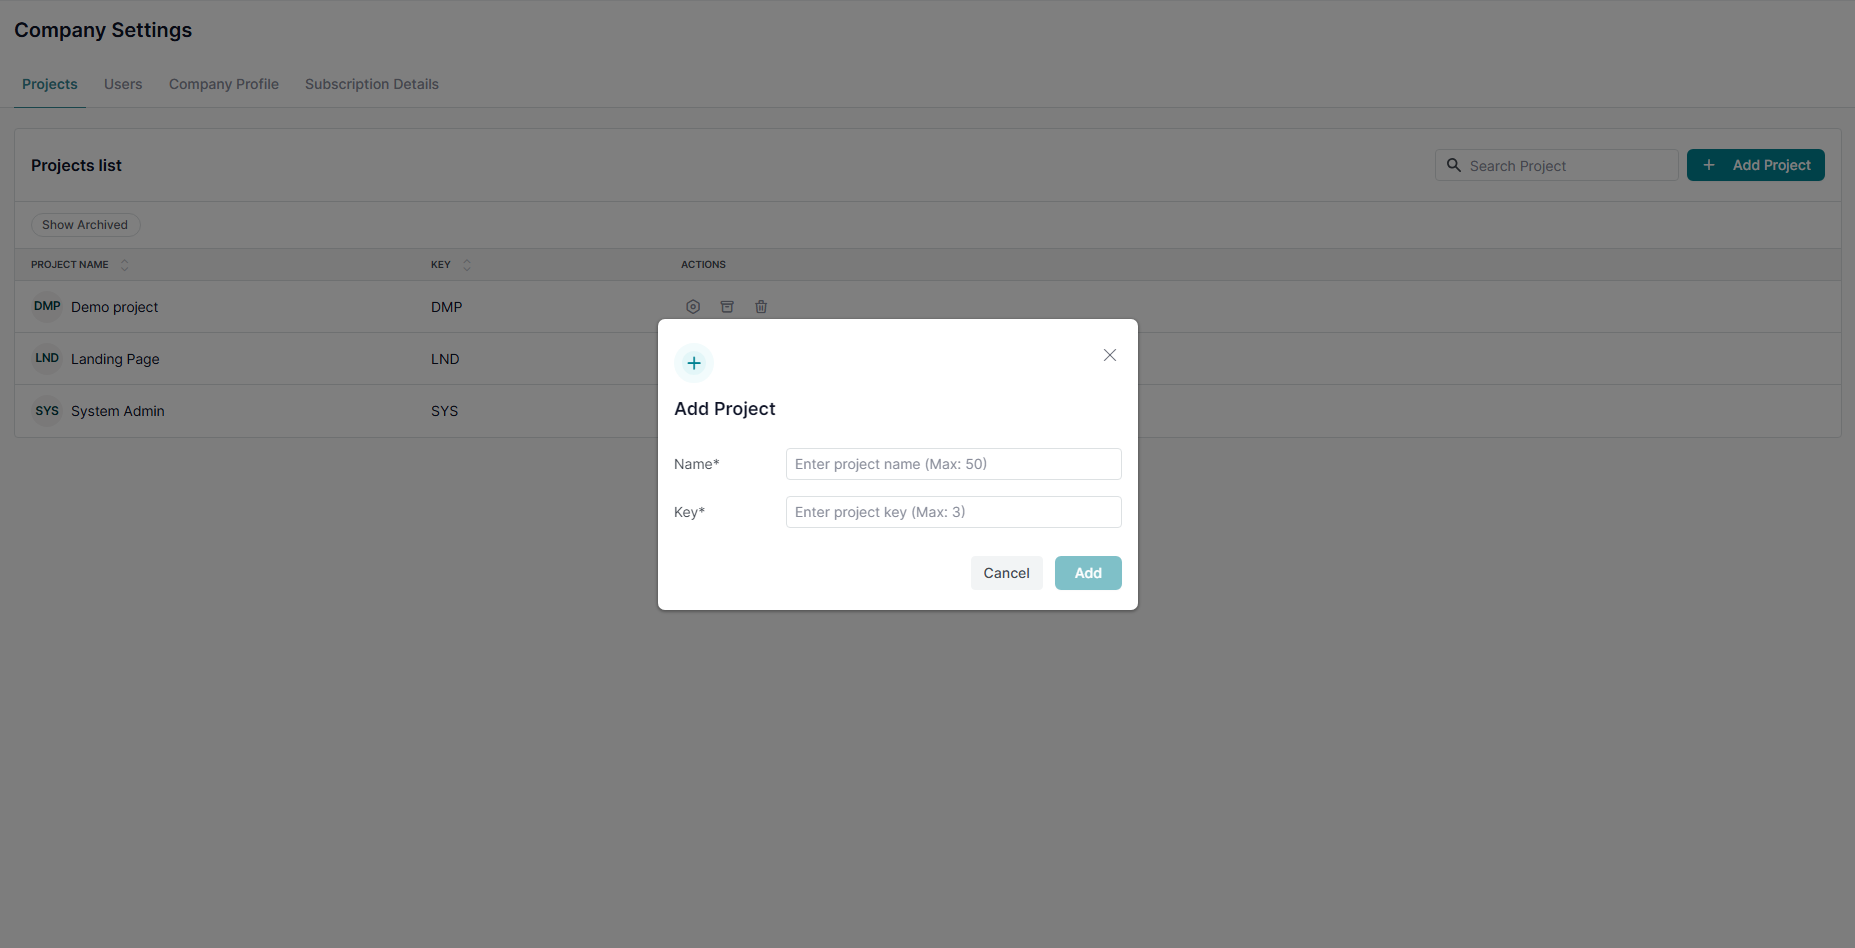
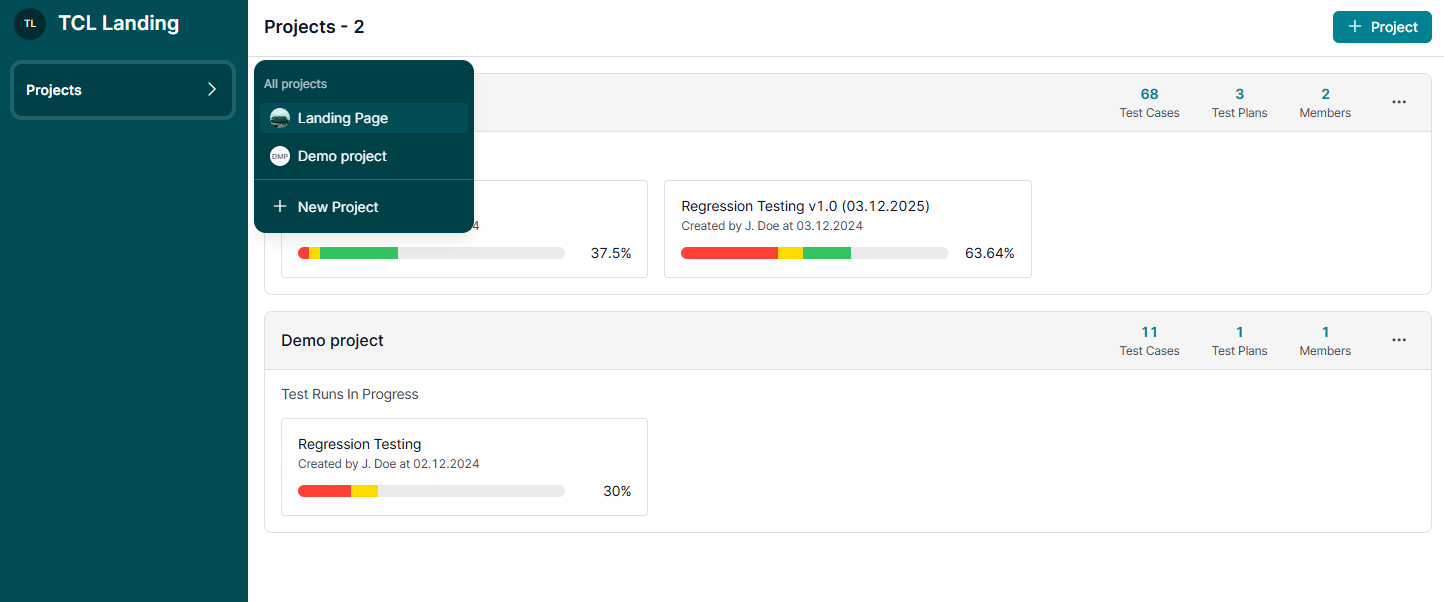
Navigate to Company Settings > Projects and click '+ Add Project' to start creating a new project

Note 1: Only a Company Owner and Administrators can create projects.

Note 2: You can create a Project on the Company Account's Dashboard as well.

Projects List

2. Insert Project Details

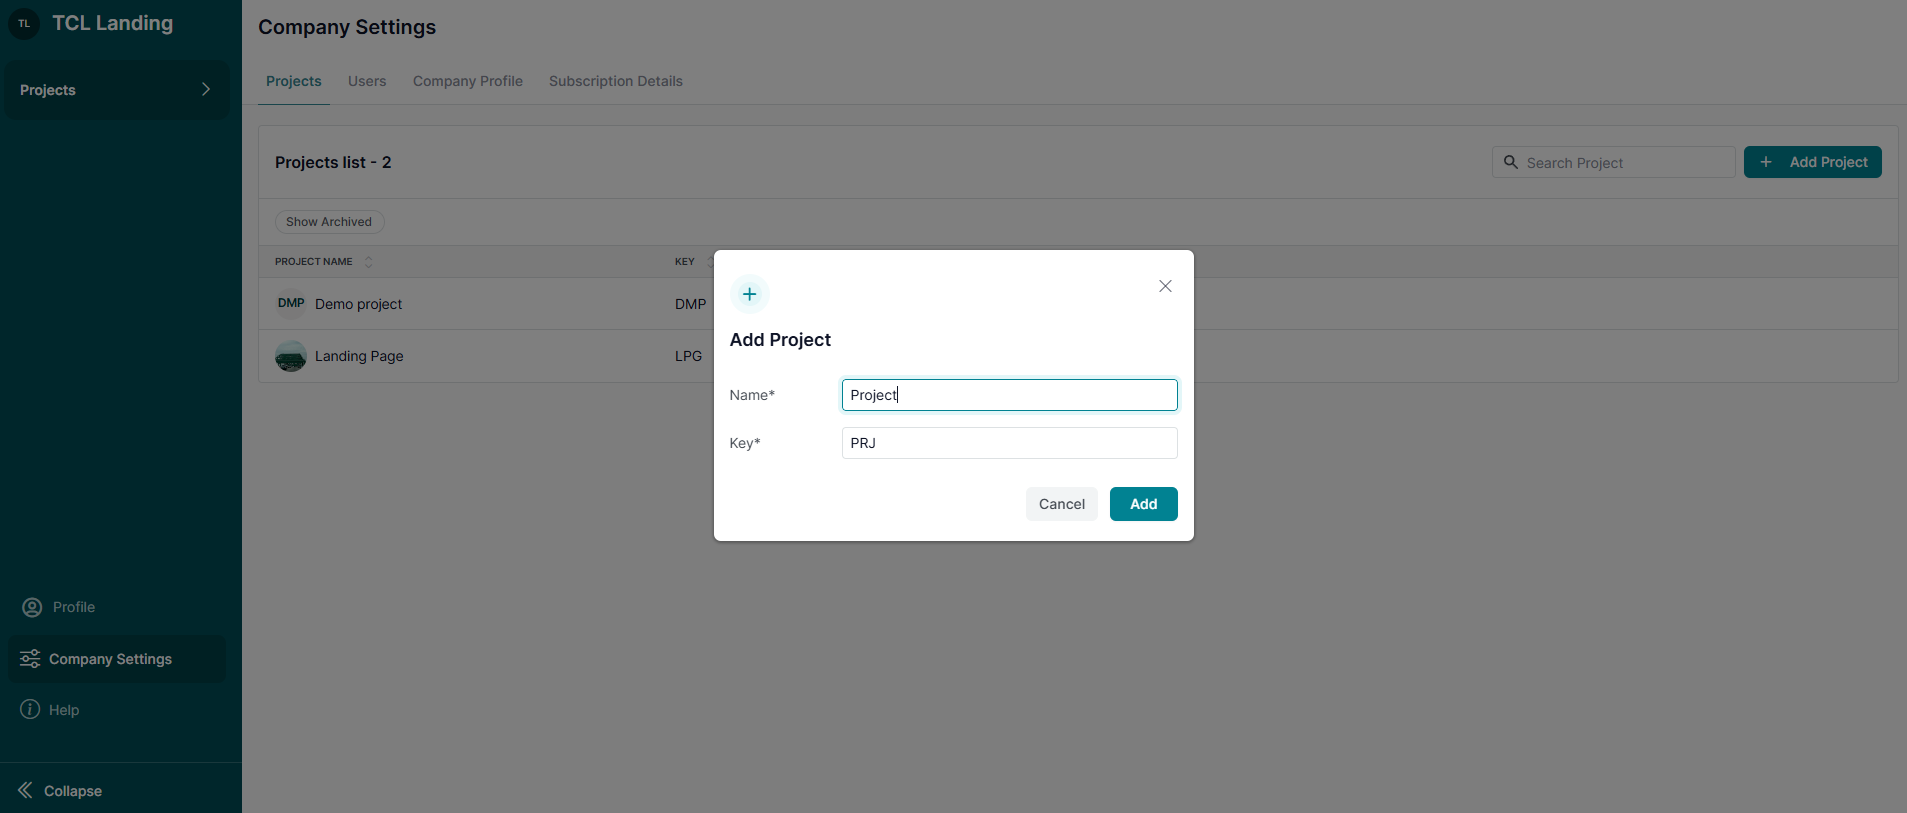
Provide the following information:

  • Project Name: Enter the name of your project.
    • You can update this name later if needed.
  • Project Unique Key: Add a unique identifier for the project.
    • This key can also be modified later.
Create a Project

3. Invite Project Members

Once your project is created, invite team members to collaborate.

Learn more about inviting users to projects here.

Add User to a Project via Company Settings

4. Unlimited Projects

TestCaseLab allows you to create unlimited projects within your Company Account, ensuring flexibility for managing all your testing needs.

Manage Project

Effectively managing projects in TestCaseLab ensures smooth collaboration and keeps your team organized. Here’s a step-by-step guide to manage project settings, members, and more.

1. Access Project Settings

To open the settings:

  • Click the three-dot menu next to the project name on the Dashboard and choose Project Details, or
  • Navigate to the project and select Project Settings from the sidebar.

Note: Only Project Administrators have access to Project Settings.

Go to Project Settings via Dashboard

2. Edit Project Information

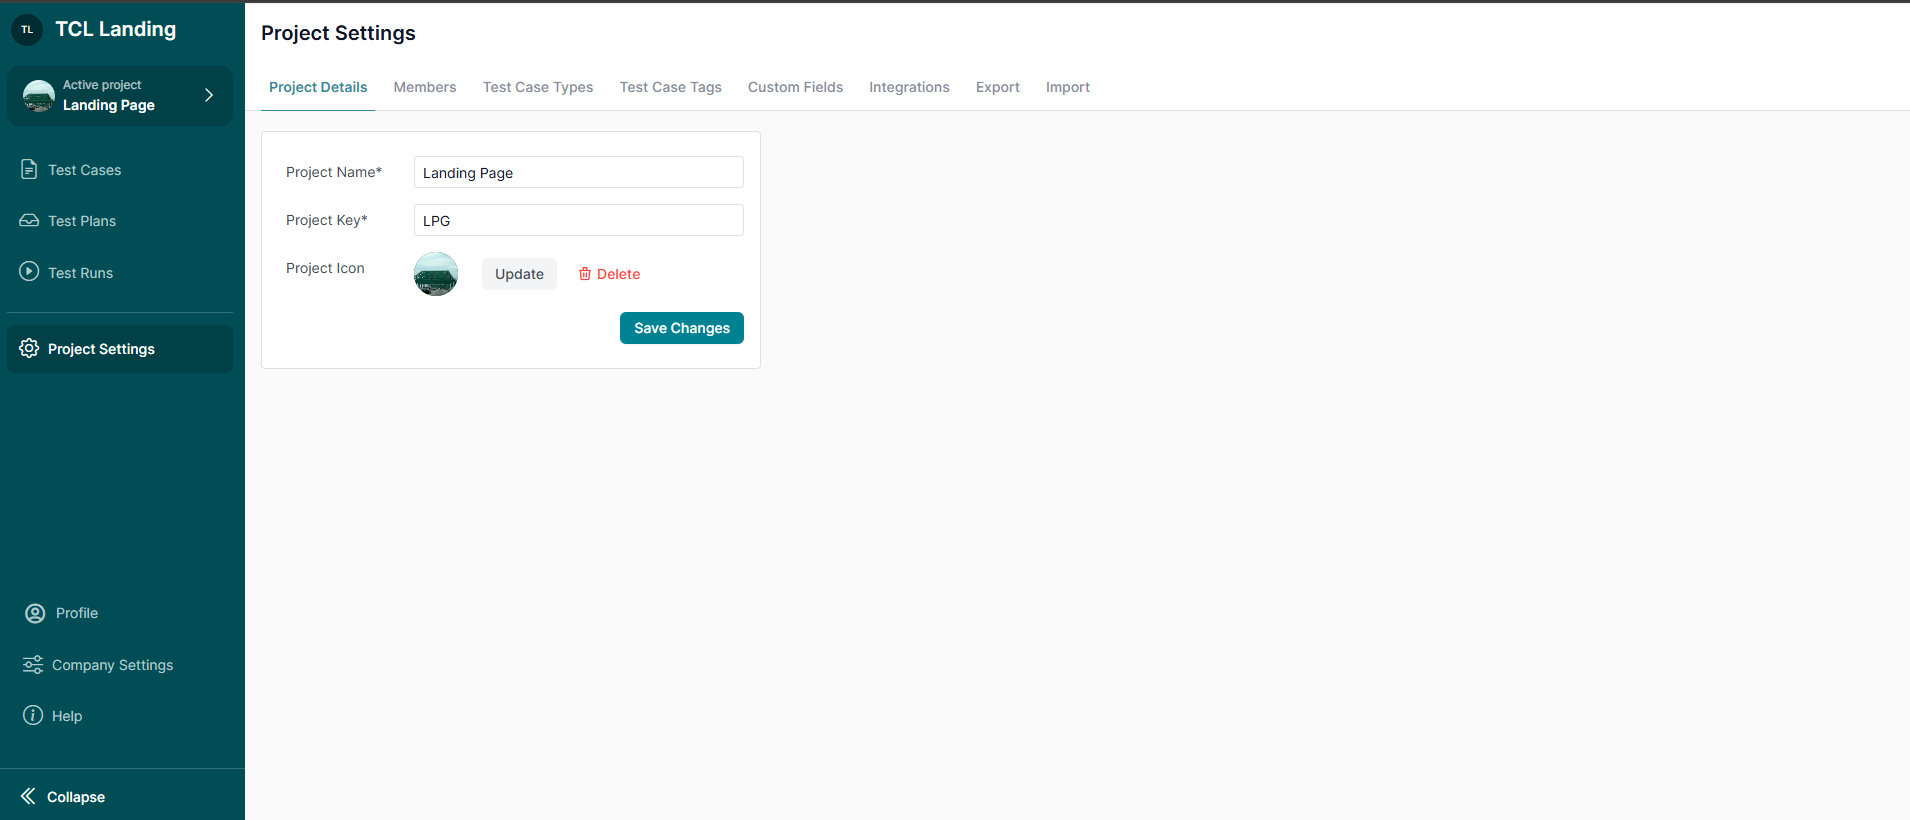
In the Project Settings > Project Details, you can:

  • Update the Project Name to reflect any changes.
  • Change the Project Key if needed.
  • Add or Update the Project Logo for better project identification.
Edit Project Details

3. Manage Project Members

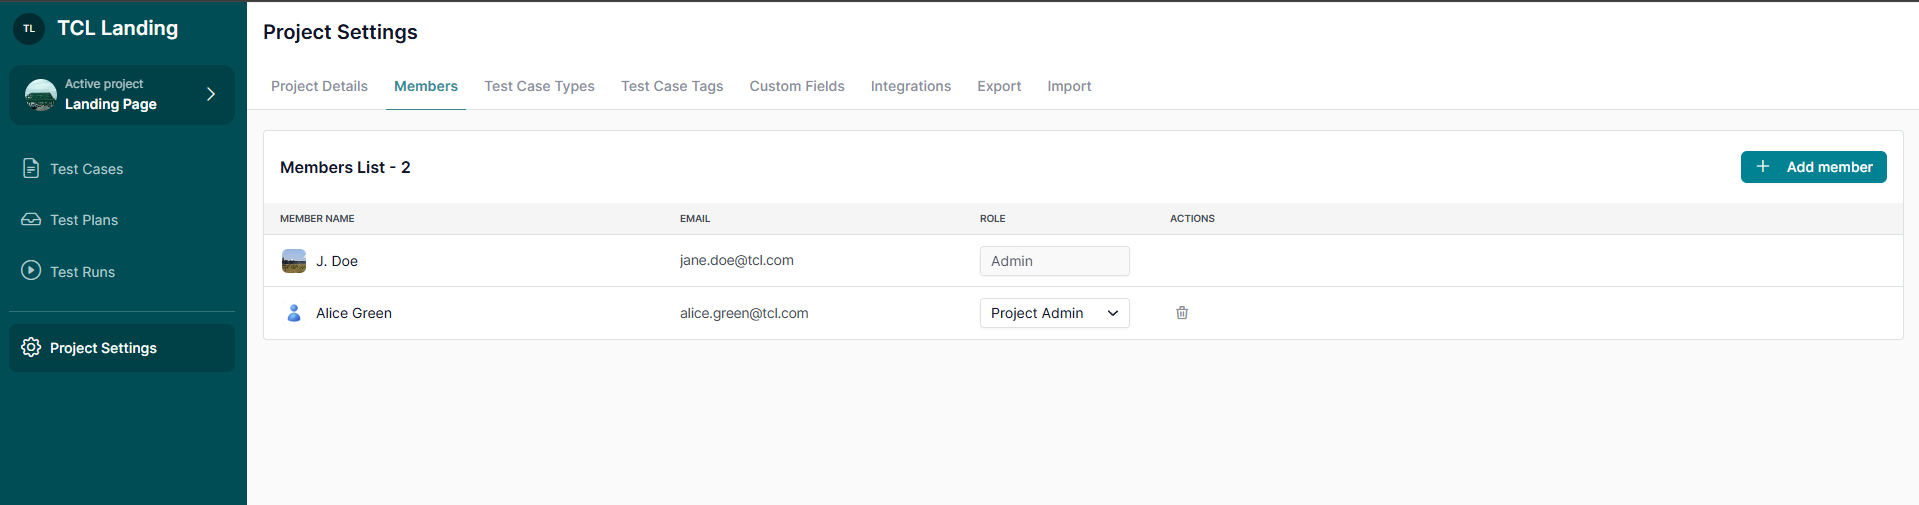
Go to Project Settings > Members to:

  • Invite new team members.
  • Manage existing project members’ roles and access.

Learn more about managing project members here.

Project Members

4. Archive or Delete a Project

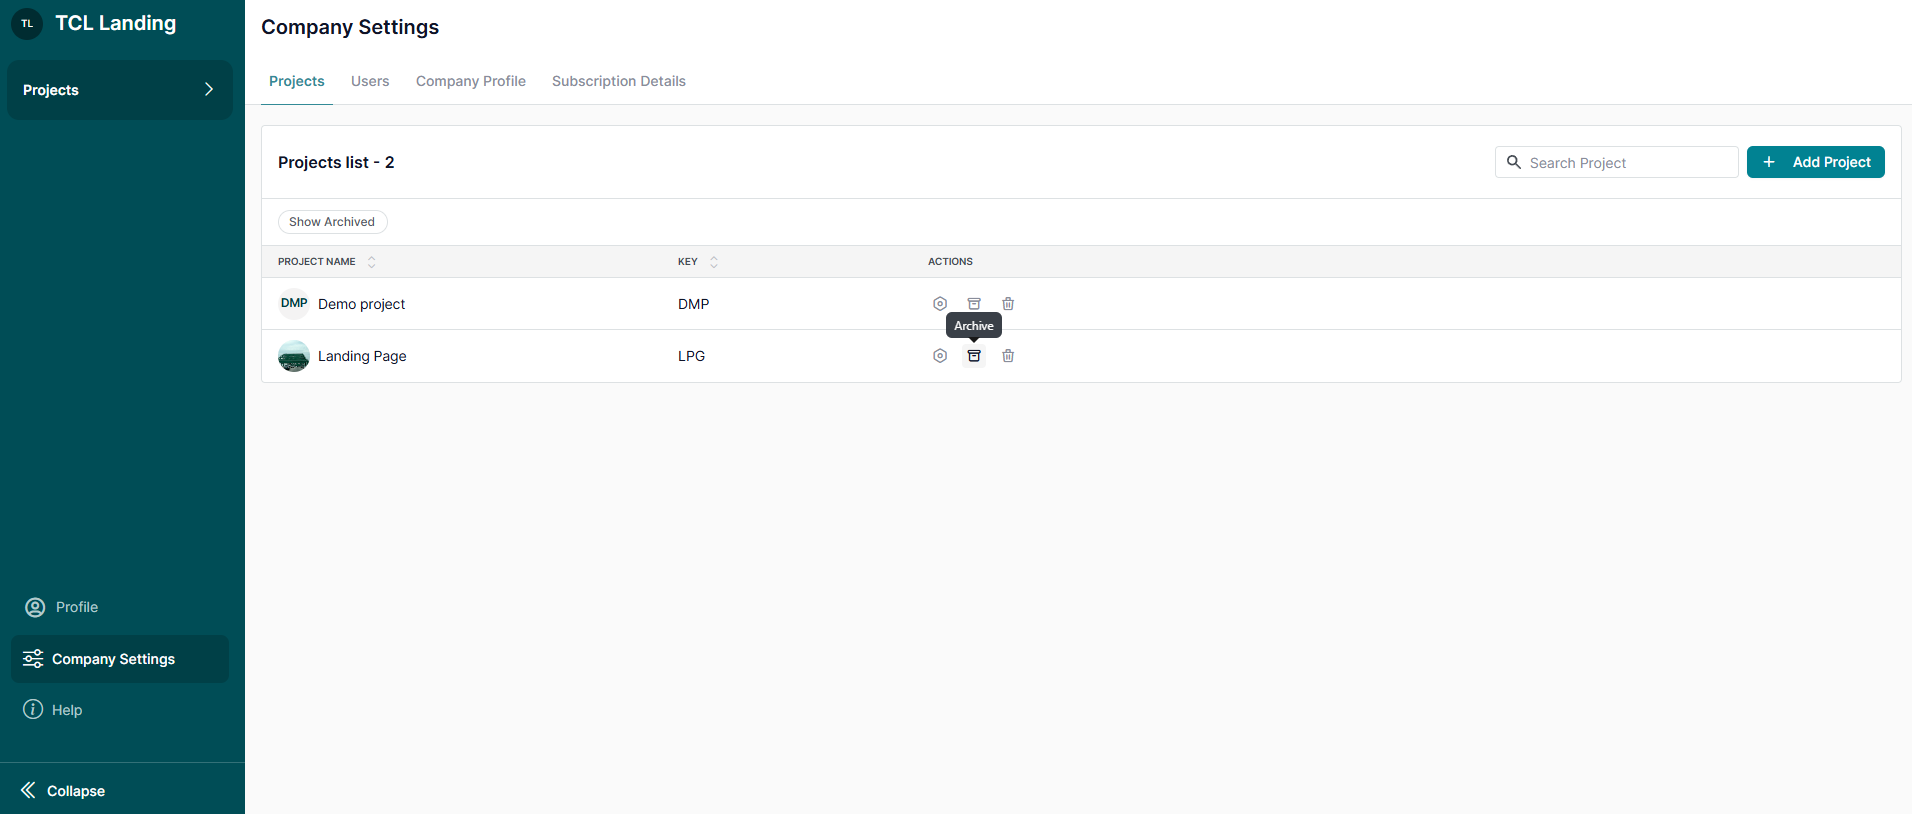
Go to Company Settings > Projects, select the project, and choose the appropriate option.

Note 1: Deleted projects cannot be restored.

Note 2: Only a Company Administrator can archive or delete a project.

Archive a Project

Pin Important Projects

You can pin projects that you use most often to keep them at the top of your project list.

Pinned projects appear first in the Company Projects Dashboard

Pinning is personal for each user. If you pin a project, it does not affect the project order for other team members.

1. Pin a Project

  • Go to the Dashboard.
  • Find the project you want to keep at the top.
  • Click the pin icon on the project card.

Once pinned, the project will move to the top of the project list.

2. Unpin a Project

To remove a project from your pinned list:

  • Go to the Dashboard.
  • Click the filled pin icon on the pinned project card.

The project will return to the regular project order.

3. Understand Project Ordering

Pinned projects are always shown first.

If you pin several projects, the most recently pinned project appears at the top of the pinned group.

Unpinned projects keep the standard project ordering used in your account.

4. Pin Limit

Each user can pin up to 5 projects.

If you already have 5 pinned projects and try to pin another one, the project will not be pinned.

Note: To pin another project, unpin one of your currently pinned projects first.

What’s Next?

By managing projects effectively, you can streamline your testing processes and enhance collaboration. For more guidance, explore related articles or reach out to our support team—we’re here to help!

arrow right
blog image

Switch Between Multiple Company Accounts - Streamline Collaboration

calendar
December 4, 2024

If you’re part of multiple Company Accounts, switching between them is easy and seamless. Follow these steps to access different accounts and manage your roles.

1. Access Your User Profile

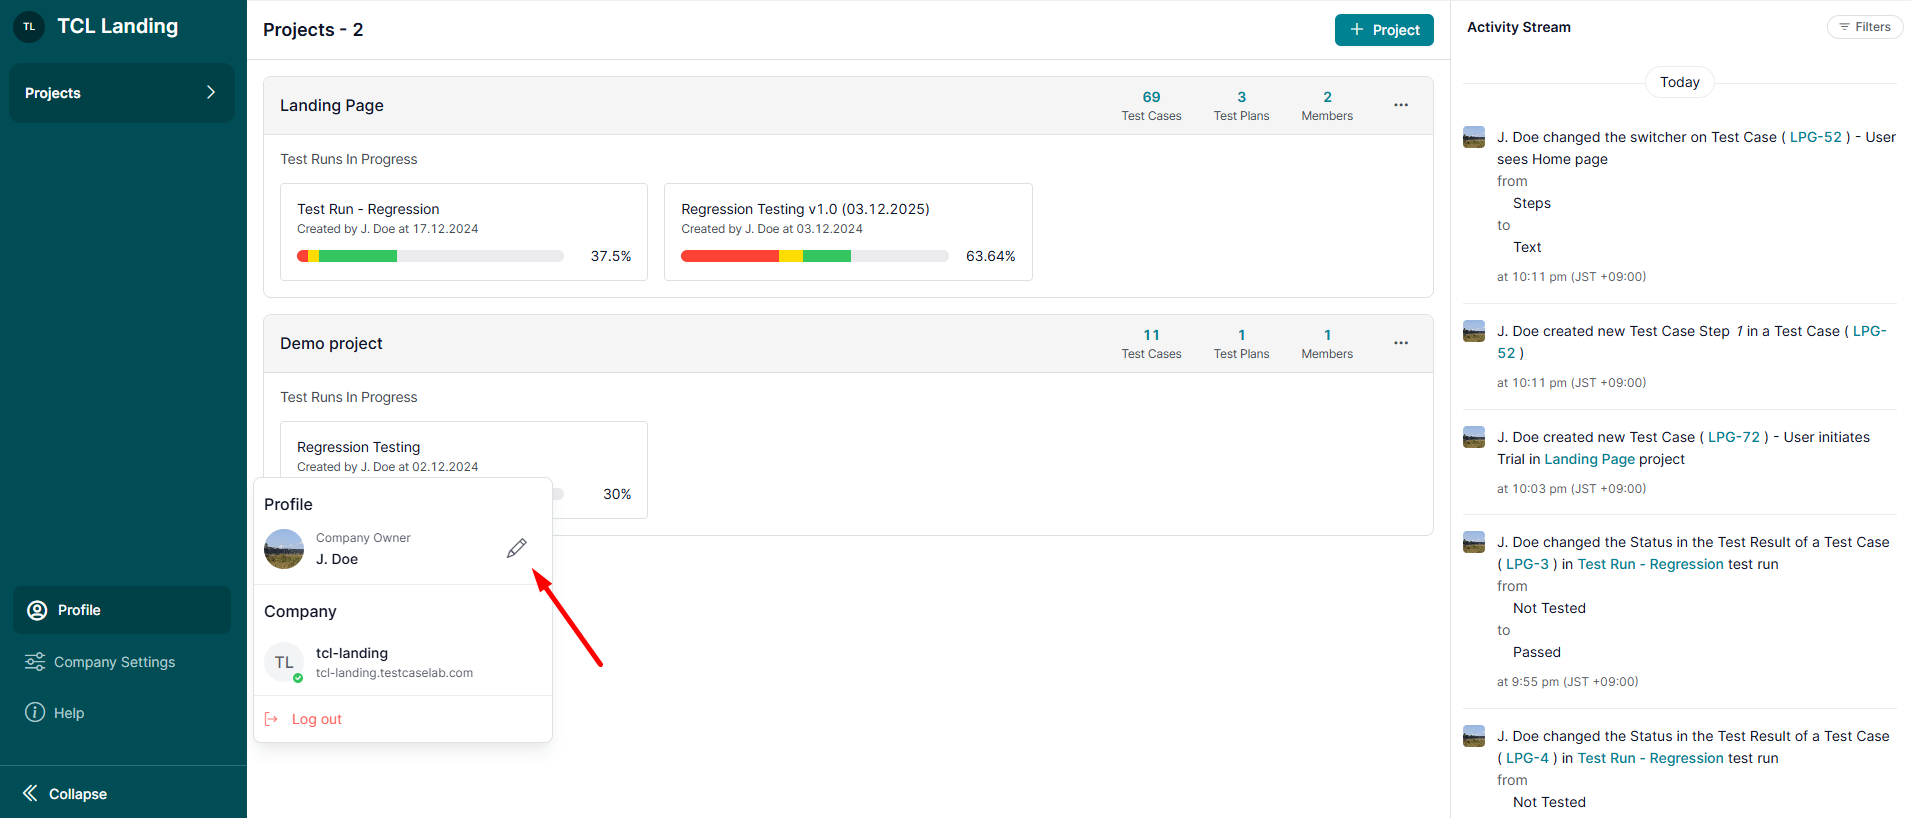
Click on ‘Profile’ in the Sidebar to open the Profile pop-up.

User Profile pop-up

2. Switch Company Accounts

  • In the Company section of the pop-up, select the Company Account you want to access.
  • You’ll instantly switch to the selected account.

3. Understand Company Roles

You can have different roles in each Company Account you’re part of:

  • Company Owner:
    • You can only own one Company Account.
  • Company Employee or Administrator:
    • You can join other Company Accounts when invited by their administrators.

Learn more about inviting users to Company Accounts here.

4. Unlimited Company Accounts

TestCaseLab allows you to access an unlimited number of Company Accounts with the same email address.

What’s Next?

Easily collaborate across multiple teams and organizations by switching between accounts. If you need help or have any questions, reach out to our support team—we’re happy to assist!

arrow right
blog image

Manage User Profile - Personalize Your Account Settings

calendar
December 4, 2024

Keeping your user profile updated ensures a personalized and secure experience while using TestCaseLab. Follow these simple steps to manage your profile settings.

1. Access Your Profile

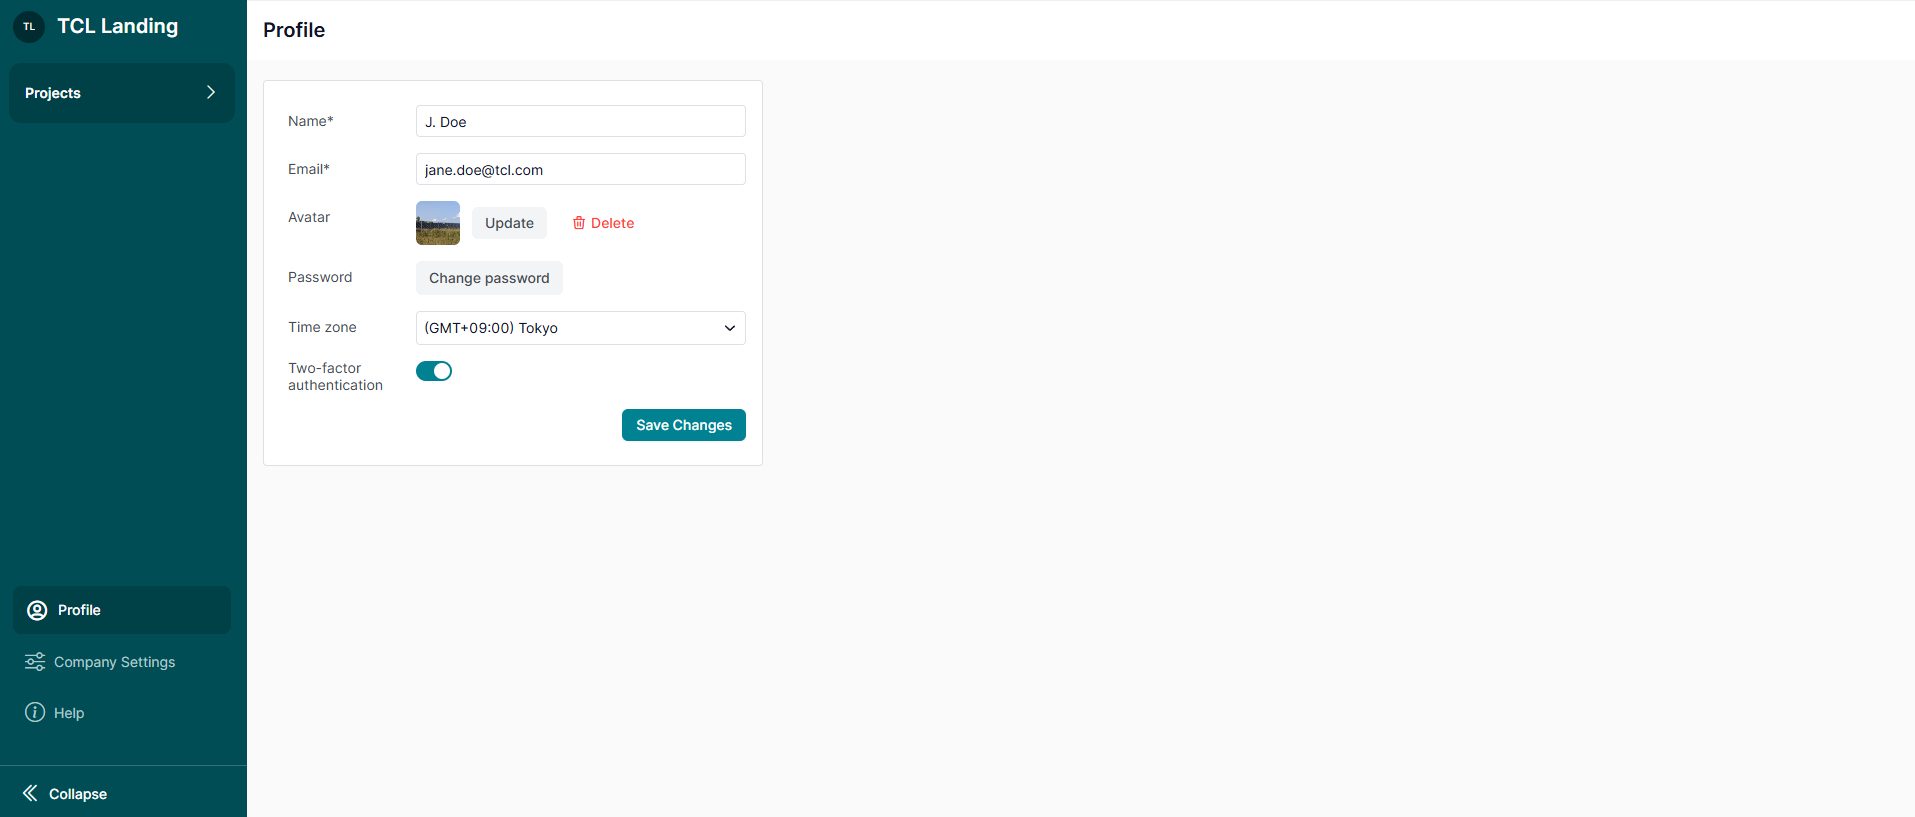
Click on ‘Profile’ in the sidebar and click ‘Edit’ to open your profile settings.

Edit Profile

2. Update Your Profile Details

You can edit the following:

  • User Name: Update your name whenever needed.
  • Email Address: Change your email address if required.
  • Profile Photo: Upload or replace your profile picture to personalize your account.
Update User Profile

3. Change Your Password

Regularly update your password to enhance the security of your account.

4. Set Your Time Zone

Adjust your time zone to match your local time for accurate scheduling and timestamps.

5. Enable Personal Two-Factor Authentication (2FA)

Strengthen your account security by enabling 2FA for your profile.

What’s Next?

Maintaining an updated profile helps ensure a seamless and secure experience in TestCaseLab. If you have any questions, our support team is here to assist you!

arrow right
blog image

Manage a Subscription Plan – Set Up, Update, or Renew with Ease

calendar
December 4, 2024

Managing your subscription plan ensures your team has the resources they need for smooth test case management. This guide explains everything you need to know about subscription options, payments, and upgrades.

1. Access Subscription Details

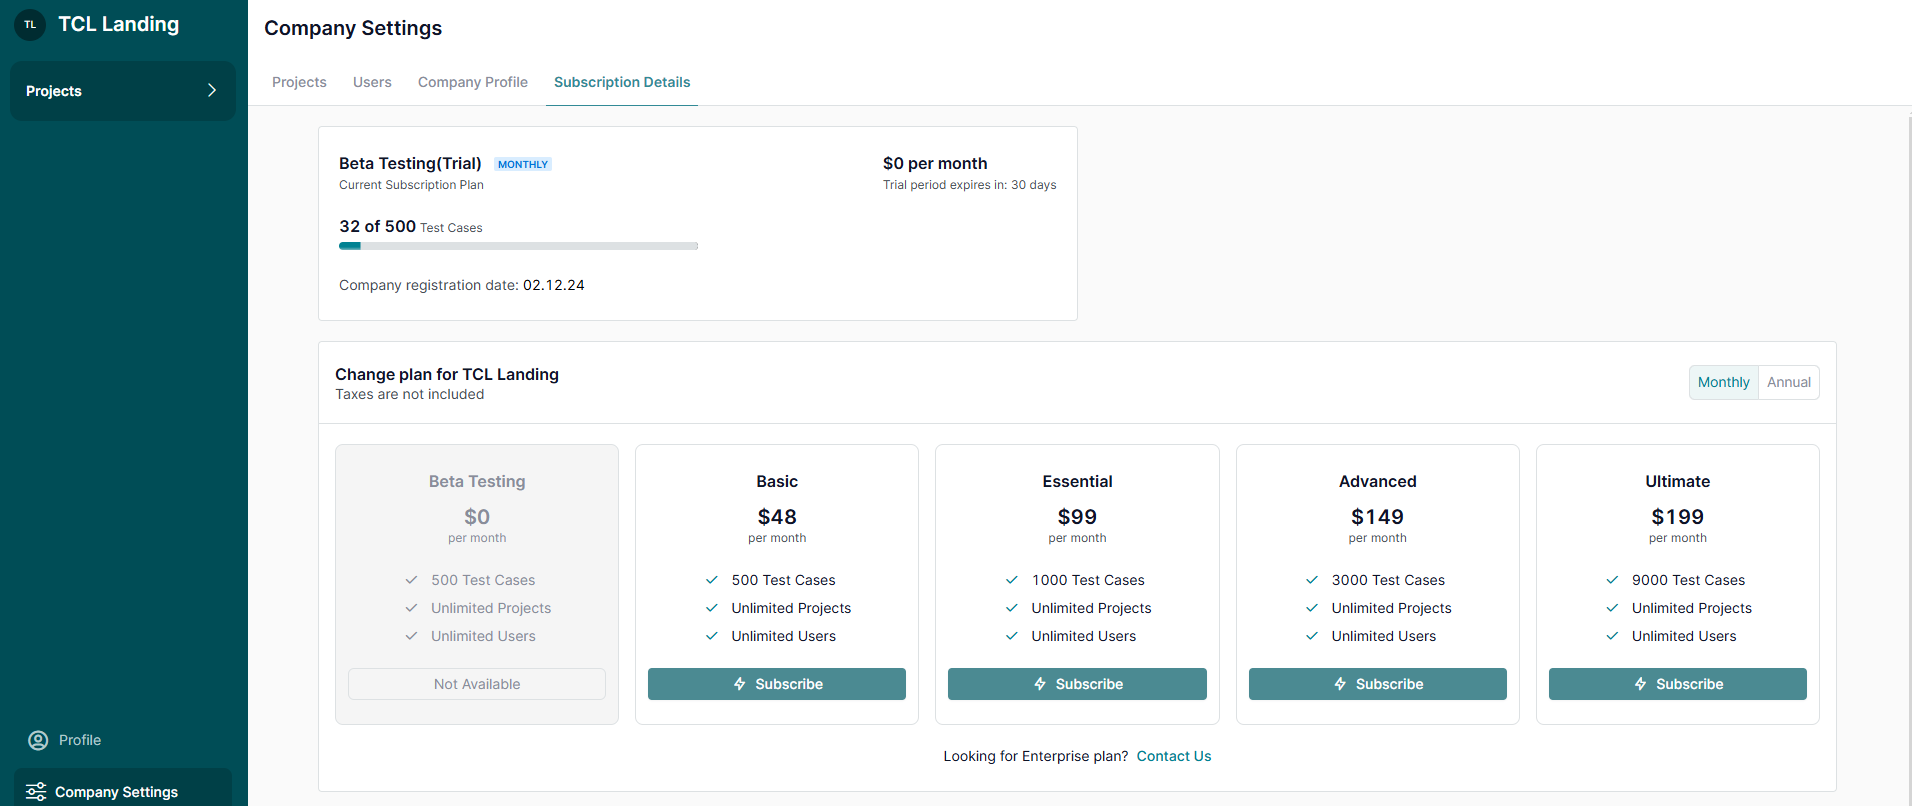
Navigate to Company Settings > Subscription Details to view and manage your plan.

Note: Only the Company Owner can manage the subscription plan for the account.

Subscription Details

2. Trial Subscription

Every new account starts with a 30-day free trial, giving you full access to TestCaseLab features.

3. Choose a Subscription Plan

Select a plan that suits your team’s needs and click ‘Subscribe.’

Note: Payments are securely processed via Stripe, which also handles your billing information and invoices.

4. Available Subscription Plans

Plans are based on the number of test cases your team can create:

  • Basic: Up to 500 test cases
  • Essential: Up to 1,000 test cases
  • Advanced: Up to 3,000 test cases
  • Ultimate: Up to 9,000 test cases
  • Enterprise: For more than 9,000 test cases or Single Sign-On (SSO) setup, contact our team.

Note: Test cases in all active projects are counted toward the subscription plan limit.

5. Upgrade or Downgrade Anytime

You can change your subscription plan anytime by clicking the ‘Upgrade’ button next to another Subscription plan.

Note: Billing is recalculated based on the new plan.

6. Payment Options

Choose between monthly or annual payments.

Note: Annual subscriptions include a discount compared to monthly payments.

7. Update Billing Information

To update your payment details, go to Company Settings > Subscription Details and click ‘Billing Info’.

Billing Management

8. View Payment History

Access Company Settings > Subscription Details and scroll to the bottom of the page to see Payment History where you can find the list of invoices and download them as needed.

Billing History

What’s Next?

Choosing the right subscription plan ensures your team can operate without limits. If you have questions or need assistance, our support team is always ready to help.

arrow right
blog image

Invite & Manage Users - Expand and Organize Your Team

calendar
December 4, 2024

Invite Users

Inviting users to your TestCaseLab account is simple and flexible. This guide walks you through the steps to add team members and manage invitations effectively.

1. Open Company Settings

Log in to TestCaseLab and go to Company Settings via the sidebar.

Note: TestCaseLab allows you to invite an unlimited number of users to your account.

Company Settings

2. Click ‘Invite User’

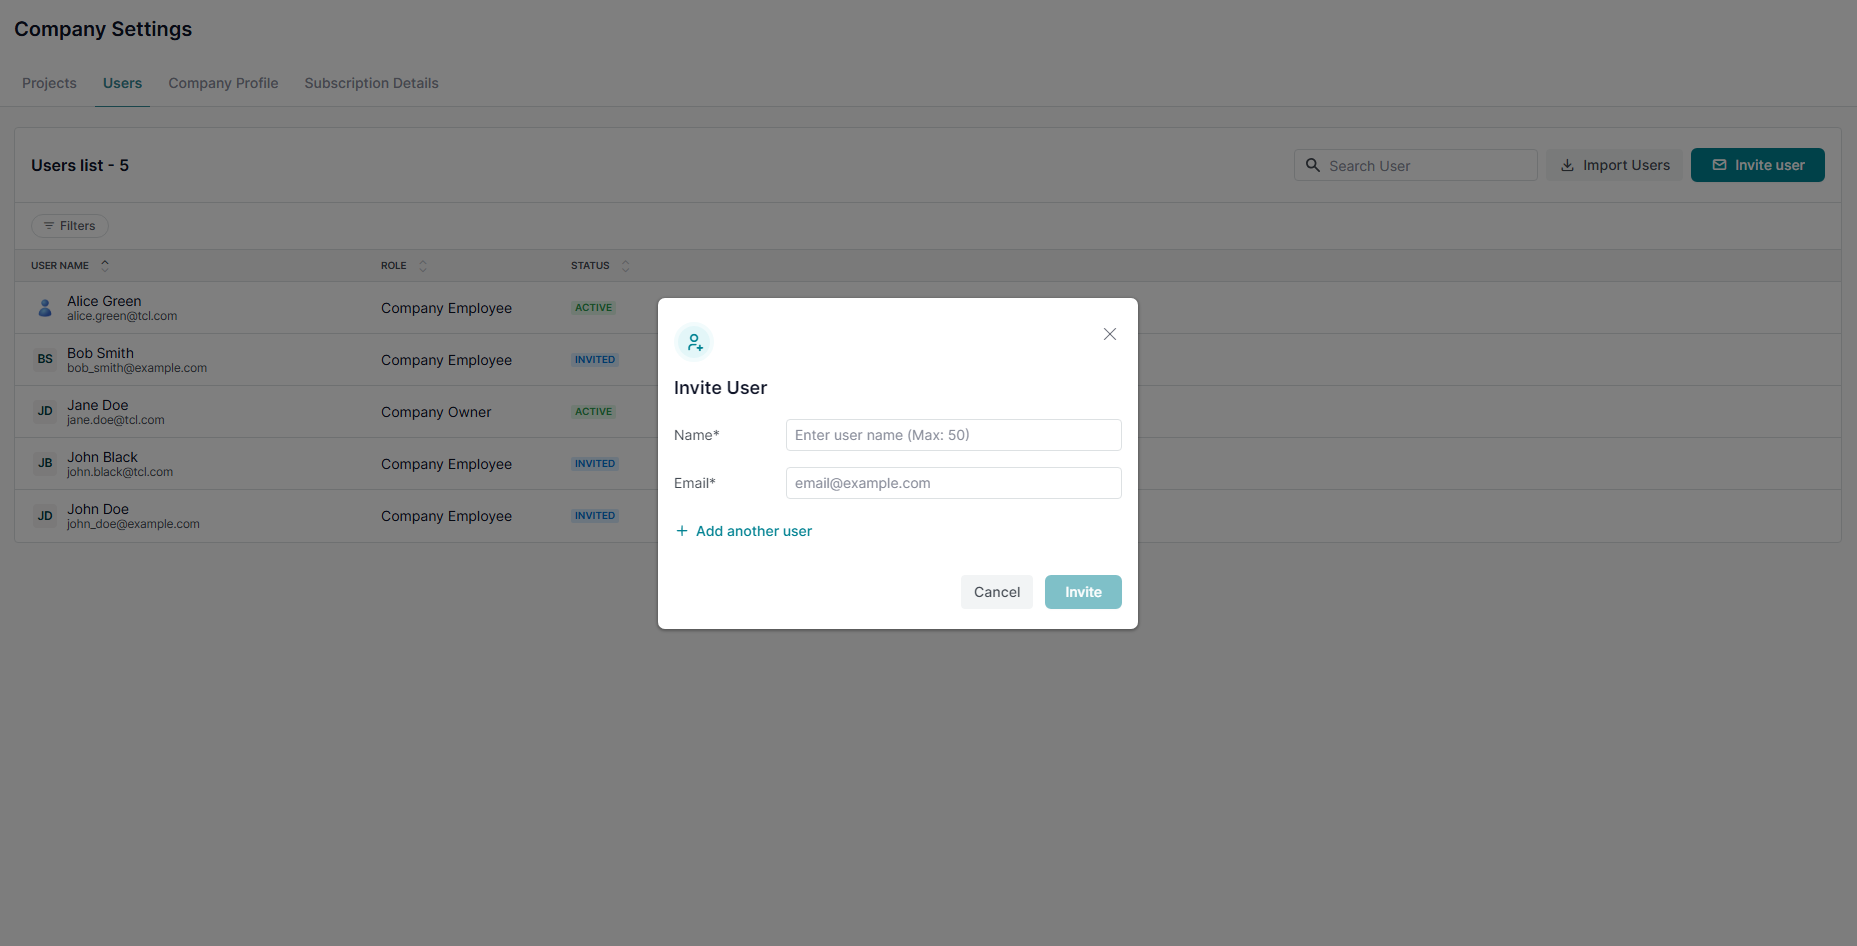
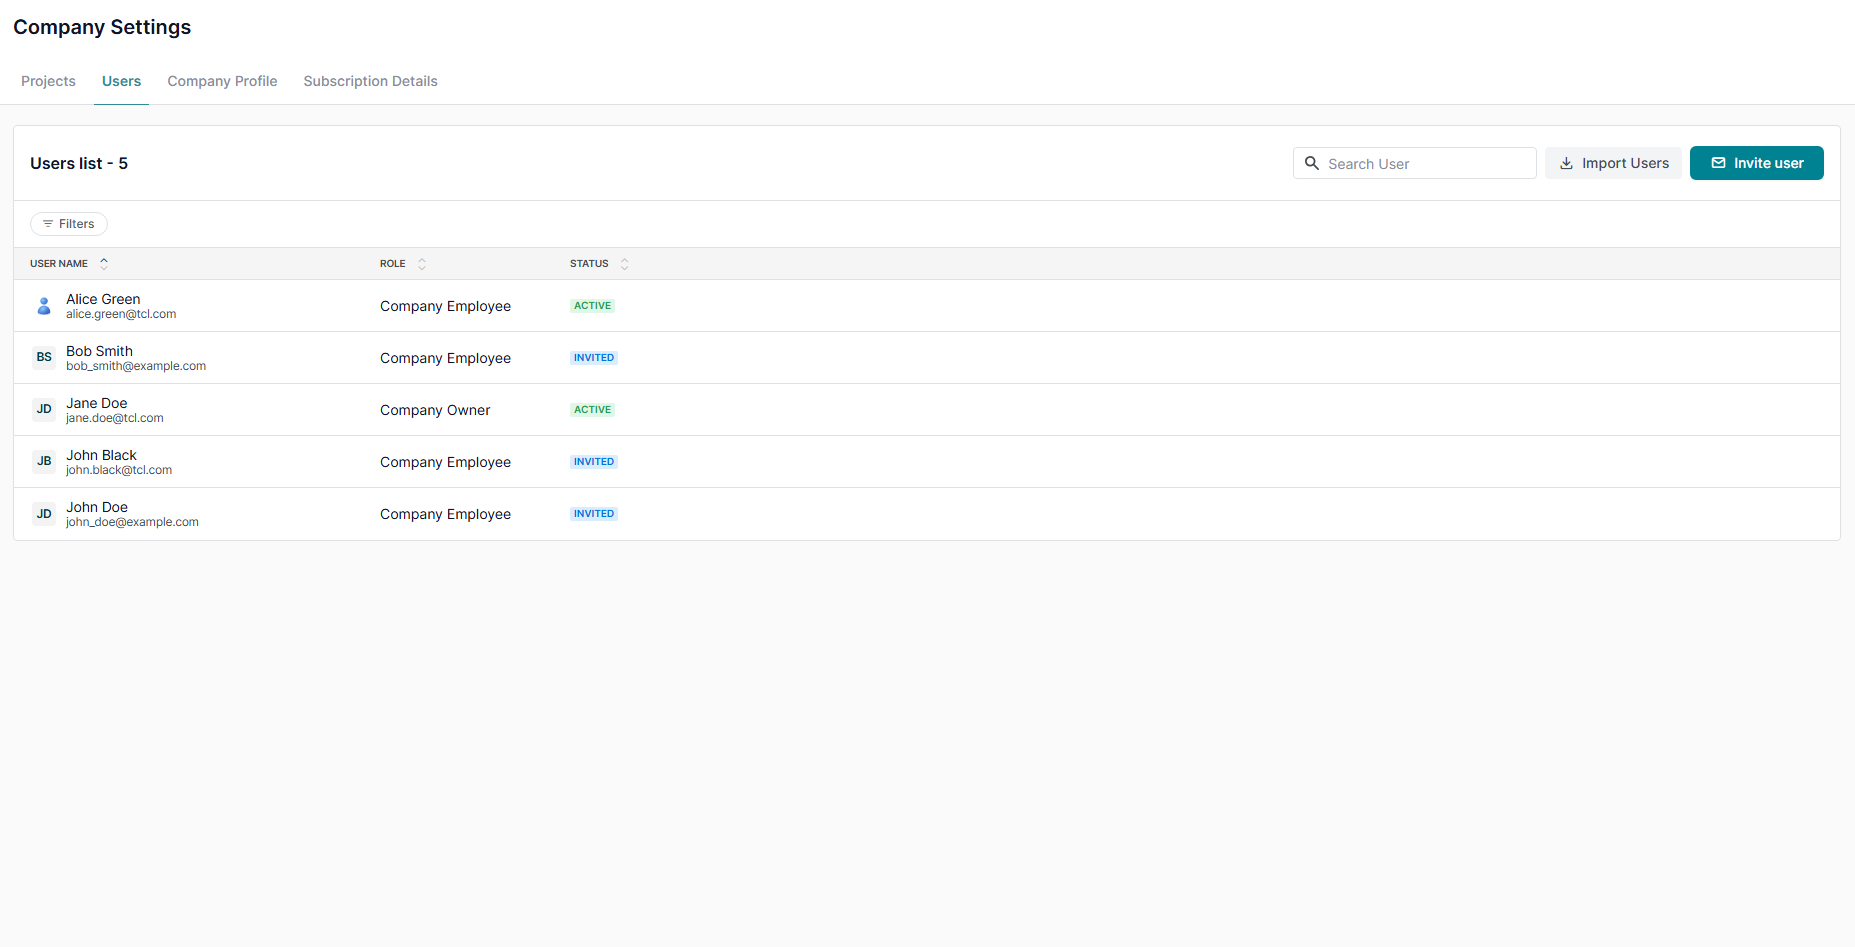
In Company Settings > Users, click the ‘Invite User’ button to begin the user invitation process.

Invite User Form

3. Fill Out the Invitation Form

  • Enter the following details:
    • Email Address: The email address of the person you want to invite.
    • User Name: The invitee’s name.
  • After submitting the form, TestCaseLab will send an invitation email with a unique link.

4. Understand User Roles

Invited users are assigned the ‘Company Employee’ role by default.

Available Roles:

  • Company Owner:
    • Limited to one per account.
    • Has full control, including managing the subscription.
  • Company Administrators:
    • Access to all projects and act as project administrators by default.
    • Cannot manage the company subscription.
  • Company Employees:
    • No access to Company Settings.
    • Can be assigned any role in specific projects they are added to.

5. Manage Invitations

After sending an invitation, you can:

  • Update the email address if there’s an error.
Update Email Address of invited User
  • Resend the invitation if the invitee didn’t receive it or the link has expired.
Resend Invitation

6. Invite Multiple Users via CSV

To add several users at once:

  • Go to Company Settings > Users
  • Click the ‘Import Users’ button
  • Download the CSV template.
  • Fill in the required details (e.g., name, email).
  • Upload the completed file, and invitations will be sent automatically.
Import Users

7. Track User Status

  • Once a user accepts the invitation, their status changes to ‘Active.’
  • You can then assign them to specific projects, where they can start contributing.

Learn how to assign users to projects here.

Add Users to Projects

Manage Users

Effectively managing users ensures smooth collaboration and secure access within your TestCaseLab account. Here’s a simple guide how to handle user roles, access, and assignments.

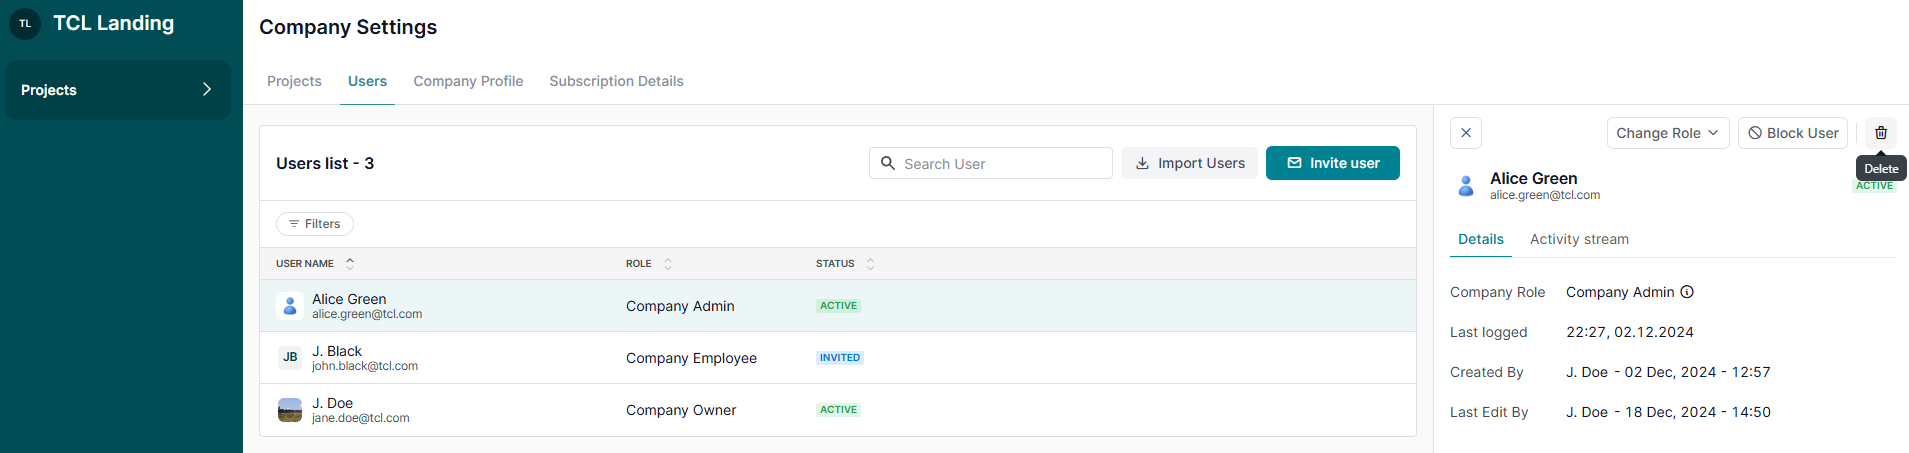
1. Change a Company Role of User

Navigate to Company Settings > Users to update a user’s role.

Change Company Role

2. Block or Unblock Users

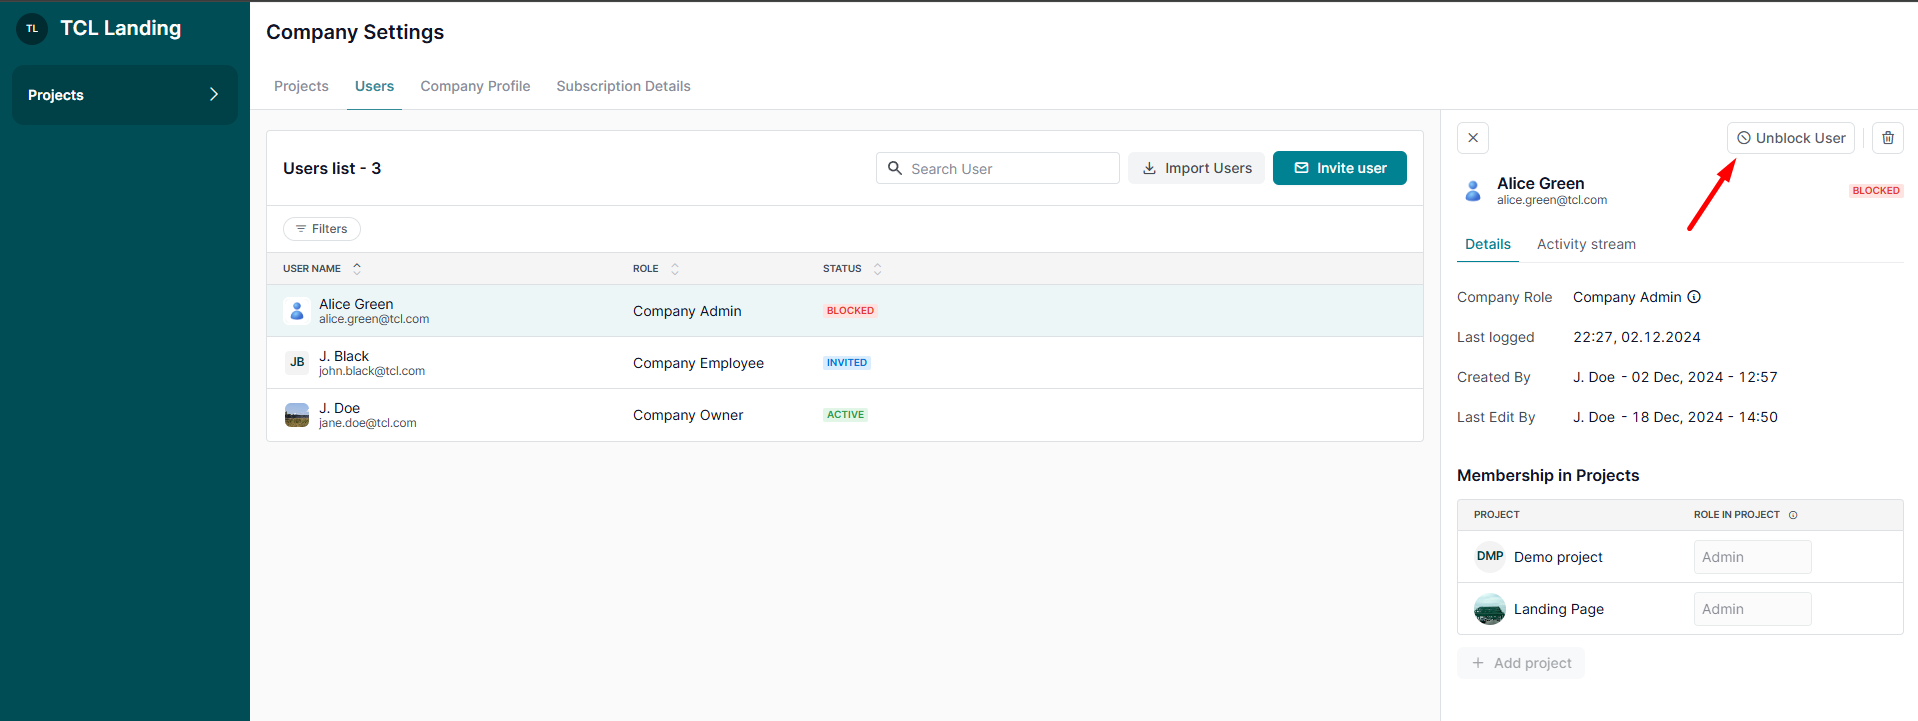
In Company Settings > Users, you can:

  • Block Users: Prevent them from accessing all projects and features.
  • Unblock Users: Restore their access when needed.
Block/Unblock User

3. Delete Users

To permanently remove a user:

  • Go to Company Settings > Users.
  • Select the option to delete the user from your Company Account.

Note: Deleted users lose all access to the account and its projects, and this action cannot be undone.

Delete User

4. Assign Users to Projects

  • In Company Settings > Users, assign users to specific projects.
  • Set their project role based on their responsibilities.

Learn more about assigning project roles here.

Add User to specific Projects

What’s Next?

By managing user roles and access effectively, you ensure a well-organized and secure workspace for your team. For further details, check out our related guides or contact support. We’re here to help!

arrow right
blog image

Create & Manage a Company Account - Get Started with TestCaseLab

calendar
December 4, 2024

Create a Company Account

Creating a company account in TestCaseLab is quick and easy. Follow these simple steps to get started and enjoy a seamless test case management experience.

1. Visit the TestCaseLab Website

Go to testcaselab.com.

2. Start Your Free Trial

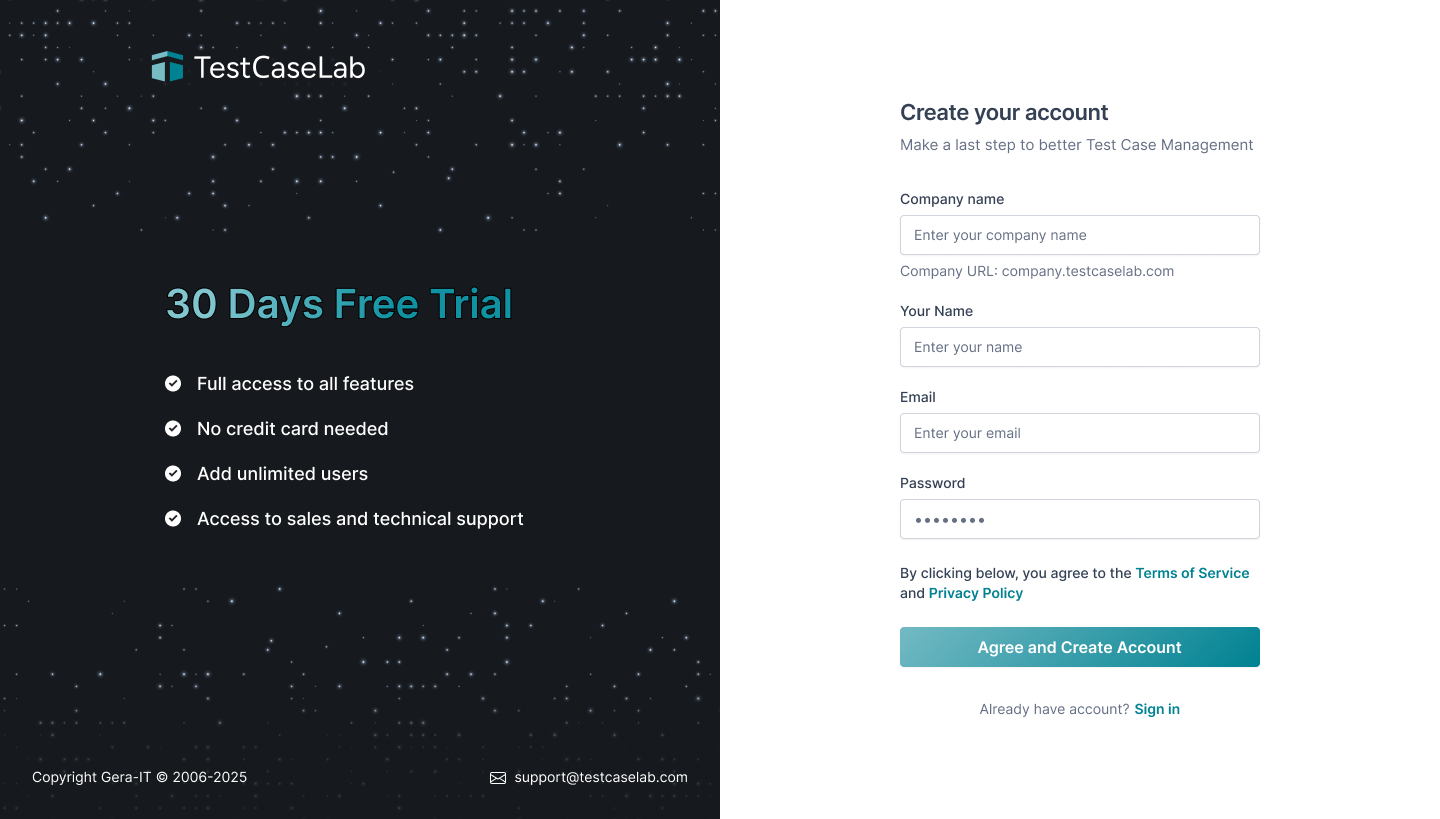
On the homepage, click the ‘Try it For Free’ button to open the Sign-Up form.

3. Complete the Sign-Up Form

Fill in the following details:

  • Company Name: Enter your company’s name.
    • This name will be used as your account’s subdomain (e.g., companyname.testcaselab.com).
    • Don’t worry—you can update it later if needed.
  • User Name: Provide your full name.
  • Email Address: Enter your email.
    • This email will be linked to the Company Owner role, which grants full administrative control over the account.
    • Ownership can be transferred to another user if necessary.
  • Password: Create a strong, secure password.
Create a Company Account

4. Understand User Roles

As the Company Owner, you will:

  • Have complete control over company account settings.
  • Be able to invite and manage users (assign them as Company Administrators and Company Employees).

Note 1: Invite as many users as needed to your company account.

Note 2: You can also be invited to join other company accounts as a Company Employee or Company Administrator.

5. Confirm Your Email

  • After completing the form, check your email inbox for a confirmation email.
  • Open the email and click the verification link to activate your account.

6. Start Exploring with Your Free Trial

Once your email is verified, you’ll gain access to TestCaseLab’s full features for 30 days.

Manage a Company Account

Managing your TestCaseLab company account is straightforward and designed to help you stay organized and efficient. Follow this guide to manage settings, projects, users, and more.

1. Access Company Settings

Navigate to Company Settings via the sidebar.

Note: Only the Company Owner and Company Administrators have access to manage the account.

Company Settings

2. Create and Manage Projects

In Company Settings > Projects, you can:

  • Create an unlimited number of projects.
  • Manage your projects:
    • Update project details anytime.
    • Archive projects to save them for later.
    • Delete projects permanently 

Note 1: Archived projects do not count toward your subscription and can be restored when needed.

Note 2: Deleted projects cannot be recovered.

Note 3: Start with a Demo Project, as this is a great way to see pre-filled data and understand how TestCaseLab works.

Learn how to manage Projects here.

Create a Project

3. Invite Users

Use Company Settings > Users to invite an unlimited number of users to your company account.

Learn more about inviting Users here.

Users

4. Update Company Account Details

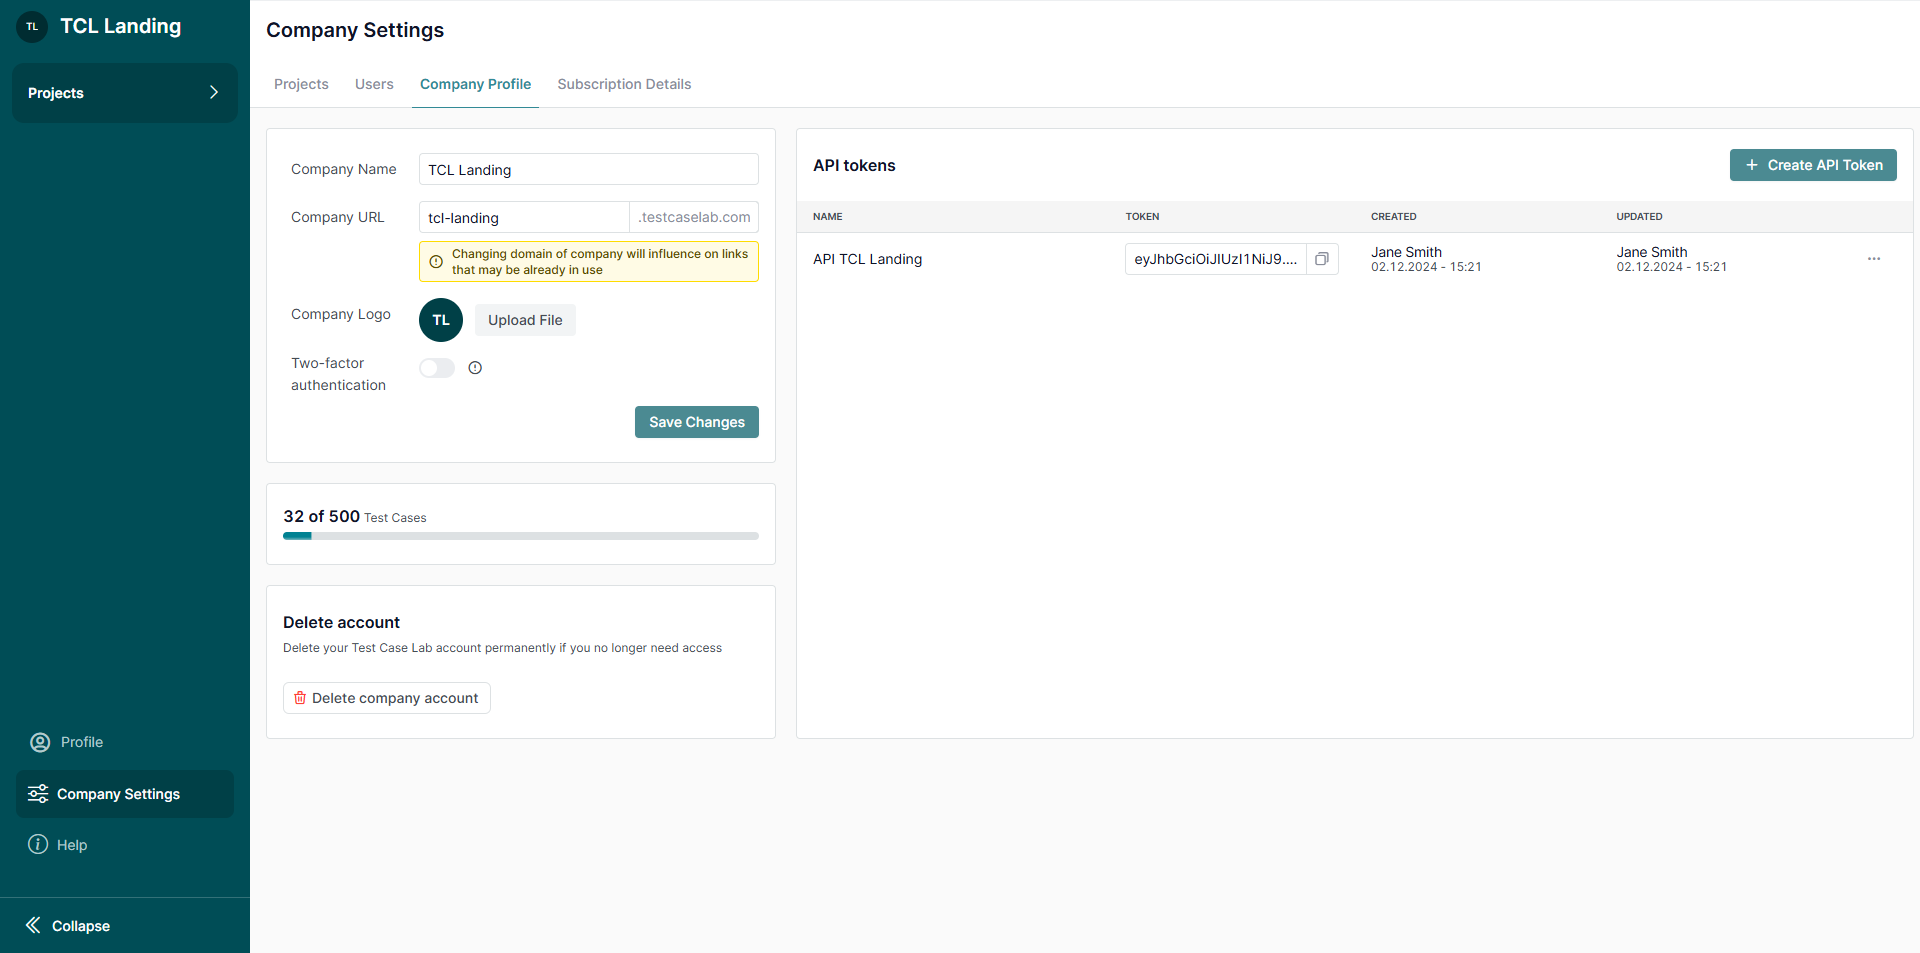
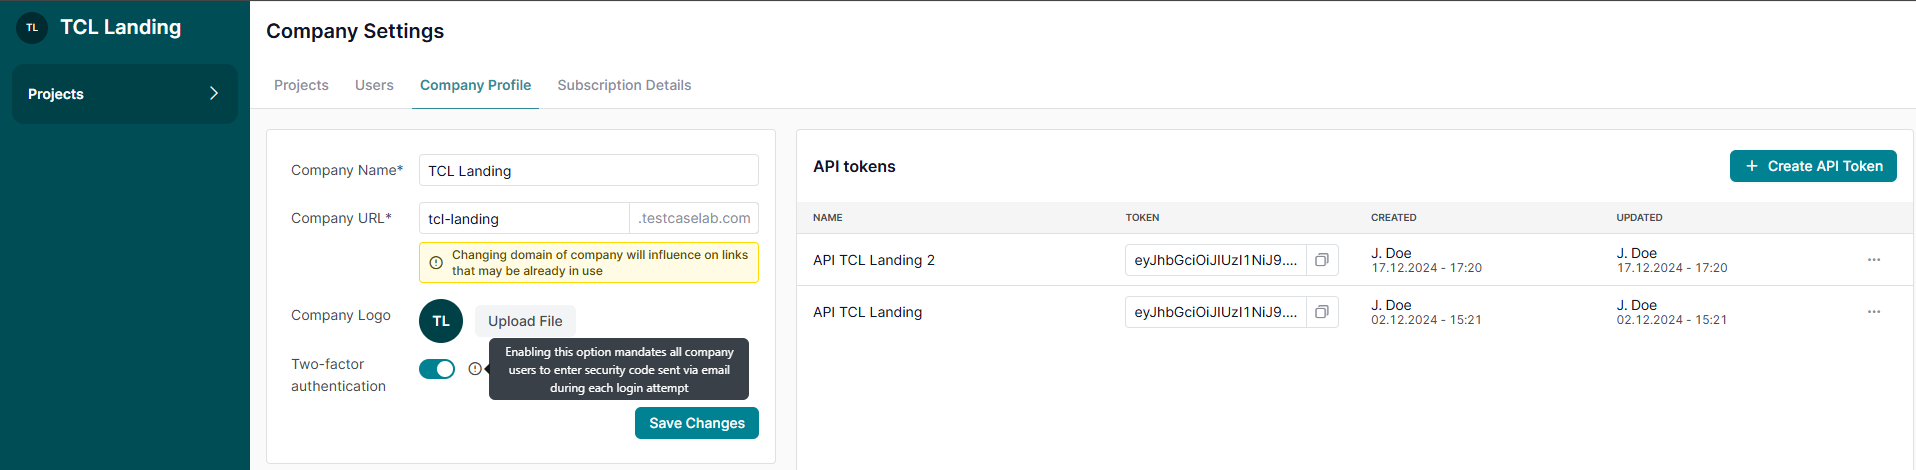
Navigate to Company Settings > Company Profile to edit your company’s name and subdomain at any time to better reflect your organization.

Update Company Profile

5. Enable Two-Factor Authentication (2FA)

Go to Company Settings > Company Profile to ensure company account security by enabling 2FA for all users in your company account.

Enable Company-wide 2FA

6. Generate and Manage API Tokens

Go to Company Settings > Company Profile to create and manage API tokens to integrate TestCaseLab with other tools you use.

Refer to the API documentation here.

Manage API Tokens

7. Manage Your Subscription Plan

Update or change your subscription plan directly in Company Settings to suit your needs.

Note: Only the Company Owner has access to manage the subscription plan of the company account.

Learn more about subscription management here.

Subscription Details

8. Delete the Company Account (If Necessary)

If required, you can permanently delete your company account.

Note: This action is irreversible.

Delete Account

What’s Next?

Efficiently managing your company account ensures seamless collaboration for your team. For further assistance, reach out to our support team—we’re here to help!

arrow right
blog image

Create & Manage a Test Case - Start Testing Quickly

calendar
December 2, 2024

Create a Test Case

Creating test cases ensures your testing process is structured and thorough. TestCaseLab offers two methods to add test cases—quick and detailed. Follow this guide to get started.

Learn what is a Test Case here.

1. Go to Test Cases

  • Open the project where you want to add test cases.
  • Navigate to the Test Cases page from the sidebar.
Navigate to Test Cases

2. Quick Create a Test Cases

Ideal for adding basic test cases with minimal details.

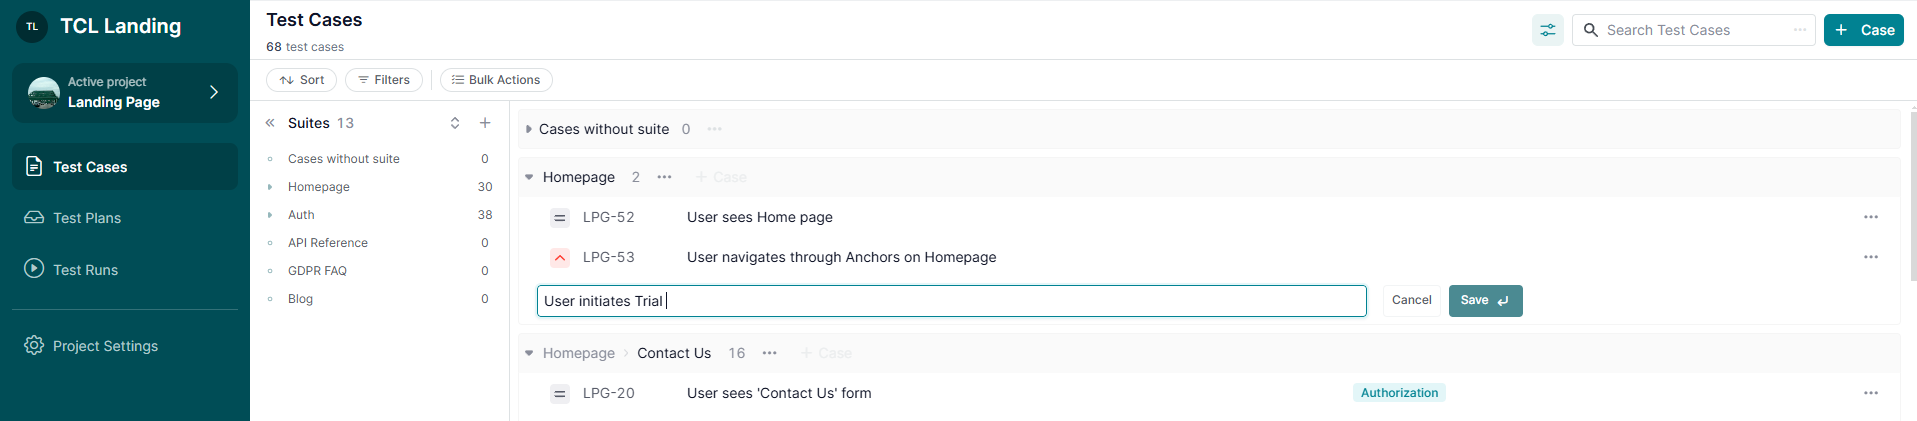
  • Use the Quick Create option for fast, in-line test case creation:
    • Enter the test case Title directly into the list via ‘+ Case’ button.
    • Click ‘Enter’ to save the test case.

Note 1: New test cases are added to the bottom of the list within the assigned Suite.

Note 2: Test Case Details can be filled out at any time in Test Case Details via in-line edit functionality or via a comprehensive Edit Case form.

Learn more about organizing test cases with Suites here.

Quick Create Test Cases

3. Create a Comprehensive Test Case

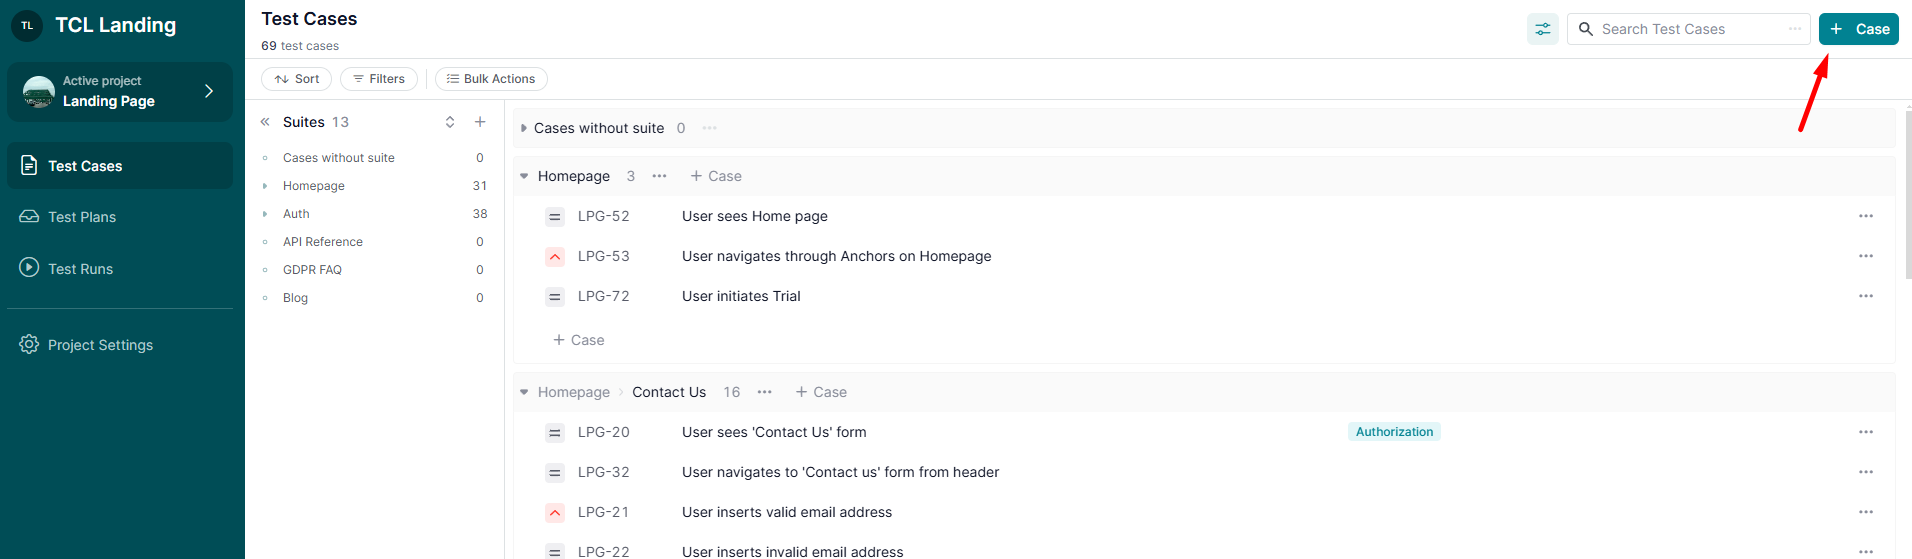
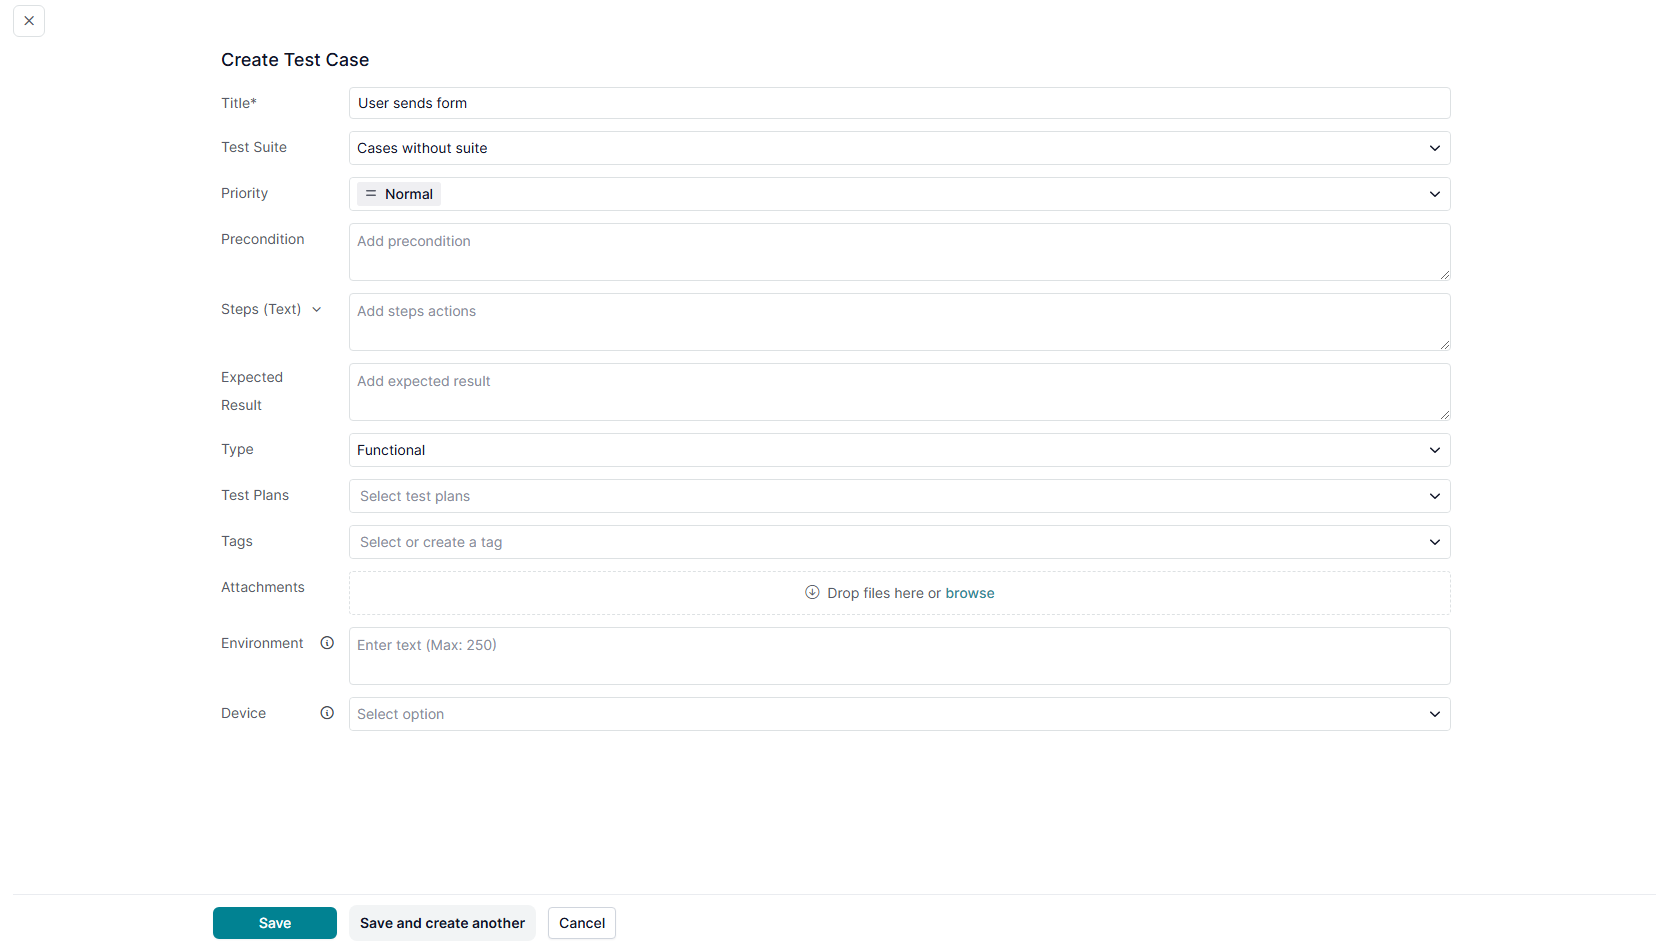
  • For detailed test cases, click the ‘+ Case’ button in the header of the Test Cases page.
Create Test Case button
  • This opens the Create Case Form, where you can add:
    • Title: Entitle a test case.
    • Suite: Assign the test case to the appropriate Suite.
    • Priority: Set the importance (e.g., High, Medium, Low).
    • Precondition: Define any setup or requirements needed before execution.
    • Steps and Expected Result: Write detailed steps using:
      • Text Mode: Enter steps as plain text.
      • Step Table Mode: Add structured steps and expected outcomes.
      • Attach up to 2 files per step.
    • Type: Categorize the test case (customizable in Project Settings).
    • Tags: Add labels to organize and filter test cases.
    • Test Plans: Link test cases to relevant plans.
    • Custom Fields: Include project-specific fields (customizable in Project Settings).
    • Attachments: Add supporting files (up to 10 MB each).
  • Use the ‘Save & Create Another’ button to save the current test case and immediately open a new form, streamlining the process for multiple entries.
Create Test Case Form

Manage a Test Case

Managing your test cases in TestCaseLab helps keep your documentation organized and ensures accurate and up-to-date information. Follow this guide to edit and interact with your test cases effectively.

1. Manage Test Cases in the List

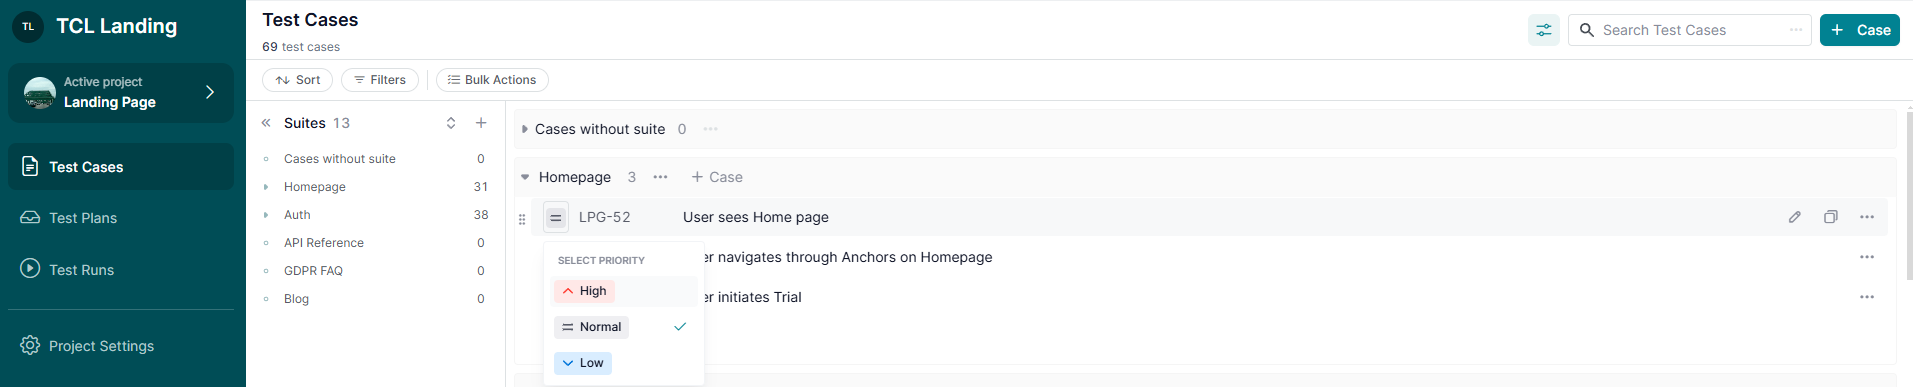
  • Change Priority: Update the test case priority directly in the Test Cases List.
  • Edit Title: Click on the test case title to edit it in-line.
Edit Test Case Title in-line
Edit Priority of Test Case

2. Change Suite or Position

  • Move to a Different Suite: Drag and drop the test case into a new Suite.
  • Reorder Position: Use drag-and-drop to reorder test cases within a Suite.

Note: Drag-and-drop of the Test Cases List grouped by Suites is available only for Project Administrators to ensure consistent list ordering for the entire team.

Learn more about Suites here.

Drag&Drop Functionality in the Test Cases list

3. View and Edit Test Case Details

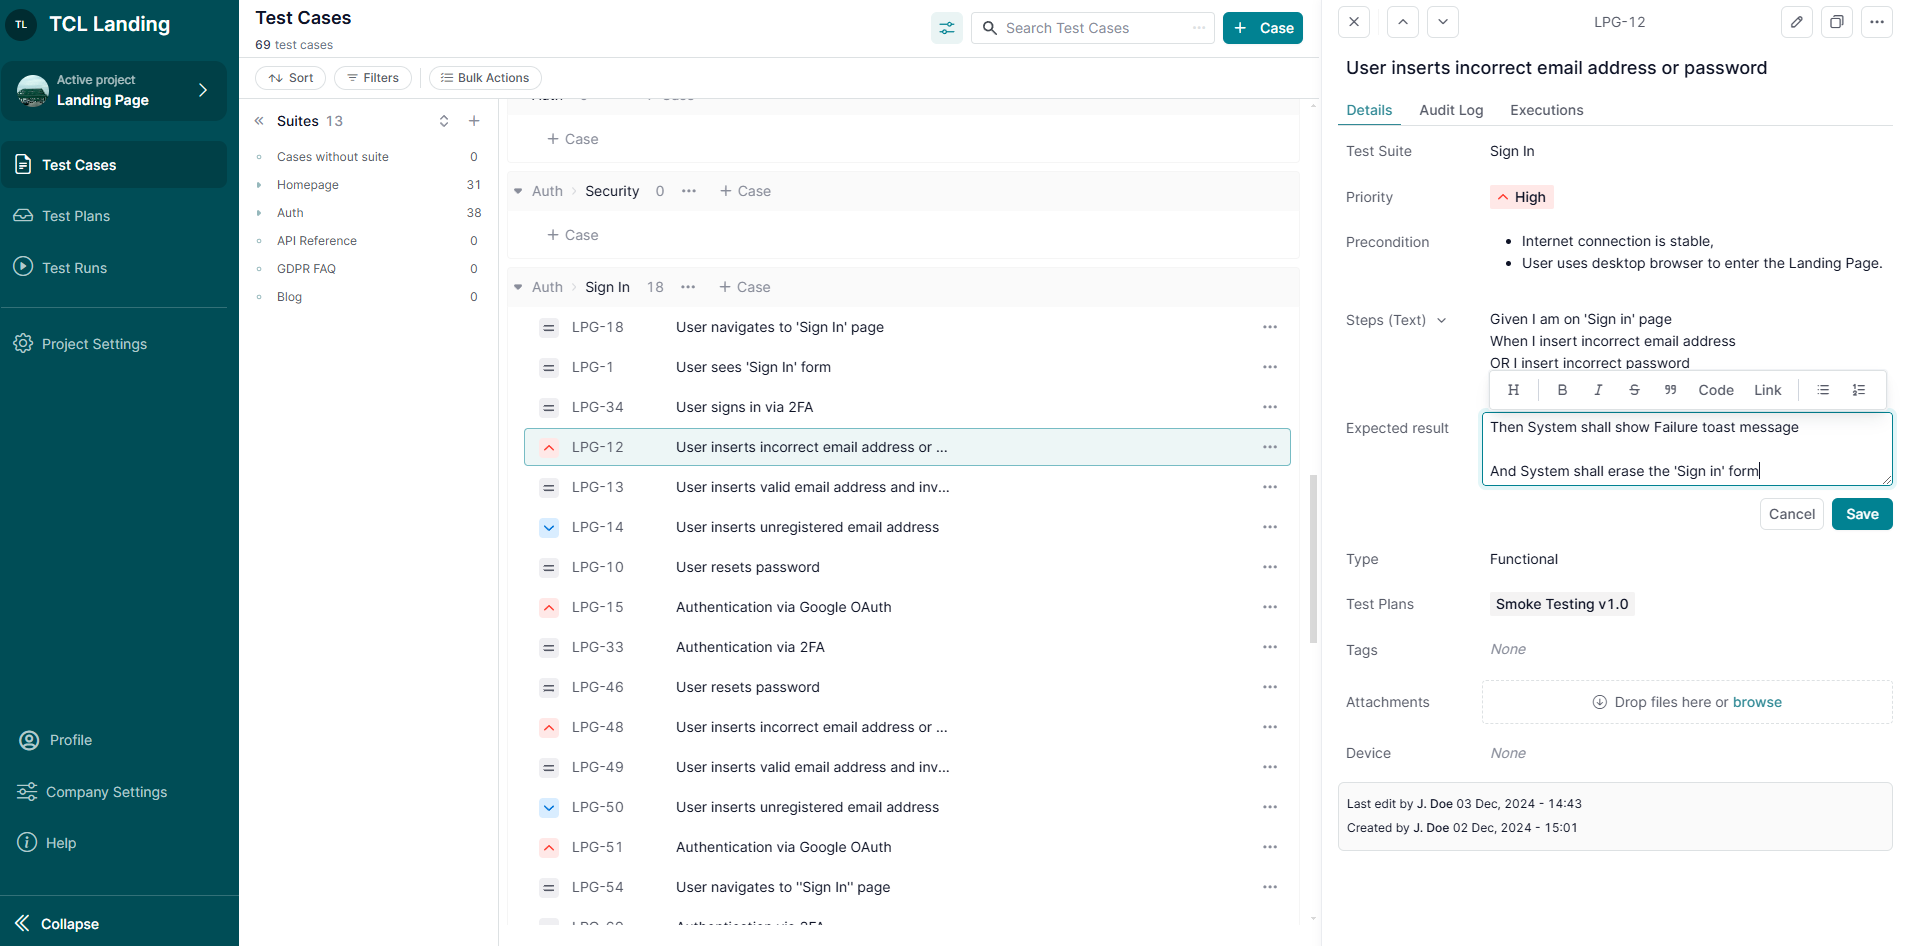
  • Click on a test case in the list to open its Details.
  • Edit the following fields in place:
    • Title: update the test case title.
    • Suite: Change the suite assignment.
    • Priority: Update the test case priority.
    • Precondition: Modify the setup or conditions needed before execution.
    • Steps and Expected Results:
      • Use Text Mode or Step Table Mode for editing.
      • Attach up to 2 files per step (applicable in Step Table Mode).
    • Type: Update the test case type (customizable in Project Settings).
    • Tags: Add or update tags for organization.
    • Test Plans: Associate the test case with specific test plans.
    • Custom Fields: Update project-specific custom fields linked to the test case (customizable in Project Settings).
    • Attachments: Add or replace supporting files.
Test Case Details

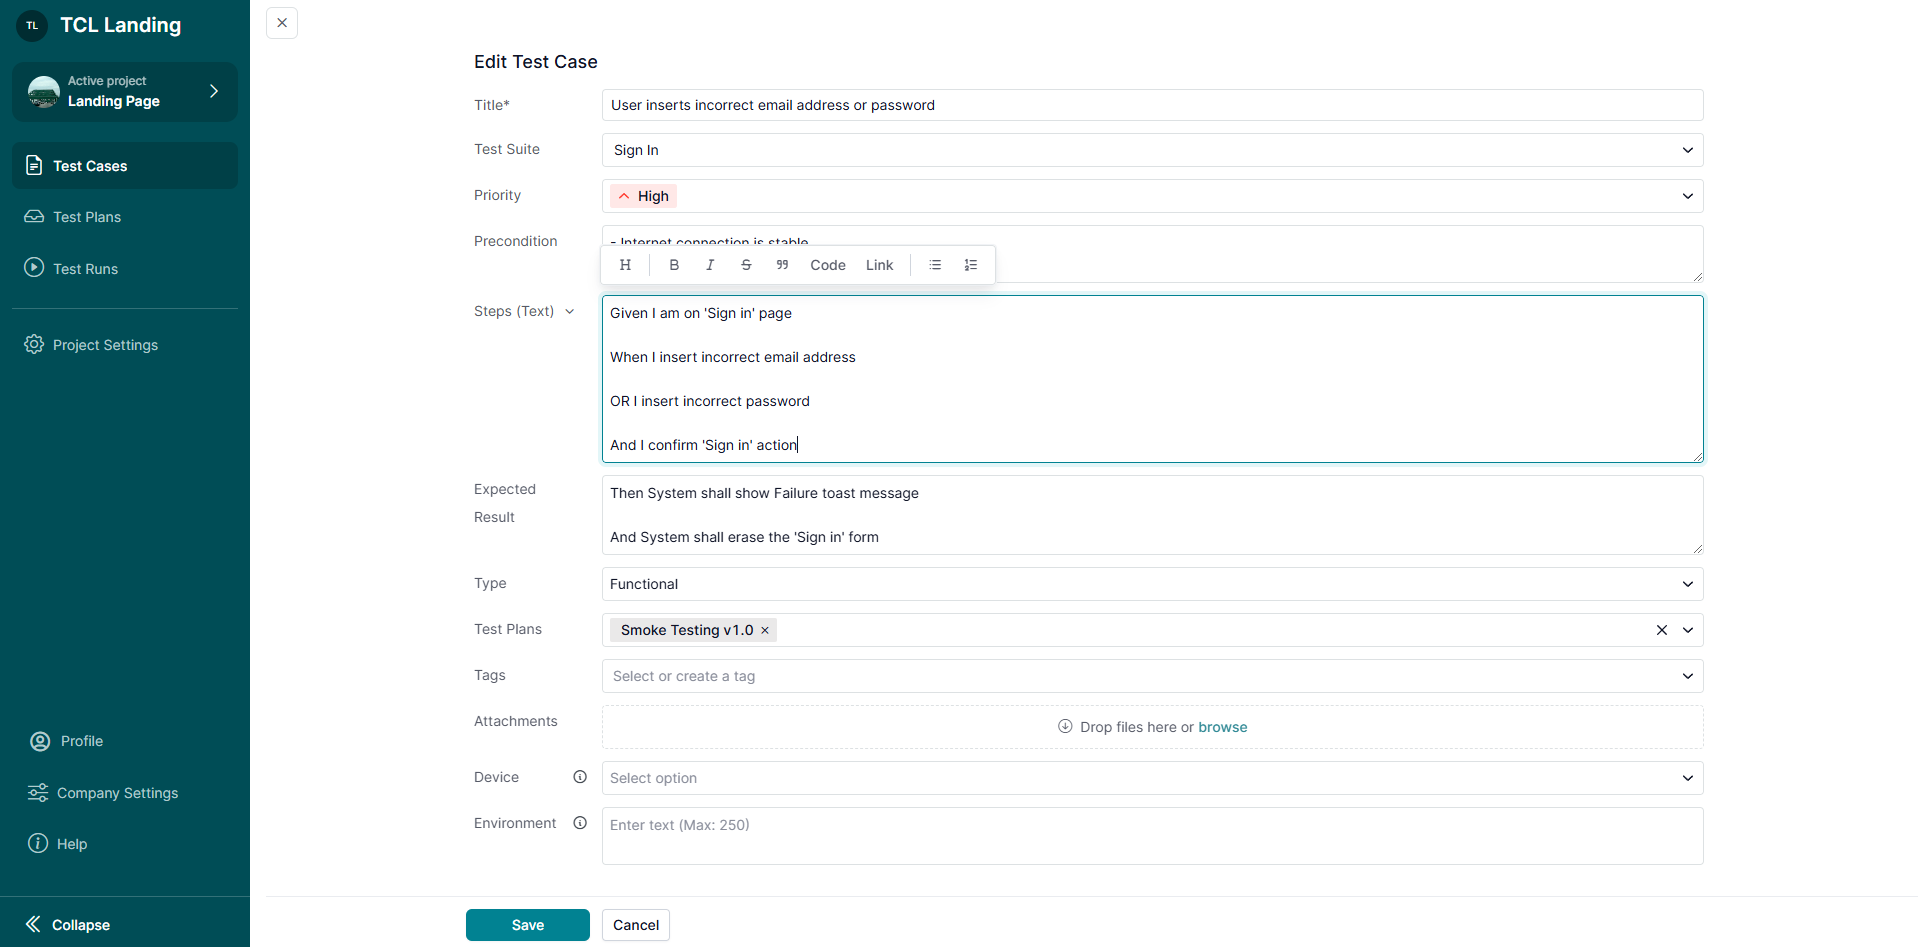
4. Use the Comprehensive Edit Case Form

Click ‘Edit’ to open the full Edit Case Form.

Note: This allows you to manage all test case details comprehensively in one place.

Edit Case Form

What’s Next?

Keeping your test cases organized and updated ensures efficient test management for your team. For more help, explore related guides or contact support. We’re here to assist!

arrow right

Organize Your Testing Process

Start using TestCaseLab now as your test case management system and bring your Quality Assurance at the top-level!
Get Started For Free
No Credit Card Required
Organize Your Testing Process